A52x Series Electronic Refrigeration Controller with Adaptive Defrost Technical Bulletin
3
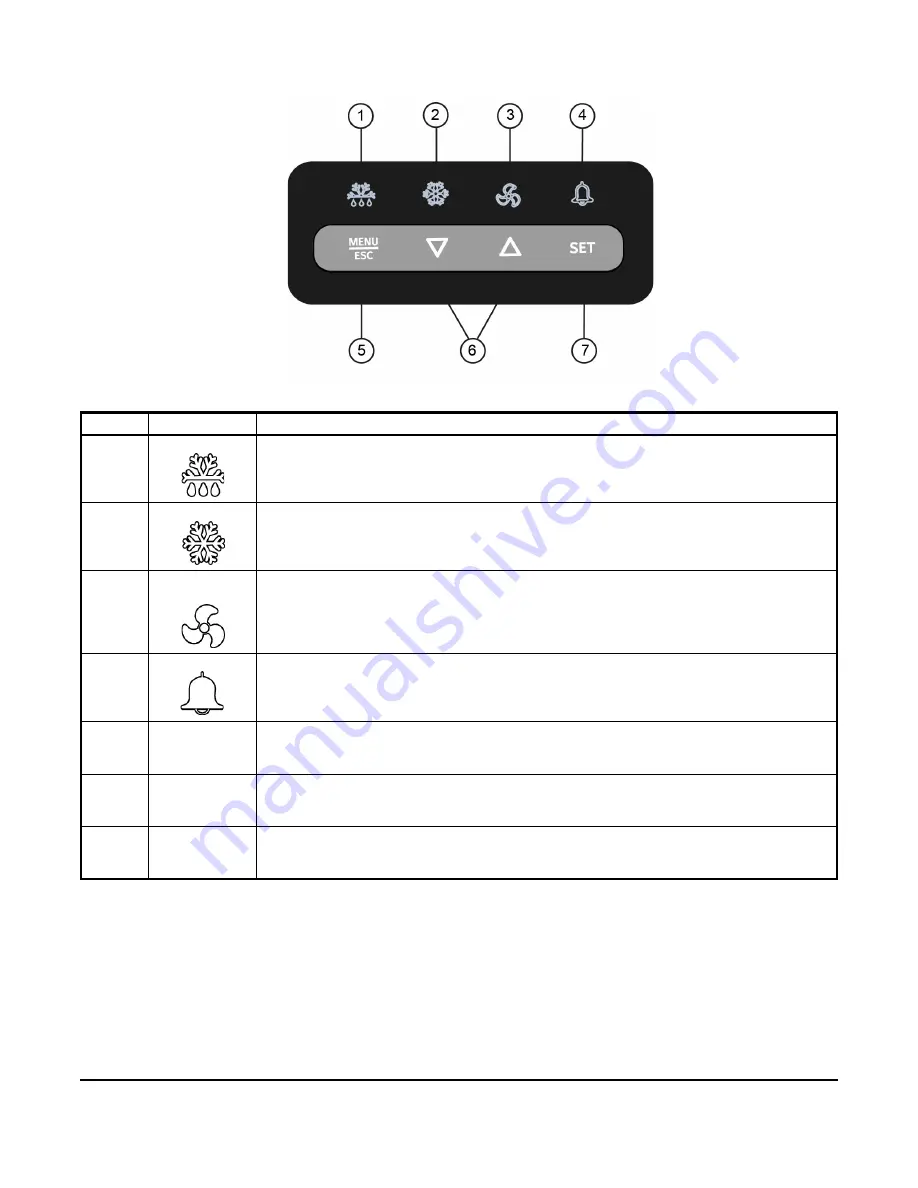
Figure 2: A52x Display Fields, Icons, and Touchpad Keys
Figure 3 on page 4 shows the A52x Controller low voltage terminal block connections. Table 2 on page 4 describes
the A52x Controller’s low voltage terminal blocks, terminals, and wire sizes. Figure 4 on page 5 shows the A52x
Controller’s high voltage terminal block connections. Table 3 on page 5 describes the A52x Controller’s high
voltage terminal blocks, terminals, and wire sizes.
Table 1: A52x Controller Icons, Keys, Description, Behavior, and User Actions
Callout
Item Name
Description / Behavior / User-Actions
1
Defrost Icon
The
Defrost
icon indicates the status of the defrost relay. A lit icon indicates that the defrost
relay is closed and the system is in defrost mode. When the
Defrost
icon is off, the defrost relay
is off and the system is not in defrost mode. To go to the manual defrost cycle start screen,
press and hold the
Defrost
icon for three seconds.
2
Cooling Icon
The
Cooling
icon indicates the status of the compressor relay. A lit icon indicates that the
compressor is on. When the
Cooling
icon is off, the system is not in normal refrigeration mode;
it may be in defrost mode or system shutdown.
3
Evaporator
Fan Icon
The
Evaporator Fan
icon indicates the status of the Evaporator Fan. A lit icon indicates that
the evaporator fan relay or relays are closed. When the
Evaporator Fan
icon is off, the
evaporator fan relay is open.
4
Alarm Icon
The
Alarm
icon indicates the presence of alarm conditions in the system. A lit icon indicates
that the alarm relay is closed. When the
Alarm
icon is off, the alarm relay is open. To
acknowledge any active alarms, tap the
Alarm
icon.
5
MENU/ESC
Key
To access the System Setup screens, press and hold the
MENU/ESC
key for three seconds on
the Home screen. To cancel any parameter value change in the current screen and return to the
previous setup screen or menu level, tap the
MENU/ESC
key in the System Setup screens.
6
Down and Up
Keys
To change the blinking parameter values in the System Setup screens, tap the
Down
or
Up
keys. To scroll through the menu screens available in the current menu level, tap the
Down
or
Up
keys.
7
SET Key
To go to the next setup menu level, tap the
SET
key. To save the blinking parameter value or
menu selection and to go to the next setup screen, tap the
SET
key in any setup selection
screen.


