1
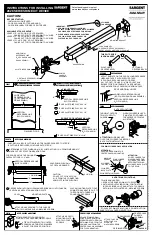
ROUGH OPENING PREPARATION
A.
Verify the opening is plumb and level.
Note: It is critical that the bottom is level.
B.
Verify the door will fit the opening.
-EASUREALLFOURSIDESOFTHEOPENINGTOMAKE
SUREITISLARGERTHANTHEDOORINWIDTHANDLARGERINHEIGHT-EASURETHE
width at the top, bottom, and center. Measure the height at the far left side, the far
right side, and in the center.
Note: 1-1/2" or more of solid wood blocking is required around the perimeter of
the opening. Fix any problems with the rough opening before proceeding.
C.
Apply flashing paper at the bottom
# #UTONEPIECEOFmASHINGPAPERLONGER
than the width of the rough opening. Position the top edge of the flashing paper with
the top of the sill plate. Center the flashing paper with the opening width. Staple the
flashing paper to the sill plate.
Note: Sill flashing paper is not required for installation on concrete floors.
D.
Apply flashing paper to the sides of the rough opening
$ #UTTWOPIECESOF
mASHINGPAPERLONGERTHANTHEHEIGHTOFTHEROUGHOPENING!PPLYONEPIECETO
each jamb. Position the edge of the flashing paper with the inside edge of the trimmer
JACKSTUD ANDCENTERTHEmASHINGPAPERWITHTHEHEIGHTOFTHEROUGHOPENING3TAPLE
the flashing paper to the trimmer.
E.
Apply bottom flashing tape #1.
#UTAPIECEOFmASHINGTAPELONGERTHANTHEOPENING
WIDTH!PPLYATTHEBOTTOMOFTHEOPENINGASSHOWN% SOITOVERHANGSTOTHEEXTERIOR
Note: The tape is cut 12" longer than the width of the opening so that it will extend up
each side approximately 6".
F.
Tab the bottom flashing tape and fold.
#UTWIDETABSATEACHCORNERFROMEACHSIDE
OFCORNER & &OLDTAPETOTHEEXTERIORANDPRESSlRMLYTOADHEREITTOTHEmASHINGPAPER
'
Apply bottom flashing tape #2.
#UTAPIECEOFmASHINGTAPELONGERTHANTHEOPENING
WIDTH!PPLYATTHEBOTTOMOVERLAPPINGTAPEBYATLEAST$/./4ALLOWTHETAPETO
EXTENDPASTTHEINTERIORFACEOFTHEFRAMING'
In-swing Architect Series
®
and Designer Series
®
:
)FTHEWALLDEPTHISGREATERTHANADDA
THIRDPIECEOFmASHINGTAPE4HEmASHINGTAPESHOULDCOMETOWITHINOFTHEINTERIORFACEOF
the framing.
Note: The flashing tape does not need to extend all the way to the interior of the framing.
(
Attach the aluminum sill support or wood blocking
TOTHEEXTERIOROFTHEBOXPLATE
to support the edge of the door sill. Place the sill support flush with the subfloor.
£
£
£
£
£
£
£
£


