background image

4

INTEGRATING THE WINDOW TO THE WATER RESISTIVE BARRIER

A. 

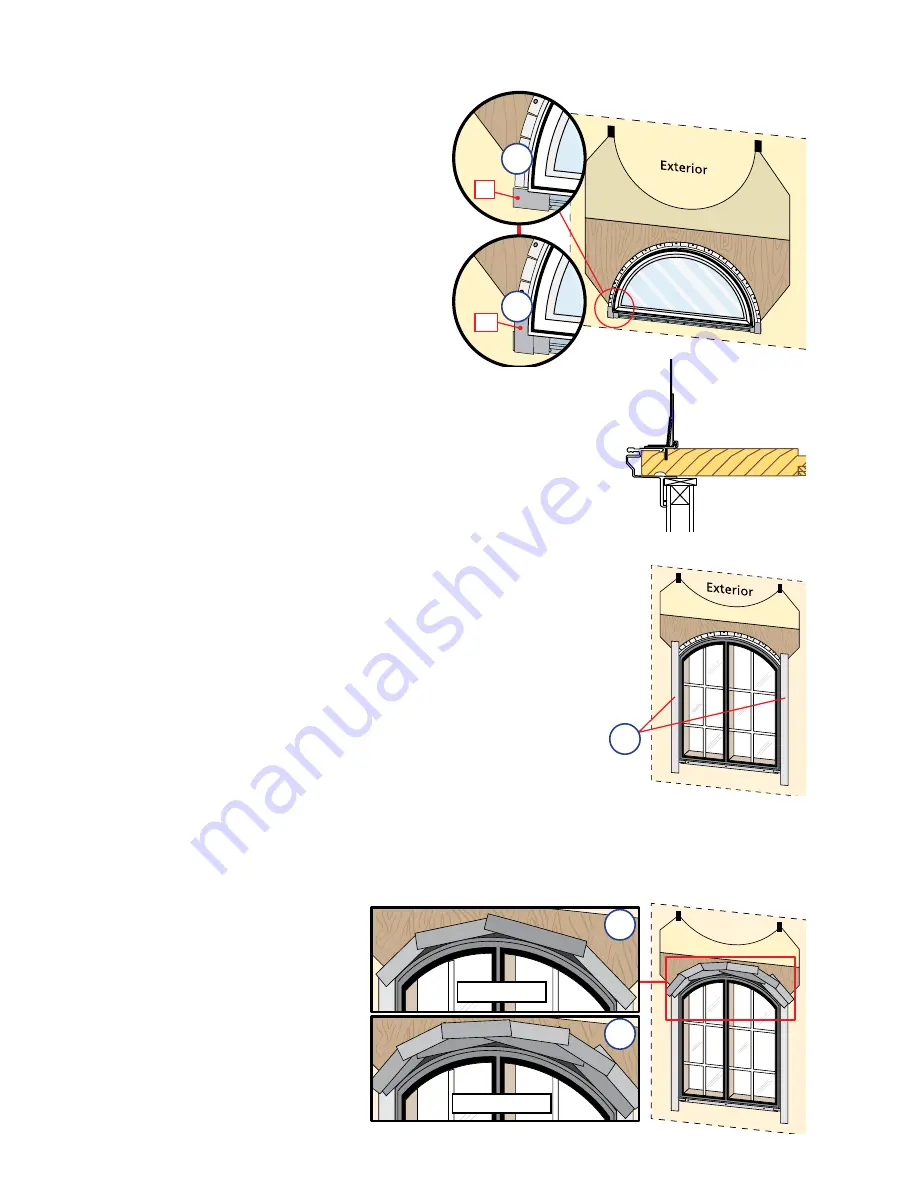
Units that do not have pre-applied fin 
corners: 

Cut four pieces of flashing tape 

LONG!PPLYONEPIECEOFmASHING

tape to each end of the sill fin so that it 

EXTENDSPASTTHEENDOFTHESILL

fin. Apply one piece of flashing tape to 
the bottom end of each flexible vinyl fin, 

BEGINNINGFROMTHEENDOFTHElN

and lapping over the flashing tape that 
extends from the end of the sill fin.

Note: The flashing tape must be applied approximately 1/2" 
onto the frame cladding at the jambs and head. Pre-folding the 
tape at 1/2" before removing the paper backing will make it 
easier to apply the tape correctly. If the siding is less than 1/2" 
thick, adjust the dimension of the fold so the exterior sealant 
line will cover the exterior edge of the tape.

B. 

Apply side flashing tape.

#UTTWOPIECESOFmASHINGTAPELONGER

than the frame height of the window. Position the tape so it laps 

ONTOTHEFRAMECLADDINGCOVERSTHElNANDLAPSONTOTHEWATER

RESISTIVEBARRIER4HETAPESHOULDEXTENDABOVETHETOPOFTHE

WINDOWANDBELOWTHEBOTTOMOFTHEWINDOW0RESSTHETAPEDOWN

firmly while folding down the excess tape at the top and bottom of 
the window.

Note: DO NOT tape or seal the bottom nailing fin.

C. 

Circle top window:


Apply top flashing tape. First layer:

 Several pieces of flashing tape will be needed 

to cover the top fin. Start taping from the sides of the window working toward the 
peak. To determine the length of cuts, hold the tape along the radius, and cut the 
tape just past where it leaves the top fixed extruded fin or for the flexible fin, just 

PASTTHEmEXIBLEWEATHER

strip.  The top tape must 
overlap the one beneath 
it in order to divert water 
properly. The sharper the 
arc of the window, the 
shorter the pieces of tape 
will be. 


Second layer:

 Apply a 

second layer of tape just 
above and overlapping the 
first layer of flashing tape by 

ANDOFFSETTINGTHESEAMS

of the first layer. Press the 
tape down firmly.

TU

OE

"

"

#

&YUFSJPS

$

'JSTU-BZFS

$

4FDPOE-BZFS

Summary of Contents for 80GZ0102

Page 1: ...ting an experienced architect contractor or structural engineer prior to installation of Pella products The individual building owner architect contractor installer and or consumer responsible for the...

Page 2: ...E APPROPRIATE PERSONAL PROTECTIVE EQUIPMENT B Verify the window will t the opening Measure all four sides of the opening to MAKE SURE IT IS LARGER THAN THE WINDOW in both width and height On larger op...

Page 3: ...G from each side Spacers are also required at points where windows are joined in multiple window applications Add shims as necessary to ensure the spacers are level Once level attach spacers and shims...

Page 4: ...each installation screw hole Adjust the shims as required to plumb and square the window in the opening Note DO NOT over shim C Check the interior reveal Make sure the measurement from the interior fa...

Page 5: ...dow Position the tape so it laps ONTO THE FRAME CLADDING COVERS THE lN AND LAPS ONTO THE WATER RESISTIVE BARRIER 4HE TAPE SHOULD EXTEND ABOVE THE TOP OF THE WINDOW AND BELOW THE BOTTOM OF THE WINDOW 0...

Page 6: ...al cuts in the water resistive barrier Apply the tape covering the entire diagonal cut in the resistive water barrier at both upper corners of the window Note Be sure to overlap the top corners 4E 5 S...

Page 7: ...PG DDFTTPSZ SPPWF DDFTTPSZ SPPWF OTVMBUJOH GPBN JO 7 45 4 JO MFBSBODF BDLFS 3PE BOE 4FBMBOU UZQJDBM OTVMBUJOH GPBN 1FSJNFUFS 4FBMBOU NVTU FYUFOE UP SPPNTJEF PG DDFTTPSZ SPPWF DDFTTPSZ SPPWF 7 INTERIO...

Page 8: ...e the sash to stick it is optional to paint stain or nish the HORIZONTAL SASH EDGES s N PATIO DOORS IT IS OPTIONAL TO PAINT STAIN OR lNISH THE VERTICAL AND HORIZONTAL PANEL EDGES Note To maintain prop...

Page 9: ...lla products as well as the design and installation of ashing and sealing systems are the responsibility of the Buyer or User the architect contractor installer or other construction professional and...

Reviews: