background image

ISSUED: 07-08-05  SHEET #: 055-9430-1

Visit the Peerless Web Site at www.peerlessindustries.com

6 of 9

For customer service call 1-800-729-0307 or 708-865-8870.

Note: 

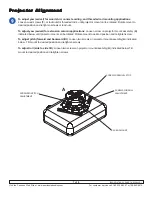
The projector adapter plate and projector you are installing may differ in appearance from the sample illustrated

below.
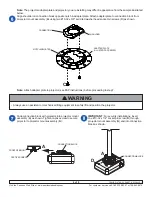
Align shoulder on connection block opposite notch in adapter plate. Attach adapter plate to connection block from
projector mount assembly (

A

) using two #10-32 x 3/8" serrated washer head socket pin screws (

C

) as shown.

Slide connection block with projector into projector mount
assembly (

A

) as shown. Tighten captive screw to secure

projector to projector mount assembly (

A

).

IMPORTANT

: For security installations, insert

one #10-32 x 1/4" socket pin screw (

D

) through

projector mount assembly (

A

) and into connection

block as shown.

A

CONNECTION BLOCK

D

CONNECTION BLOCK

A

CAPTIVE SCREW

FRONT OF MOUNT

• Always use an assistant or mechanical lifting equipment to safely lift and position the projector.

WARNING

ADAPTER PLATE
(UL LISTED PAP SERIES)

CONNECTION

NOTCH INDICATES

C

SHOULDER

Note:

  Attach adapter plate to projector (see PAP instructions) before proceeding to step 7.

Summary of Contents for PRS 1P

Page 1: ...tions To Wood Joist Finished Ceilings Exposed Wood Joists or Wood Beam Ceilings step 2 page 3 To Concrete Ceilings step 3 page 4 Applications Threaded Rod step 4 page 5 ExtensionColumn step 5 page 5 P...

Page 2: ...5 0592 B 4 mm security allen wrench 1 560 9646 560 9646 560 9646 C 10 32 x 3 8 serrated washer head socket pin screw 2 520 1151 520 2151 520 2151 D 10 32 x 1 4 socket pin screw 1 520 1196 520 2196 520...

Page 3: ...using 3 8 10 mm socket wrench until projector mount assembly A is firmly attached Skip to step 6 Installation To Wood Joist Finished Ceilings Exposed Wood Joists or Wood Beam Ceilings F F A WOOD JOIST...

Page 4: ...l CORRECT concrete metal bracket plaster dry wall concrete ceiling F F F Illustration A Installation to Concrete Ceilings A 2 A CONCRETECEILING E G G G Note It is the responsibility of the installer t...

Page 5: ...extension columns reducer ACC 913 will be required as shown in figure 2 2 Tighten swivel stop screw against extension column or reducer using security allen wrench B Note Swivel stop screw is used to...

Page 6: ...ead socket pin screws C as shown Slide connection block with projector into projector mount assembly A as shown Tighten captive screw to secure projector to projector mount assembly A IMPORTANT For se...

Page 7: ...cations Loosen screw on projector mount assembly A indicated below until projector mount can be rotated Rotate mount to desired position and retighten screw To adjust pitch forward and backward tilt L...

Page 8: ...27 2 kg COLOR White Mounts above 2 x 4 or 2 x 2 false ceiling tile Includes tie wire supports flush mount tube and offers two knockout panels for outlet boxes Offers unlimited adjustment for projecto...

Page 9: ...h security lock For use with projectors that have a built in security slot Extension column Side to side adjuster Extension Columns Security Accessories Additional Projector Mount Accessories PRS Seri...

Reviews: