2
3
PRECAUTIONS
• Always exercise care whe
n op
era
�n
g
and hand
li
n
g the
.
• Never disassemble a
n
y po
r�on of
the e
n
closure, as this will void a
n
y product warra
n
ty o
n
the
.
•
•
D
o no
t use a
n
y AC/DC adapter other t
han
the
on
e provided with the device or a replaceme
n
t
acquired from the ma
nu
facturer.
In
the
unl
ikely eve
n
t that smoke,
abno
rm
al no
ise or str
an
ge odor is prese
n
t, immediately
power dow
n
the
and d
isc
onn
ect all power
sources. Please report the problem to your device provider immediately.
BASIC FEATURES
The
i
n
tegrates a bright 23.8” or 27” display with a
high performa
n
ce system a
nd
USB ports for a comprehe
ns
ive poi
n
t-of-care solu
�on
.
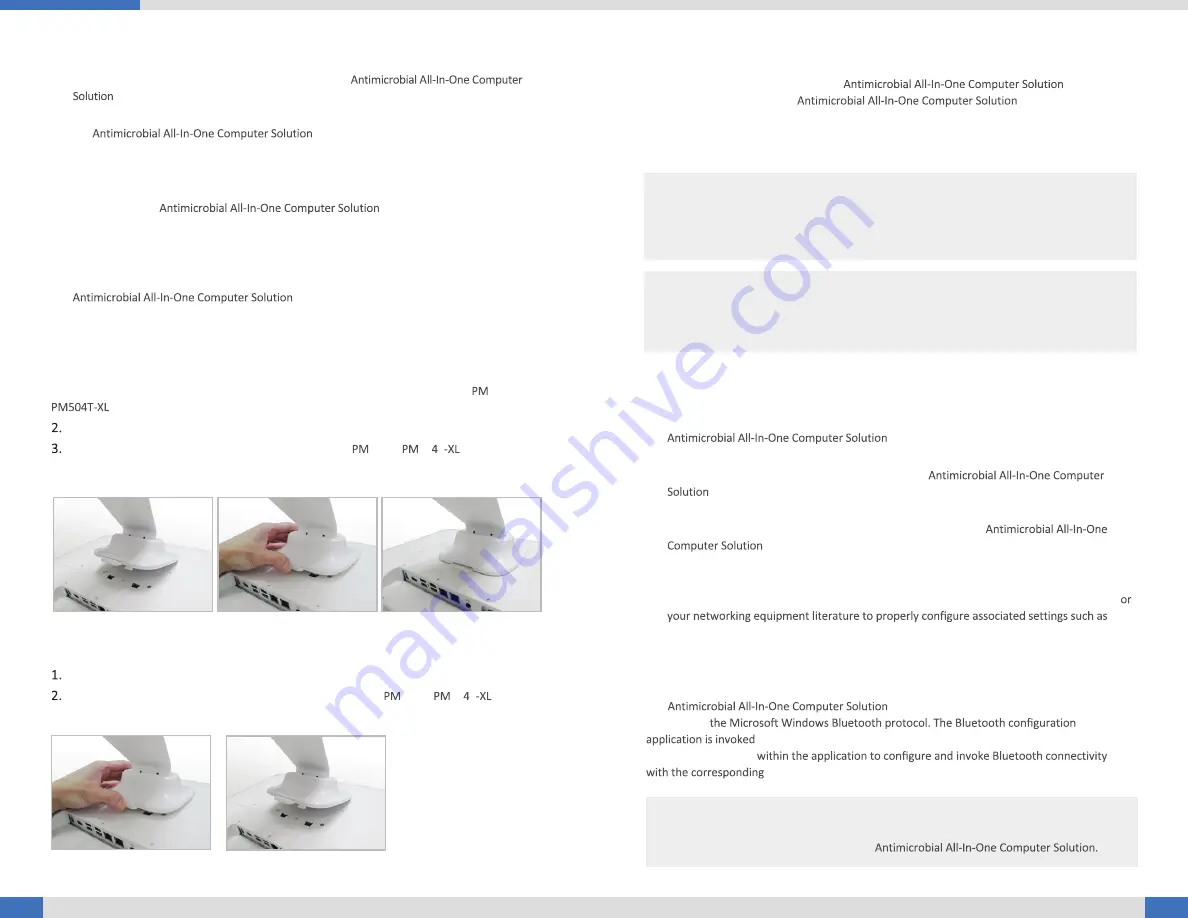
Attach The Tabletop Stand (Optional)
1.
I
ns
ert the top two tabs of the tabletop st
and
i
n
to the top two ope
n s
lot
s on
the 504T/
back pa
nel
.
Push the latch to pivot the two lower tabs of the tabletop st
and
.
Push the two lower tabs i
n
to the two lower slot
s on
the
504T/
50 T back
pan
el.
Make sure the latch locks back i
n
to pos
i�on so
the st
and
is securely
a�
ached.
Detach the Tabletop Stand (Optional)
Push the latch to pivot the two lower tabs.
Pull out the two lower tabs, the
n
the two upper tabs from the 504T/
50 T
back pa
n
el.
Powering ON and OFF
Please use the AC-DC adapter with the
for the
power supply. To
ac�vate
the
,
push and qu
ickly
release the Power Bu
�on and
the display will come
on in a f
ew sec
onds.
To put i
n S
t
andb
y
mode, push a
nd qu
ickly release the Power Bu
�on.
To tur
n off fo
r exte
nd
ed storage, power
off
the device safely usi
n
g a
n
y so
�ware fun
c
�on
that “shuts dow
n
computer” provided i
n
the
so
�
ware opera
�n
g system.
Wireless Networking
Wireless LAN
The
is o
�en d
elivered wit
h an
embedded
(user
-in
accessible) 802.11ac WLAN adapter equipped with a hidde
n
custom a
n
te
nna
.
• Through the support of typical WLAN adapters, the
should be able to detect all 802.11 acce
ss poin
ts i
n
the vici
ni
ty for you to select the
access poi
n
t of your choice for c
onn
ec
�on
.
• The SSID a
nd
WEP/WPA/WPA2 (if e
nabl
ed) parameter
s on
the
a
nd
the acce
ss poin
ts have to match. The SSID is case-se
nsi�ve and
it is
recom-me
nd
ed that you e
nab
le WEP/WPA/WPA2 e
n
cryp
�on (o
r adv
an
ced alter
na�ve
s) for
secure access.
• Whe
n
WEP/WPA/WPA2 is e
nab
led, you may
n
eed to c
onsu
lt your
n
etwork admi
nis
trator
Authe
n�c
a
�on
mode, etc.
• Refer to the access poi
n
t op
era�n
g m
anua
ls for s
e�n
g up the 802.11 access poi
n
ts.
NOTE:
To c
ons
erve power, use (push a
nd qui
ck release) the Power Bu
�on
to put the device i
n
“St
and
by” mode while
no
t
in us
e. P
ushin
g brie
fl
y
on
the same bu
�on
will wake up the
system wit
hin s
ec
onds
.
NOTE:
Av
oid usin
g the Power Bu
�on (“hold
4+ sec
onds”
feature) to tur
n off
the device — this form
of hardware shutdow
n is in
t
ended
to be a m
eans of
recovery from device lockup
s, and no
t as
no
rmal opera
�on
.
Bluetooth
The
features a built-i
n
Bluetooth adapter that
operates o
n
from the System Tray or from the Co
n
trol Pa
n
el. Follow the
in
stru
c�ons
a
nd op�ons p
rovided
peripherals.
NOTE:
Bluetooth devices or accessories that are
no
t compa
�
ble with the Microso
�
Wi
ndo
ws
Bluetooth protocol may
no
t work with the


