


(800) 348 9250
pcbunlimited.com
Operating the stencil printer
Maintenance and care
Once the installation is completed in the order described above, it is easy to place successive
PCBs on the placeholders.
BUT BE CAREFULL
Due to the fact that no PCB is the same, it is advisable to check if the PCB pads still exactly
match the
stencil holes before each print.
Let’s start!
1. Place a PCB on the place holders and close the printer as described before. Check if
the holes and pads are still aligned.
2. Put the solder paste on the backside of the stencil with a spatula. Take care that the
solder paste is applied over the full width of the stencil cut-out.
3. Place the squeegee behind the solder paste under a 45-60 degree angle and, in a
zigzagging motion while applying a little pressure, move the squeegee to the front side
of the stencil.
Make sure that all the holes in the stencil are filled with solder paste.
4. Remove the remaining paste at the end of the stencil with the squeegee.
5. Carefully open the printer and remove the PCB. It is now ready for assembly!
6. For successive printing repeat from step 1.
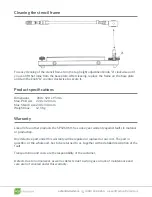
Use the SP912 M1 only in a dry, clean location and strictly avoid aggressive environmental
conditions such as etching equipment. Clean the machine after use with a solvent that only
removes paste and has no aggressive elements in it that could affect the machine or the stencil.
Note:
To prevent corrosion, slightly oil all metal surfaces twice or several times a year with resin and
acid free machine oil. No further lubrication is needed or advised.
7. Remove the outline plate without moving the PCB and close the printer again. (picture B)
8. Use the bottom and top height controls to bring the stencil just above the PCB. Less space is
better.
9. Use the X- and Y-axis for small adjustments to align the stencil holes and PCB pads.
10. Your printer is now ready for printing!


