background image

88888

Technical Reference Booklet

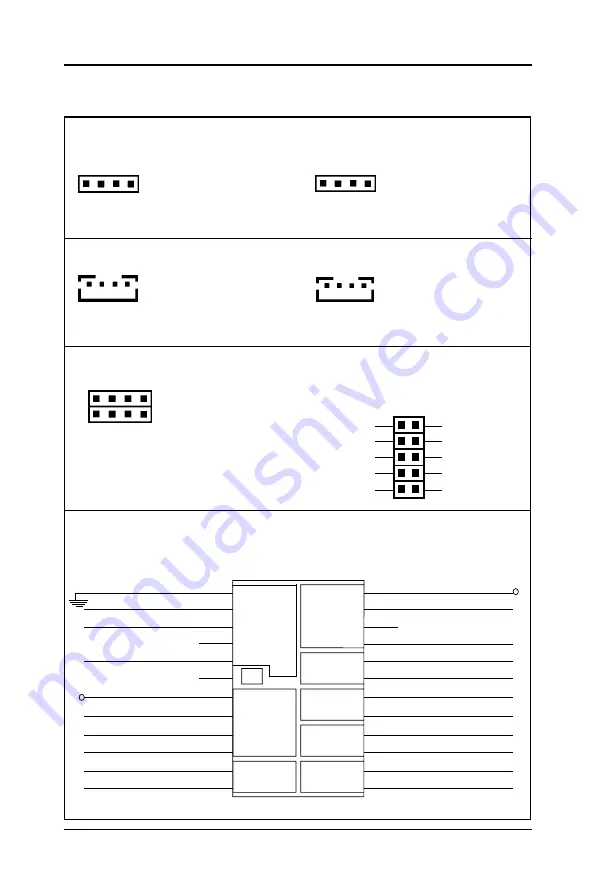
CDS2 : CD-IN

CDS2 : CD-IN

CDS2 : CD-IN

CDS2 : CD-IN

CDS2 : CD-IN

Pin

Pin

Pin

Pin

Pin Assignment

Assignment

Assignment

Assignment

Assignment

1

CD-R

2

GND

3

CD-L

4

GND

USB Connector

USB Connector

USB Connector

USB Connector

USB Connector

Pin

Pin

Pin

Pin

Pin Assignment

Assignment

Assignment

Assignment

Assignment

1

VCC

2

GND

3

USBP1-

4

USBP0+

5

USBP1+

6

USBP0-

7

GND

8

VCC

R  G  L  G

R  G  L  G

R  G  L  G

R  G  L  G

R  G  L  G

G  L  G  R

G  L  G  R

G  L  G  R

G  L  G  R

G  L  G  R

CDS3 : CD-IN

CDS3 : CD-IN

CDS3 : CD-IN

CDS3 : CD-IN

CDS3 : CD-IN

Pin

Pin

Pin

Pin

Pin Assignment

Assignment

Assignment

Assignment

Assignment

1

GND

2

CD-L

3

GND

4

CD-R

1

11

11

2

22

22

7

77

77

8

88

88

LINEOUTR

MICIN

GND

BIAS

X

LINEOUTL

LINEINR

LINEINL

10

9

2

1

GND

GND

J10

J10

J10

J10

J10

Front Panel

Front Panel

Front Panel

Front Panel

Front Panel

Sound Connector

Sound Connector

Sound Connector

Sound Connector

Sound Connector

1

11

11

1

11

11

CDS1 : CD-IN

CDS1 : CD-IN

CDS1 : CD-IN

CDS1 : CD-IN

CDS1 : CD-IN

Pin

Pin

Pin

Pin

Pin Assignment

Assignment

Assignment

Assignment

Assignment

1

CD-L

2

GND

3

GND

4

CD-R

Pin Assignment

Pin Assignment

Pin Assignment

Pin Assignment

Pin Assignment

Internal Audio Connector

AUX1 : AUX-IN

AUX1 : AUX-IN

AUX1 : AUX-IN

AUX1 : AUX-IN

AUX1 : AUX-IN

Pin

Pin

Pin

Pin

Pin Assignment

Assignment

Assignment

Assignment

Assignment

1

AUX-L

2

GND

3

GND

4

AUX-R

FP1

FRONT PANEL HEADER

HEADER 2x12

GND

24

KEYLOCK

22

GND

20
18

16

14

12

IRTX

10

GND

8

IRRX

6

GND

4

SUS+

2

SW -

PWR+

- SW
+SUS

LED -

PWR+

LED -

HDD+

SW -

RST+

+

-

NC

S

SPKER

IrDA

+
TX
-
RX

KEYLOCK

-
S
-
NC
+

23

21

GND

19

17

SPEAKER

15

GND

13

RST+

11

HDDLED-

9

7

PWRLED-

5

3

GND

1

PWR+

X

VCC

X

X

VCC

Summary of Contents for P4M266AS4-284M

Page 1: ...to correct the interference by one or more of the following measures REORIENTORRELOCATETHERECEIVINGANTENNA INCREASE THE SEPARATION BETWEEN THE EQUIPMENT AND THE RECEIVER CONNECTTHEEQUIPMENTINTOANOUTL...

Page 2: ...ment 8 HARDWARE SETUP HARDWARE SETUP HARDWARE SETUP HARDWARE SETUP HARDWARE SETUP 9 9 9 9 9 To Install DIMMs 9 Installing a New Processor 10 To Install a Processor to ZIF Socket 10 Connect the Process...

Page 3: ...with capacities over 8 4GB Easy to upgrade BIOS by end user On board I O On board I O On board I O On board I O On board I O On board two PCI fast IDE ports supporting up to 4 ATA ATA2 Ultra ATA33 66...

Page 4: ...Mic in and MIDI game port Note Note Note Note Note If this motherboard bundles a PCI sound function so one slot cannot support bus master feature If you find that your PCI card with bus master feature...

Page 5: ...on the motherboard The VGA Connector is only for P4M266 chipset USB3 USB Connector is only for VT8233 chipset NOTE 1 Be sure to check the cable orientation in order to match the colored strip to the...

Page 6: ...ency multiplier locked no CPU speed change will be seen even if the frequency multiplier setting in CMOS setup is changed J5 On Board PCI Codec Sound optional J5 On Board PCI Codec Sound optional J5 O...

Page 7: ...1 325 1 700 1 300 1 675 1 275 1 650 1 250 1 625 1 225 1 600 1 200 1 575 1 175 1 550 1 150 1 525 1 125 1 500 1 100 1 475 Defaulting CPU On Off Default setting SW5 1 Off Auto Setting SW5 1 On Manual Set...

Page 8: ...INR LINEINL 10 9 2 1 GND GND J10 J10 J10 J10 J10 Front Panel Front Panel Front Panel Front Panel Front Panel Sound Connector Sound Connector Sound Connector Sound Connector Sound Connector 1 1 1 1 1 1...

Page 9: ...nstall DIMMs 1 Locate the DIMM sockets 2 Holding the DIMM by the edges remove it from its antistatic package 3 Make sure the clips at either end of the socket are pushed away from the socket 4 Positio...

Page 10: ...ift the chip straight up out of the socket Be careful not to bend any pins Be careful not to bend any of the pins when removing the microprocessor chip from its socket The microprocessor chip can be p...

Page 11: ...DEL to enter SETUP Press DEL to enter SETUP Press DEL to enter SETUP Press DEL to enter SETUP If the message disappears before you can respond and you still wish to enter Setup restart the system to t...

Page 12: ...ase and may not be exactly the same as the one on your unit Note that a brief description of each highlighted item will appear at the bottom of the screen Standard This setup page includes all the ite...

Page 13: ...o highlight the item and then use the PgUp or PgDn key to select the desired value in each item Phoenix AwardBIOs CMOS Setup Utility Standard CMOS Features Date mm dd yy Fri Feb 01 2002 Item Help Time...

Page 14: ...to configure your system for basic operation You have the opportunity to select the boot up sequence keyboard operation shadowing and security Advanced Chipset Features Advanced Chipset Features Adva...

Page 15: ...password ENTER PASSWORD ENTER PASSWORD ENTER PASSWORD ENTER PASSWORD ENTER PASSWORD Type the password up to eight characters in length and press Enter The new password will clear the previously enter...

Page 16: ...t to save BIOS Y N is displayed Key in N if there is no need to save the existing BIOS content Key in Y if a backup copy of the existing BIOS is needed A file name has to be assigned to the existing B...

Reviews: