background image

46

For continuing high performance and to minimize possible
equipment failure, periodic maintenance must be performed on

this equipment. Consult your local dealer about proper frequency
of maintenance and the availability of a maintenance contract.

ELECTRICAL SHOCK AND FIRE HAZARD

Failure to follow this warning could result in personal

injury, death or property damage.
Turn off the gas and electrical supplies to the unit before

performing any maintenance or service. Follow the

operating instructions on the label attached to the furnace.

!

WARNING

CARBON MONOXIDE POISONING AND FIRE

HAZARD

Failure to follow this warning could result in personal

injury, death and/or property damage.
Never operate unit without a filter or with filter access door

removed.

!

WARNING

CUT HAZARD

Failure to follow this caution may result in personal injury.
Sheet metal parts may have sharp edges or burrs. Use care

and wear appropriate protective clothing, safety glasses and

gloves when handling parts and servicing furnaces.

CAUTION

!

The minimum maintenance on this furnace is as follows:
1. Check and clean air filter each month or more frequently if
required. Replace if torn.
2. Check blower motor and wheel for cleanliness each heating

and cooling season. Clean as necessary.
3. Check electrical connections for tightness and controls for

proper operation each heating season. Service as necessary.
4. Inspect burner compartment before each heating season for

rust, corrosion, soot or excessive dust. If necessary, have furnace
and burner serviced by a qualified service agency.
5. Inspect the vent pipe/vent system before each heating season

for rust, corrosion, water leakage, sagging pipes or broken
fittings. Have vent pipes/vent system serviced by a qualified

service agency.
6. Inspect any accessories attached to the furnace such as a

humidifier or electronic air cleaner. Perform any service or

maintenance to the accessories as recommended in the accessory
instructions.

CLEANING AND/OR REPLACING AIR FILTER

The air filter arrangement will vary depending on the application.

The filter is exterior to the furnace casing.

NOTE

: If the filter has an airflow direction arrow, the arrow

must point towards the blower.

CUT HAZARD

Failure to follow this caution may result in personal injury.
Sheet metal parts may have sharp edges or burrs. Use care

and wear appropriate protective clothing, safety glasses and

gloves when handling parts and servicing furnaces.

CAUTION

!

Media cabinet filter procedures

:

NOTE

: Media cabinet or 1 in. filter rack are accessories and are

not included from the factory with standard furnace model.
1. Turn off electrical supply to furnace before removing filter

access door.
2. Remove filter cabinet door.
3. Slide filter out of cabinet.
4. If equipped with permanent, washable 1--inch filter, clean filter

by spraying cold tap water through filter in opposite direction of

airflow. Rinse filter and let dry. Oiling or coating of the filter is
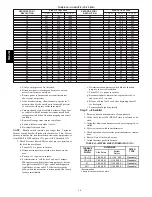
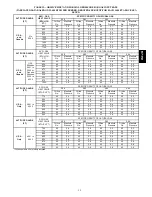
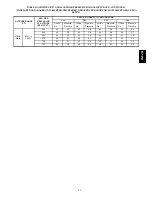
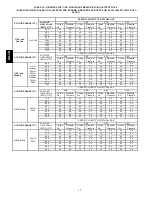
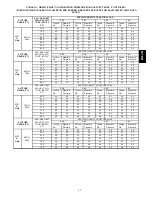
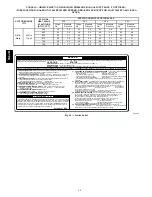
not recommended. See Table 11 for size information.
5. If equipped with factory--specified disposable media filter,
replace only with media filter having the same part number and

size. For expandable replacement media, refer to the instructions
included with the replacement media. If equipped with accessory

KGAFR0301ALL external filter rack, See Table 11.
6. Slide filter into cabinet.
7. Replace filter cabinet door.
8. Turn on electrical supply to furnace.

BLOWER MOTOR AND WHEEL

ELECTRICAL SHOCK HAZARD

Failure to follow this warning could result in personal

injury or death.
Blower access door switch opens 115--v power to

control. No component operation can occur unless

switch is closed. Caution must be taken when manually

closing this switch for service purposes.

!

WARNING

NOTE

: The blower wheel should not be dropped or bent as

balance will be affected.

The following steps should be performed by a qualified

service agency.

To ensure long life and high efficiency, clean accumulated dirt

and grease from blower wheel and motor annually.
The inducer and blower motors are pre--lubricated and require no

additional lubrication. These motors can be identified by the

absence of oil ports on each end of the motor.
Clean blower motor and wheel as follows:

1. Turn off electrical supply to furnace.
2. Loosen the thumbscrew on outer door and remove outer

door.

3. For downflow or horizontal furnaces having vent pipes

within the furnace that pass in front of the blower access

door:

a. Disconnect vent connector from furnace vent elbow.

b. Disconnect and remove short piece of vent pipe from

within furnace.

4. Remove 2 screws from blower access door and remove

blower access door.

5. Disconnect blower leads from furnace control. Record

wire color and location for reassembly. All other factory
wires can be left connected, but field thermostat connec-

tions may need to be disconnected depending on their
length and routing.

6. Remove 2 screws holding control box to blower shelf.
7. Hang control box from front of furnace casing and away

from blower compartment.

8. Remove 2 screws holding blower assembly to blower

deck and slide blower assembly out of furnace.

PG

8J

/M

Summary of Contents for PG8J

Page 1: ...g 22 J Box Relocation 22 Electrical Connection to J Box 22 Power Cord Install Furnace J Box 23 BX Cable Install Furn J Box 23 24 V Wiring 25 Accessories 25 General Venting Requirements 25 Masonry Chimney Requirements 26 Appliance Application Requirements 28 Additional Venting Requirements 29 Sidewall Venting 30 START UP ADJUSTMENT AND SAFETY CHECK 31 Step 1 General 31 Step 2 Start Up Procedures 31...

Page 2: ...njury Sheet metal parts may have sharp edges or burrs Use care and wear appropriate protective clothing safety glasses and gloves when handling parts and servicing furnaces CAUTION FIRE EXPLOSION ELECTRICAL SHOCK AND CARBON MONOXIDE POISONING HAZARD Failure to follow this warning could result in personal injury death or property damage Improper installation adjustment alteration service maintenanc...

Page 3: ... openings for airflow requirements above 1800 CFM A04037 Fig 1 Dimensional Drawing 13 These furnaces SHALL NOT be installed directly on car peting tile or any other combustible material other than wood flooring In downflow installations factory access ory floor base MUST be used when installed on combust ible materials and wood flooring Special base is not re quired when this furnace is installed ...

Page 4: ... plancher combustible seulement quand on utilise la base spéciale pièce nº KGASB0201ALL l ensemble serpentin pièce nº CD5 ou CK5 ou le carter de serpentin pièce nº KCAKC Dans une alcôve on doit maintenir un dégagement à l avant de 18 po 450mm La poistion indiquée concerne le côté d entrée ou de retour quand la fournaise est dans la position horizontale Le contact n est permis qu entre les lignes f...

Page 5: ...cautions will prevent electrostatic discharges from personnel and hand tools which are held during the procedure These precautions will help to avoid exposing the control to electrostatic discharge by putting the furnace the control and the person at the same electrostatic potential CAUTION 1 Disconnect all power to the furnace Multiple disconnects may be required DO NOT TOUCH THE CONTROL OR ANY W...

Page 6: ...m Refer to Air Ducts section S be provided ample space for servicing and cleaning Always comply with minimum fire protection clear ances shown on the furnace clearance to combustible label S The following types of furnace installations may re quire OUTDOOR AIR for combustion due to chemical exposures S Commercial buildings S Buildings with indoor pools S Laundry rooms S Hobby or craft rooms and S ...

Page 7: ...temperature of the return air to the furnace is maintained between 55_F 13_C and 80_F 27_C with no evening setback or shutdown The use of the furnace while the structure is under construction is deemed to be intermittent operation per our installation instructions The air temperature rise is within the rated rise range on the furnace rating plate and the gas input rate has been set to the nameplat...

Page 8: ... outdoors a One opening MUST commence within 12 in 300 mm of the ceiling and the second opening MUST commence within 12 in 300 mm of the floor b Size openings and ducts per Fig 7 and Table 2 c TWO HORIZONTAL DUCTS require 1 sq in of free area per 2 000 Btuh 1 100 mm2 kW of combined input for all gas appliances in the space per Fig 7 and Table 2 d TWO OPENINGS OR VERTICAL DUCTS require 1 sq in of f...

Page 9: ...0 000 divided by 4 000 35 0 Sq In for each two Vertical Ducts or Openings 66 000 40 000 106 000 divided by 3 000 35 3 Sq In for a Single Duct or Opening 88 000 30 000 118 000 divided by 2 000 59 0 Sq In for each of two Horizontal Ducts TABLE 3 MINIMUM SPACE VOLUMES FOR 100 COMBUSTION VENTILATION AND DILUTION FROM INDOORS ACH OTHER THAN FAN ASSISTED TO TAL 1 000 S BTUH GAS INPUT RATE FAN ASSISTED T...

Page 10: ...BTUH IN DOOR OR WALL 12 MAX Minimum opening size is 100 sq in with minimum dimensions of 3 in Minimum of 3 in when type B1 vent is used UNCONFINED SPACE INTERIOR HEATED SPACE CLEARANCE IN FRONT OF COMBUSTION AIR OPENINGS SHALL BE AT LEAST 3 IN A03175 Fig 8 Air for Combustion Ventilation and Dilution From Indoors b Combining spaces on same floor level Each opening shall have free area of at least 1...

Page 11: ... Return Air Inlet These furnaces are shipped with bottom closure panel installed in bottom return air opening This panel MUST be in place when only side return air is used NOTE Side return air openings can be used in UPFLOW and most HORIZONTAL configurations Do not use side return air openings in DOWNFLOW configuration In upflow position with side return inlet s leveling legs may be used See Fig 1...

Page 12: ... remove 2 screws holding bottom filler panel See Fig 9 2 Rotate bottom filler panel downward to release holding tabs 3 Remove bottom closure panel 4 Reinstall bottom filler panel and screws HORIZONTAL INSTALLATION FIRE EXPLOSION AND CARBON MONOXIDE POISONING HAZARD Failure to follow this warning could result in personal injury death or property damage Do not install the furnace on its back or hang...

Page 13: ...is furnace requires KGAFR030ALL 1 in external filter rack or a suitable field supplied substitute such as the media cabinet Refer to the instructions supplied with external filter rack for assembly and installation options AIR DUCTS General Requirements The duct system should be designed and sized according to accepted national standards such as those published by Air Conditioning Contractors Asso...

Page 14: ... 1 8 19 16 3 4 20 5 8 Downflow Applications on Combustible Flooring with CD5 or CK5 Coil Assembly or KCAKC coil box KGASB subbase not required 15 1 2 19 16 1 2 20 21 Upflow Applications on Combustible or Noncombustible Floor ing KGASB subbase not required 19 1 2 21 5 8 20 1 8 22 1 4 Downflow Applications on Noncombustible Flooring KGASB subbase not required 19 3 8 19 20 19 5 8 Downflow application...

Page 15: ... 1895 1730 1920 1785 1630 1790 1675 1535 1660 1565 1420 1530 1420 1275 1350 1260 1135 Both Sides or 1 Side Bottom High Med High Med Low 2530 2285 1995 2450 2215 1945 2365 2150 1900 2270 2075 1840 2165 1985 1770 2065 1890 1685 1940 1780 1600 1805 1660 1480 1670 1525 1350 1505 1360 1180 1Side Only High Med High Med Low 2475 2260 1950 2395 2190 1910 2300 2110 1855 2200 2035 1795 2090 1940 1730 1985 1...

Page 16: ...15 1555 1445 1290 1385 1265 1160 060155 Bottom Only High Med High Med Low 2465 2115 1800 2430 2105 1790 2375 2075 1770 2305 2030 1735 2230 1980 1695 2110 1910 1640 2000 1830 1570 1865 1725 1465 1725 1590 1345 1545 1425 1225 Both Sides Or 1 Side Bottom High Med High Med Low 2155 1800 2135 1790 2375 2095 1770 2285 2040 1735 2200 1975 1695 2105 1895 1640 1995 1790 1570 1870 1685 1465 1730 1550 1345 1...

Page 17: ... SCREWS TYPICAL FOR 2 SUPPORTS 1 SQUARE 11 4 x 11 4 x 1 8 ANGLE IRON OR UNI STRUT MAY BE USED 2 HEX NUTS 2 WASHERS 2 LOCK WASHERS REQ PER ROD 8 MIN FOR DOOR REMOVAL OUTER DOOR ASSEMBLY A05027 Fig 15 Horizontal Unit Suspension A02014 Fig 16 Horizontal Suspension with Straps PG8J M ...

Page 18: ...D BY INTERSECTIONS OF THE TOP AND TWO SIDES OF THE FURNACE JACKET AND BUILDING JOISTS STUDS OR FRAMING GAS ENTRY 17 3 4 OVER ALL 4 3 4 UNDER DOOR 1 UNDER FURNACE EXTEND OUT 12 OUT FROM FACE OF DOOR WHEN USED WITH SINGLE WALL VENT CONNECTIONS A02164 Fig 17 Typical Attic Installation A02075 Fig 18 Upflow Return Air configurations and Restrictions PG8J M ...

Page 19: ... NOTE For horizontal applications the top most flange may be bent past 90_ to allow the evaporator coil to hang on the flange temporarily while the remaining attachment and sealing of the coil are performed Downflow Furnaces Connect supply air duct to supply air outlet on furnace Bend flange inward past 90_ with wide duct pliers See Fig 14 The supply air duct must be connected to ONLY the furnace ...

Page 20: ...ST be performed by a li censed plumber or gas fitter 2 When flexible connectors are used the maximum length shall not exceed 36 inches 915 mm 3 When lever handle type manual equipment shutoff valves are used they shall be T handle valves 4 The use of copper tubing for gas piping is NOT approved by the state of Massachusetts Refer to Table 6 for recommended gas pipe sizing Risers must be used to co...

Page 21: ...FGC in the United States or NSCNGPIC in Canada local and national plumbing and gas codes before the furnace has been connected After all connections have been made purge lines and check for leakage at furnace prior to operating furnace If pressure exceeds 0 5 psig 14 in wc gas supply pipe must be disconnected from furnace and capped before and during supply pipe pressure test If test pressure is e...

Page 22: ... warning could result in personal injury death or property damage Do not connect aluminum wire between disconnect switch and furnace Use only copper wire WARNING Use a separate fused branch electrical circuit with a properly sized fuse or circuit breaker for this furnace See Table 7 for wire size and fuse specifications A readily accessible means of electrical disconnect must be located within sig...

Page 23: ...r wires into electrical box 10 Remove cover from furnace J Box 11 Route and secure field ground wire to green ground screw on J Box bracket 12 Connect line voltage leads as shown in Fig 26 13 Reinstall cover to J Box Do not pinch wires between cover and bracket Electrical Box on Furnace Casing Side See Fig 24 FIRE OR ELECTRICAL SHOCK HAZARD Failure to follow this warning could result in personal i...

Page 24: ...ST TERMINAL BLOWER OFF DELAY J2 J2 JUMPER PLT A02100 Fig 25 Furnace Control 115 V FIELD SUPPLIED DISCONNECT AUXILIARY J BOX 24 V TERMINAL BLOCK THREE WIRE HEATING ONLY FIVE WIRE NOTE 1 NOTE 2 FIELD SUPPLIED DISCONNECT CONDENSING UNIT TWO WIRE FURNACE C O N T R O L R G COM W C R G Y GND GND FIELD 24 V WIRING FIELD 115 208 230 460 V WIRING FACTORY 24 V WIRING FACTORY 115 V WIRING 208 230 OR 460 V TH...

Page 25: ...being placed into operation could result in carbon monoxide poisoning or death The following steps shall be followed for each appliance connected to the venting system being placed into operation while all other appliances connected to the venting system are not in operation 1 Seal any unused openings in venting system 2 Inspect the venting system for proper size and horizontal pitch as required i...

Page 26: ...ails Canada and U S A This furnace is permitted to be vented into a clay tile lined masonry chimney that is exposed to the outdoors below the roof line provided 1 Vent connector is Type B double wall and 2 This furnace is common vented with at least 1 draft hood equipped appliance and 3 The combined appliance input rating is less than the max imum capacity given in Table A and 4 The input rating o...

Page 27: ...n cleanout Mortar tile metal vent fuel oil residue Is liner and top seal in good condition Is chimney property lined with clay tile liner Crown condition Missing mortar or brick Rebuild crown Yes Yes No No No Reline Yes Repair Yes Yes Yes No No Remove mortar and tile debris Remove metal vent or liner No No No No Yes Yes Suitable Suitable Not Suitable Line chimney with property sized listed flexibl...

Page 28: ...urnace and or vent ing system Derating is permitted only for altitudes above 2000 ft 3 Adjust the air temperature rise to the midpoint of the rise range or slightly above Low air temperature rise can cause low vent gas temperature and potential for condensation problems 4 Set thermostat heat anticipator or cycle rate to reduce short cycling EXTERIOR MASONRY CHIMNEY FAN NAT INSTALLATIONS WITH TYPE ...

Page 29: ...The vent connector can exit the door through one of 5 locations on the door 1 Attach the single wall vent connector to the furnace vent elbow and fasten the vent connector to the vent elbow with at least two field supplied corrosion resistant sheet metal screws located 180_ apart NOTE An accessory flue extension KGAFE0112UPH is available to extend from the furnace elbow to outside the furnace casi...

Page 30: ...ons for complete details The horizontal portion of the venting system shall slope upwards not less than 1 4 in per linear ft 21 mm m from the furnace to the vent and shall be rigidly supported every 5 ft or less with metal hangers or straps to ensure there is no movement after installation SIDEWALL VENTING This furnace is not approved for direct sidewall horizontal venting In the U S Per section 1...

Page 31: ...p and water solution to check for leakage WARNING 1 Purge gas lines after all connections have been made 2 Check gas lines for leaks ELECTRICAL SHOCK HAZARD Failure to follow this warning could result in personal injury or death Blower access door switch opens 115 v power to control No component operation can occur unless switch is closed Caution must be taken when manually closing this switch for...

Page 32: ...e page following these figures A03210 Fig 35 Downflow Application Vent Elbow Up then Left SEE NOTES 1 2 4 5 7 8 9 on the page following these figures A03211 Fig 36 Downflow Application Vent Elbow Up SEE NOTES 1 2 4 5 6 7 8 9 10 on the page following these figures A03207 Fig 37 Downflow Application Vent Elbow Left then Up SEE NOTES 1 2 3 4 5 7 8 9 on the page following these figures A03212 Fig 38 D...

Page 33: ...plication Vent Elbow Left 1 For common vent vent connector sizing and vent material United States Use the NFGC Canada use the NSCNGPIC 2 Immediately increase to 5 in or 6 in vent connector outside furnace casing when 5 in vent connector is required refer to Note 1 above 3 Side outlet vent for upflow and downflow installations must use Type B vent immediately after exiting the furnace except when K...

Page 34: ...rnace gas input rate on rating plate is for installations at altitudes up to 2000 ft Furnace input rate must be within 2 percent of furnace rating plate input 1 Determine the correct gas input rate In the U S A The input rating for altitudes above 2 000 ft must be redu ced by 4 percent for each 1 000 ft above sea level For installations below 2000 ft refer to the unit rating plate For installation...

Page 35: ...lve 5 Set temperature rise The furnace must operate within the temperature rise ranges specified on the furnace rating plate Do not exceed temperature rise range specified on unit rating plate Determine the temperature rise as fol lows NOTE Blower access door must be installed when taking temperature rise reading Leaving blower access door off will result in incorrect temperature measurements a Pl...

Page 36: ...36 A08411 Fig 46 Wiring Diagram PG8J M ...

Page 37: ... the midpoint of rise range or slightly above CAUTION 7 Adjust blower off delay The blower off delay has 4 ad justable settings from 90 sec to 180 sec The blower off delay jumpers are located on the furnace control board See Fig 25 To change the blower off delay setting move the jumper from one set of pins on the control to the pins used for the selected blower off delay Factory off delay setting ...

Page 38: ...minutes determine reason draft safeguard switch did not function properly and correct condition f Remove blockage from furnace vent elbow g Switch will auto reset when it cools h Re install vent connector NOTE Should switch remain open longer than 3 minutes furnace control board will lockout the furnace for 3 hrs To reset furnace control board turn thermostat below room temperature or from HEAT to...

Page 39: ...50 43 3 7 43 3 8 42 3 2 42 3 3 875 43 3 5 43 3 6 43 3 7 43 3 8 900 43 3 3 43 3 4 43 3 5 43 3 6 925 43 3 1 43 3 2 43 3 3 43 3 4 950 43 2 9 43 3 0 43 3 1 43 3 2 975 43 2 8 43 2 9 43 3 0 43 3 1 1000 43 2 6 43 2 7 43 2 8 43 2 9 ALTITUDE RANGE FT AVG GAS HEAT VALUE BTU CU FT SPECIFIC GRAVITY OF NATURAL GAS 0 58 0 60 0 62 0 64 Orifice No Manifold Pressure Orifice No Manifold Pressure Orifice No Manifold...

Page 40: ... 43 3 5 725 43 2 9 43 3 0 43 3 1 43 3 2 750 43 2 7 43 2 8 43 2 9 43 3 0 775 43 2 6 43 2 7 43 2 7 43 2 8 800 43 2 4 43 2 5 43 2 6 43 2 7 825 43 2 3 43 2 3 43 2 4 43 2 5 850 43 2 1 43 2 2 43 2 3 43 2 4 ALTITUDE RANGE FT AVG GAS HEAT VALUE AT ALTI TUDE BTU CU FT SPECIFIC GRAVITY OF NATURAL GAS 0 58 0 60 0 62 0 64 Orifice No Manifold Pressure Orifice No Manifold Pressure Orifice No Manifold Pressure O...

Page 41: ...T ALTITUDE BTU CU FT SPECIFIC GRAVITY OF NATURAL GAS 0 58 0 60 0 62 0 64 Orifice No Manifold Pressure Orifice No Manifold Pressure Orifice No Manifold Pressure Orifice No Manifold Pressure U S A Only 9001 to 10 000 600 43 2 7 43 2 8 43 2 9 43 3 0 625 43 2 5 43 2 6 43 2 6 43 2 7 650 43 2 3 43 2 4 43 2 4 43 2 5 675 43 2 1 43 2 2 43 2 3 43 2 3 700 48 3 7 43 2 0 43 2 1 43 2 2 725 48 3 5 48 3 6 48 3 7 ...

Page 42: ... 3 7 43 3 8 42 3 2 850 43 3 3 43 3 5 43 3 6 43 3 7 875 43 3 2 43 3 3 43 3 4 43 3 5 900 43 3 0 43 3 1 43 3 2 43 3 3 925 43 2 8 43 2 9 43 3 0 43 3 1 950 43 2 7 43 2 8 43 2 9 43 2 9 975 43 2 5 43 2 6 43 2 7 43 2 8 1000 43 2 4 43 2 5 43 2 6 43 2 7 ALTITUDE RANGE FT SPECIFIC GRAVITY OF NATURAL GAS AVG GAS HEAT VALUE BTU CU FT 0 58 0 60 0 62 0 64 Orifice No Manifold Pressure Orifice No Manifold Pressure...

Page 43: ...1 43 3 2 725 43 2 7 43 2 8 43 2 9 43 2 9 750 43 2 5 43 2 6 43 2 7 43 2 8 775 43 2 3 43 2 4 43 2 5 43 2 6 800 43 2 2 43 2 3 43 2 3 43 2 4 825 43 2 1 43 2 1 43 2 2 43 2 3 850 48 3 7 43 2 0 43 2 1 43 2 1 ALTITUDE RANGE FT AVG GAS HEAT VALUE AT ALTI TUDE BTU CU FT SPECIFIC GRAVITY OF NATURAL GAS 0 58 0 60 0 62 0 64 Orifice No Manifold Pressure Orifice No Manifold Pressure Orifice No Manifold Pressure ...

Page 44: ...h stuck closed 24 SECONDARY VOLTAGE FUSE IS OPEN Check for Short circuit in secondary voltage 24VAC wiring If status code recall is needed briefly remove then reconnect one main limit wire to display stored status code On REDLEDboards do not remove power or blower door before initiating status code recall After status code recall is completed component test will occur 327596 101 REV B 31 PRESSURE ...

Page 45: ...hen fuse needs to be replaced Proper instrumentation is required to service electrical controls The control in this furnace is equipped with a Status Code LED Light Emitting Diode to aid in installation servicing and troubleshooting It can be viewed through the sight glass in blower access door The furnace control LED is either ON continuously rapid flashing or a code composed of 2 digits The firs...

Page 46: ...N Media cabinet filter procedures NOTE Media cabinet or 1 in filter rack are accessories and are not included from the factory with standard furnace model 1 Turn off electrical supply to furnace before removing filter access door 2 Remove filter cabinet door 3 Slide filter out of cabinet 4 If equipped with permanent washable 1 inch filter clean filter by spraying cold tap water through filter in o...

Page 47: ...s shown at the bottom of the SERVICE label located on the front of blower access door d Verify blower is rotating in the correct direction ELECTRICAL SHOCK HAZARD Failure to follow this warning could result in personal injury or death Blower access door switch opens 115 v power to furnace control No component operation can occur unless switch is closed Exercise caution to avoid electrical shock fr...

Page 48: ...ed to clean 2 lower passes of cell in same manner as upper pass 5 Repeat foregoing procedures until each cell in furnace has been cleaned 6 Using vacuum cleaner remove residue from each cell 7 Using vacuum cleaner with soft brush attachment clean burner assembly 8 Clean flame sensor with fine steel wool 9 Install NOx baffles if removed 10 Reinstall burner assembly Center burners in cell openings 1...

Page 49: ...PU will lock out of Gas Heating mode and operate the inducer motor IDM until flame is no longer proved e Blower On Delay If the burner flame is proven the blower motor is energized on HEAT speed 25 sec after the gas valve GV is energized Simultaneously the electronic air cleaner terminal EAC 1 is energized and remains energized as long as the blower motor BLWM is energized f Blower Off Delay When ...

Page 50: ...bleshooting Refer to the service label See Fig 50 Service Label The Troubleshooting Guide can be a useful tool in isolating furnace operation problems Beginning with the word Start answer each question and follow the appropriate arrow to the next item The Guide will help to identify the problem or failed component After replacing any component verify correct operation sequence PG8J M ...

Page 51: ... component test sequence The inducer will start and run for the entire component test The HSI blower motor FAN speed AMBER LED boards only HEAT speed and COOL speed will run for 10 15 seconds each Gas valve and humidifier will not be turned on Was there a previous status code other than 11 Is door switch closed Is there 115V going to switch Replace door switch Replace transformer Does the control ...

Page 52: ...the trial for ignition period the control will repeat the ignition sequence 3 more times before lockout 14 occurs If flame signal is lost during the blower on delay period blower will come on for the selected blower off delay Check the following items first before proceeding to the next step Gas valve turned off Manual shut off valve Green Yellow wire MUST be connected to furnace sheet metal Flame...

Reviews: