


PAGE 2
Wiring
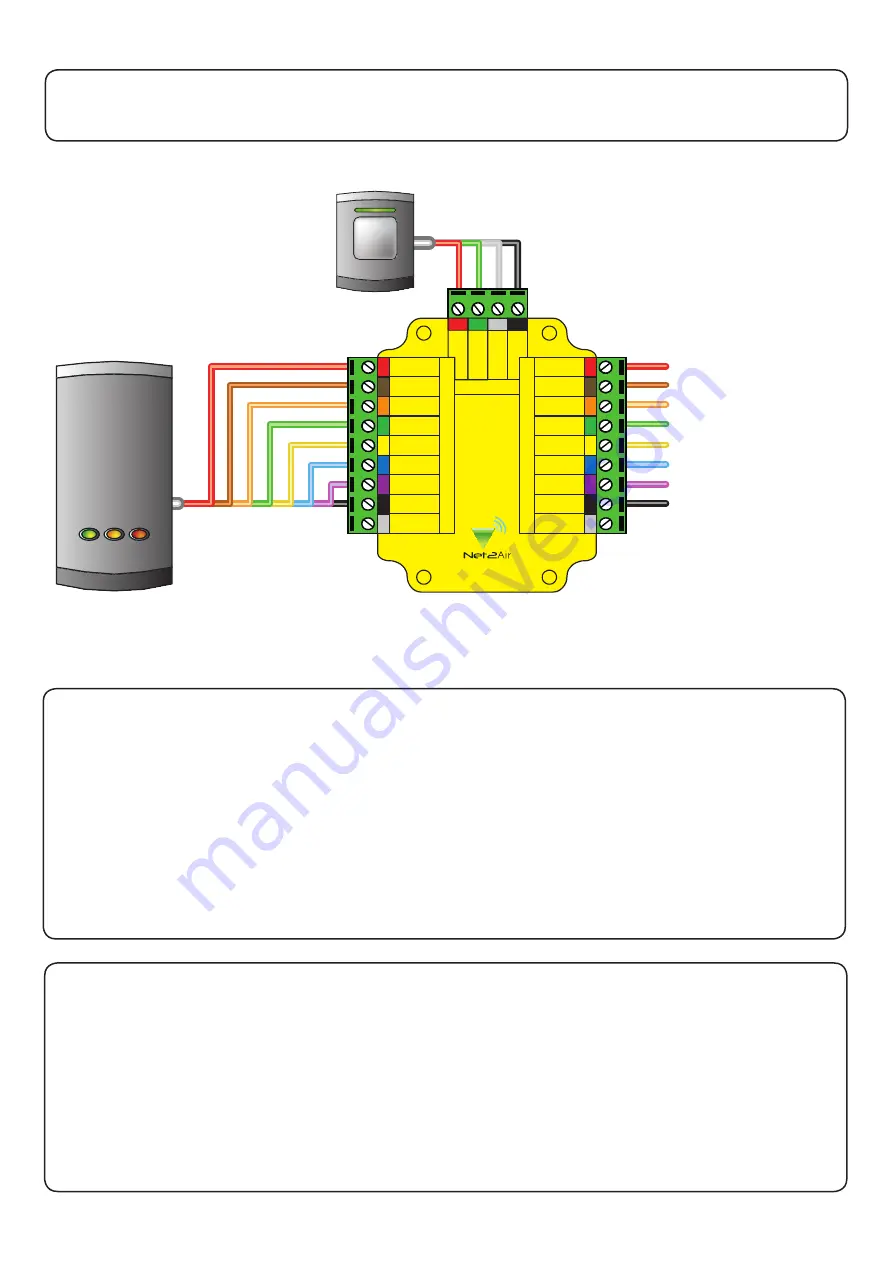
12V
Red LED
Amber LED
Green LED
Data/D0
Clock/D1
Media detect
Entry
0V
Reader
Entry confirm
12V
Red LED
Amber LED
Green LED
Data/D0
Clock/D1
Media detect
Entry
0V
Net2 C
on
tr
ol Unit
0V
Exit/En
tr
y
Gr
een LED
12V
Net2Air Interface
Entry confirmation button
(optional)
Input terminal
(FOR FUTURE USE)
Readers can be extended using Belden CR9540 10-core overall screened cable to a maximum of 100 metres.
Cable extensions
Using an entry confirmation button
Where two door readers may pick up the same hands free token, a push to make button can be used to confirm
an entry request for the specific door. Where fitted, the button LED will flash for 5 seconds after the hands free
token has been recognised and must be pressed to unlock the door.
Configuration
Firmware download
Hands free firmware for the P series reader will be downloaded from the interface to the reader as soon as it is
powered up. This is indicated by flashing amber and red LED's on the reader. Once complete all LED's will be lit.
This may take up to 10 minutes to complete. Do NOT disconnect power during the firmware update.
If the firmware update is still taking place after 10 minutes then remove and then re-connect the ACU cable.
Listen to the reader, the reader should NOT beep. If the reader beeps within approximately 10 seconds of power
up it will not take the firmware update. Repeat the process until the reader does NOT 'beep' on power up. Then
leave for 10 mins to allow the update to take place.
To enable the use of an entry confirmation button do the following steps:
1. Power down the interface board
2. Power up the interface board
3. Press and hold the entry confirmation button for a minumum of 3 seconds within 60 seconds of power up.
To disable the use of the button, repeat the above process.
*
+12V DC
Red LED
Amber LED
Green LED
Data 1
Data 0
Not required
0V
*


