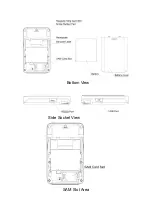
PAX D200 User Manual Download Page 3

2.


Installation 

1)


SAM Card Installation


Open up battery cover, which is at the bottom of the terminal; 


Take out battery; 


Insert SAM card to corresponding SAM card slot. 

2)


Battery Installation


Hold the battery with its facing up; 


Attach battery forelock to battery bayonet; 


Press down the other side of the battery 

3. Instruction 

1


Power ON/OFF 

Power on: Insert power adapter or insert the battery, Press 

  button for 3 seconds until LED 

backlight  is  on.  If  POS  terminal  is  being  turned  on  successfully,  PAX  LOGO  can  be  seen  and   
‘Di’    from the buzzer can be heard. 

Power off: Press 

  button for 3 seconds until Shutting down... can be seen. POS terminal is 

being turned off. 

2


Magnetic Stripe Card 

When  user  swipes  magnetic  stripe  card  along  the  slot,  the  backside  of  card,  which  contains 

magnetic strip information, should be facing to the terminal. Bi-directional swiping is supported. It 

is recommended to swipe starting from the top of the terminal to the bottom of the terminal with a 

constant moving speed. 

3


IC card 

When  user  insert  IC  card  into  the  IC  slot,  the  chip  of  IC  card  should  be  facing  up;  user  is 

recommended to gently insert the card, in order to avoid any physical damage to the card or the IC 

slot of the terminal. If IC card is successfully read by the terminal, the IC card icon will be shown 

on LCD display screen. 


4. Specifications 

Default


Contactless Card Reader 

CPU

  32-bit

MIPS 

Memory

32MB SDRAM , 32MB NOR Flash 

Display

2.4 -inch 240x320 pixel color TFT    LCD

LED backlight


Keypad

10 alphanumeric keys, 5 functional keys

touch key; 

Magnetic Card    Reader 

Track 1/2/3

bi-directional swipe 

IC Card Reader

1 user card 

EMV2000


SAM slots

SAM slot

Communication

Bluetooth, WIFI 

Peripheral Ports:    1 Micro USB(Device) 


      1 Mini USB(RS232) 

Power Supply

Input

100—240VAC ~0.2A 50/60HZ 

              Output

5V DC 1A 

Battery

Li-on bttery,1900mAh,3.7V 

Working Environment

  Temperature

~50

(32

~122

Summary of Contents for D200

Page 1: ...D200 Wireless POS Terminal 1 Production Description TOP View ...

Page 2: ...Bottom View Side Socket View SAM Slot Area ...

Page 3: ...Bi directional swiping is supported It is recommended to swipe starting from the top of the terminal to the bottom of the terminal with a constant moving speed 3 IC card When user insert IC card into the IC slot the chip of IC card should be facing up user is recommended to gently insert the card in order to avoid any physical damage to the card or the IC slot of the terminal If IC card is success...

Page 4: ...he terminal is defective please contact professional POS repair technicians 7 When installing paper roll please be aware of the cutter within paper bracket 8 When D200 power supplied by the USB port of PC we don t recommend the use of CTLS function 9 When charged by the USB port of PC charge time will be long we recommend charging using the adapter 6 Battery Usage Tips 1 Charge indoor by PAX charg...

Page 5: ...hnician for help FCC Note Caution Changes or modifications not expressly approved by the party responsible for compliance could void the user s authority to operate the equipment 8 RF Exposure Information SAR This phone is designed and manufactured not to exceed the emission limits for exposure to radio frequency RF energy set by the Federal Communications Commission of the United States During SA...

Page 6: ... SAR levels of various phones and at various positions they all meet the government requirements SAR compliance for body worn operation is based on a separation distance of 0 mm between the unit and the human body Carry this device at least 0 mm away from your body to ensure RF exposure level compliant or lower to the reported level To support body worn operation choose the belt clips or holsters ...

Reviews: