Contents Checklist
Please check the components after unpacking. If any one of them is
missing, or if there is a page missing from the product manual,ect.,
please contact the dealer.
USB Cable
D135 Secure Card Reader
1. Power indicator
2. Power button
3. Magnetic stripe card reader (optional)
4. Contactless transaction indicator and
status indicator
5. Smart card reader
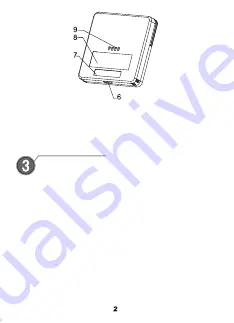
6. USB port
7. Serial number
8. Nameplate
9. Charging and communication contacts
1) Turn the D135 on.
2) Connect the phone, tablet, or other external device to the
D135 with the provided USB cable.
3) In the POS app on the external device, input sale details
and follow the app's prompts to set up payment.
4) Insert, tap, or swipe the card when the POS app prompts
for card reading on the D135 device.
5) Input PIN or signature on the phone, tablet, or other
external POS device.
6) Finish the transaction.
3.1 Connect to external device via USB Cable
3.2
Bluetooth
® wireless technology Connection
1)
2)
3)
Turn the D135 on.
Go to your phone, tablet, or other external device's settings
and scan for the D135 signal. By default, the D135's device
name is PAX D135_XXXX, with XXXX standing for the last
4 letters of the MAC address of the D135. Please note that
the device name may be modified according to user
requirements.
Pair the mobile equipment with the D135. During the pairing,
the external device may prompt for a confirmation passkey. In
such cases, enter the passkey and click OK to confirm.
4) In the POS app on the external device, input sale details and
follow the app's prompts to set up payment.
5) The POS app will prompt for reading card on the D135. Insert,
swipe, or hold card up to device.
6) Input PIN or signature on the phone, tablet, or other external
POS device.
7) Finish the transaction.
4.1 Switch the device on / off
Power on:
Press and hold the power button until the device
beeps, then release to power on the terminal.
Power off:
Press and hold the power button. When four
colored lights flash at the same time, the shutdown is complete
and the power button can be released.
4.2 Swiping Magnetic Stripe Card
Figure 4. Insert smart card
Quick Setup Guide
Product Description
Figure 1. Front view
Figure 2. Back view
Quick Start
Instructions
Pay attention to the track position of the magnetic stripe card. Make
sure to swipe the card smoothly at a constant speed in the direction
as shown in the figure.
Figure 3.Swipe magnetic stripe card
4.3 Reading smart card
When inserting smart card into the smart card slot, the EMV chip
must be facing up. In order to avoid any physical damage to the
card or the smart card slot of the terminal, it is recommended to
insert the card gently.
PAX TECHNOLOGY INC.
PAX TECHNOLOGY INC.
The following sections cover D135 communications.
The following sections cover basic operating instructions.


