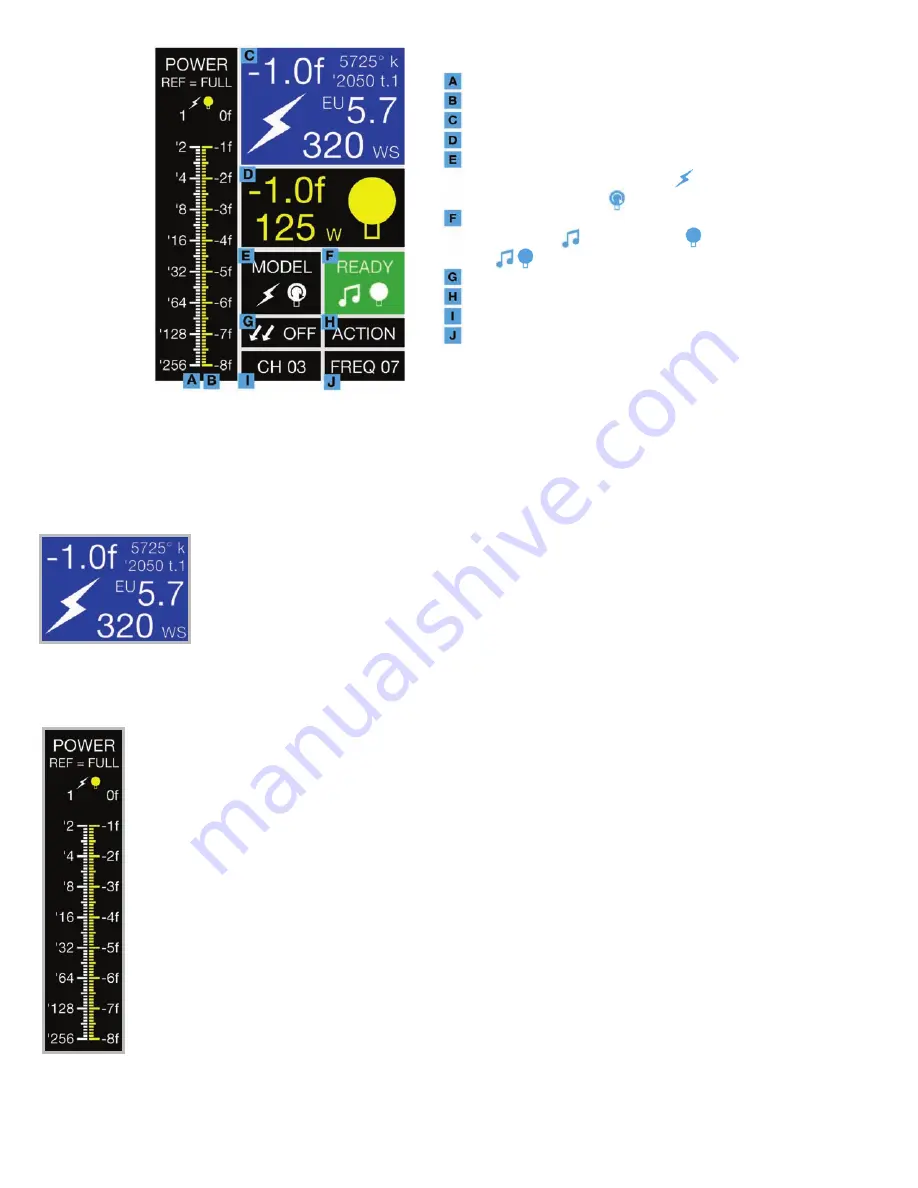
Flashpower Bargraph
(Full to 1/256 power)
Modeling Lamp Bargraph
(0 to -8f)
Flash Adjustment Screen
Model Adjustment Screen
Model Lamp Mode Screen
Full Power
ON
Tracks Flashpower
Independently Adjustable
Off
OFF
Recycle / Ready Indicator Screen
Audible Indicator
Visual Indicator
Both
Neither
OFF
Slave Eye Status Screen
(slave on or off)
Action / Color Mode Screen
Remote Channel
(channel 01 - 16)
Remote Frequency
(frequency 01 - 16)
unison. If you press the
Test Button
at any power, the unit should flash and the modeling
lamp should dim. Then, when the unit is recycled, the modeling lamp will return on and the
audible recycle indicator beep will sound.
The same should happen if the
Sync Jack
is connected to your camera via sync cord to
your camera’s PC jack or Hot Shoe Adapter (see
Camera Sync
, page 8; see also
Cyber-
Sync
TM
/ Cyber Commander™ Radio Remote
).
DEFAULT-TO-FLASH SCREEN:
Einstein™ defaults automatically to the
Flash Adjust-
ment Screen
after a few seconds following any setup changes; this is the screen with the
flash icon, highlighted in blue in the LCD screen diagram example (above). Power adjust-
ment is performed by operating the Adjust Buttons. Notice as you change the flashpower
with these buttons, the blue-highlighted screen will display the current flashpower relative
to Full Power (-1.0f in this example), the color temperature (5725K in this example), the t.1
flash duration (1/2050 second in this example), the EU Number (5.7 in this example), and
the WS (320WS in this example).
Since the modeling lamp was set to track the flashpower by the Easy Set Button, the
Model
Adjustment Screen
will also change (-1.0f and 125W in this example).
ATTACHING LIGHT MODIFIERS:
Light modifiers may be attached to Einstein™ via two
mechanisms: the
Umbrella Holder
or the front Reflector / Softbox Attachment Mechanism -
the
Holding Fingers
and
Quick-Release Levers
. The umbrella tube runs the entire length
of the top of the unit. It holds standard umbrella shafts up to 0.350” diameter, accommodat-
ing shafts 9mm and smaller. The Umbrella Holder tightening knob secures the umbrella in
the desired position. Reflectors, softboxes and similar accessories use the standard AB /
WL / Balcar mount, and are held securely by the Holding Fingers. Quick-Release Levers
are spring loaded and accessible from either side of the unit. Einstein™ mounts all acces-
sories that fit previous Paul C. Buff, Inc.™ lights except the obsolete WL130, WL5,000 and
WL10,000 models.
When mounting accessories to the face plate, be sure all four Holding
Fingers are within the opening and that the Quick-Release Levers have returned firmly to
the open position. Failure to do so can result in the unintended release of the modifier from
the light.
MICRO SD CARD SLOT:
Firmware updates can be downloaded and installed via a standard
Micro SD Card plugged into this slot.
3
Flash (left) and Modeling
(right) Bargraphs
Flash Adjustment screen


