background image


6

SmartNode 4520 and 4110 Quick Start Guide


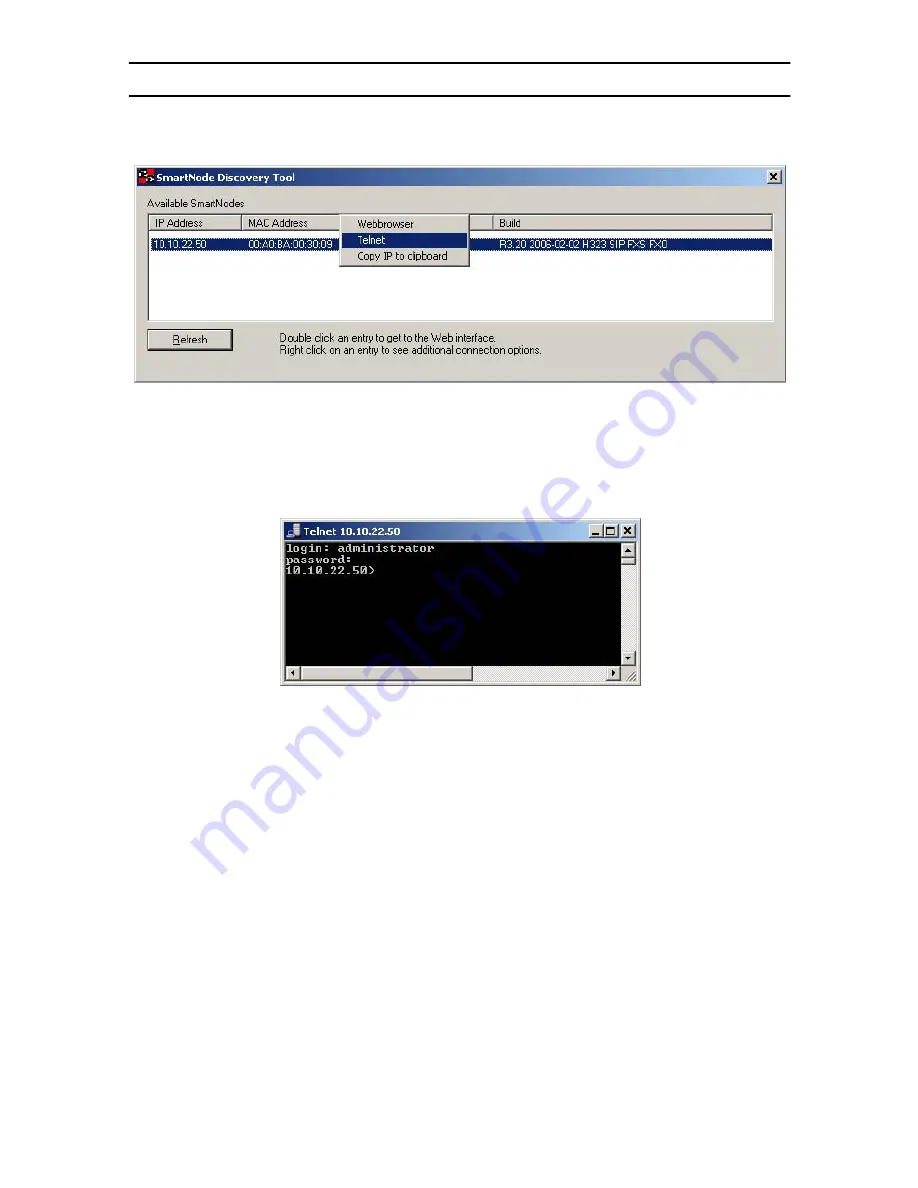
4.0  Access the Command Line Interface


   1.

In the Discovery Tool window, select the IP address of your SmartNode. 

   2.

Right-click the selected line, and select 


Telnet


.

   3.

In the telnet window, enter the username 


administrator


. At the password 

prompt simply press the 


enter


 key. The SmartNode will respond by display-

ing its IP address as the command line prompt.

   4.

After you log in your SmartNode will be running in operator execution 

mode (indicated by > character in the command line prompt). To enter con-

figuration mode, use the commands enable and configure. 


 10.10.22.50>


enable


 10.10.22.50#


configure


 10.10.22.50(cfg)#


You may now start to configure the SmartNode from scratch using the CLI com-

mands, but we recommend that you start your configuration from a template. See 

section 

5.0 “Download a configuration example, adapt it to your network, and 

load it onto the SmartNode” 

on page 7 for further details.

For a detailed description of the CLI refer to the 


SmartWare Software Configura-

tion Guide


 (SCG) available on the CD-ROM and online at 

www.patton.com/voip

.

www.voipon.co.uk    [email protected]    Tel: +44 (0)1245 808195    Fax: +44 (0)1245 600030

Summary of Contents for SmartNode 4520 Series

Page 1: ...tato approvato per collegamento alla rete di telecomunicazion pubblica Aprobaci n Los modelos que se equipan los interfaces de FXO se han aprobado para la conexi n a la red de telecomunicaci n p blica...

Page 2: ...ible and protected by a circuit breaker The smartNode is not shipped with power cables For AC powered units ensure that the power cable used meets all applicable standards for the country in which it...

Page 3: ...ure 1 Connecting the SmartNode to your PC through a hub or switch Figure 2 Connecting the SmartNode directly to your PC Option 2 Connect directly to a PC SN4520 only LAN interface ETH0 1 is configured...

Page 4: ...and click on Properties to open the Internet Protocol TCP IP Properties window see figure 4 4 Select Obtain an IP address automatically and Obtain DNS server address automatically options 5 Click OK...

Page 5: ...e CD included with your SmartNode into the CD drive on your PC 2 Copy the file named SNDiscovery exe from the CD to your PC 3 At your PC double click the SNDiscovery exe file name to activate the tool...

Page 6: ...by character in the command line prompt To enter con figuration mode use the commands enable and configure 10 10 22 50 enable 10 10 22 50 configure 10 10 22 50 cfg You may now start to configure the...

Page 7: ...If your application is unique and not covered by any of Patton s configura tion templates you can manually configure the SmartNode instead of load ing a configuration file template In that case refer...

Page 8: ...on com with a VoIP SIP client Online support www patton com E mail support support patton com answered within 1 business day Telephone support Standard 1 301 975 1007 USA Monday Friday 8 00 am to 5 00...

Page 9: ...for a Class B computing device in accordance with specifications in Subpart B of Part 15 of FCC rules which are designed to provide reasonable protection from such inter ference in a commercial instal...

Page 10: ...the problem is resolved Connection to party line service is subject to state tariffs Contact the state public utility commission public service commission or corporation commission for information C 4...

Page 11: ...The signed Declaration of Conformity can be downloaded from www patton com certifications C 6 Approval Models that are equipped with FXO ports have been approved for connection to the public telecomm...

Page 12: ...ors that may appear in this document Trademarks statement The term SmartNode is a trademark of Patton Electronics Company All other trademarks presented in this document are the property of their resp...

Reviews: