background image

Connecting the Line Interface

24

CopperLink CL1211E/CL1212E User Manual 

2


• Installation

RJ-45 (see section 

“Connecting the RJ-45 Line Interface”

)

Terminal block (see section 

“Connecting the Terminal Block Line Interface”

 on page 24)

Note

The CL1200E units work in pairs. The CL1200E/L connects to the 


CL1200E/R.

Note

Actual distance and link performance may vary depending on the environ-
ment and type/gauge of wire used.

Connecting the RJ-45 Line Interface

Do the following to connect the 

Line

 interface.

1.

To function properly, the two CL1200Es must be connected together using twisted-pair, unconditioned, 
dry, metal wire, between 19 (0.9mm) and 26 AWG (0.4mm). Leased circuits that run through signal 
equalization equipment are not acceptable.

2.

The CL1200E is equipped with an RJ-45 interface jack (see 

figure 2

 on page 15) 

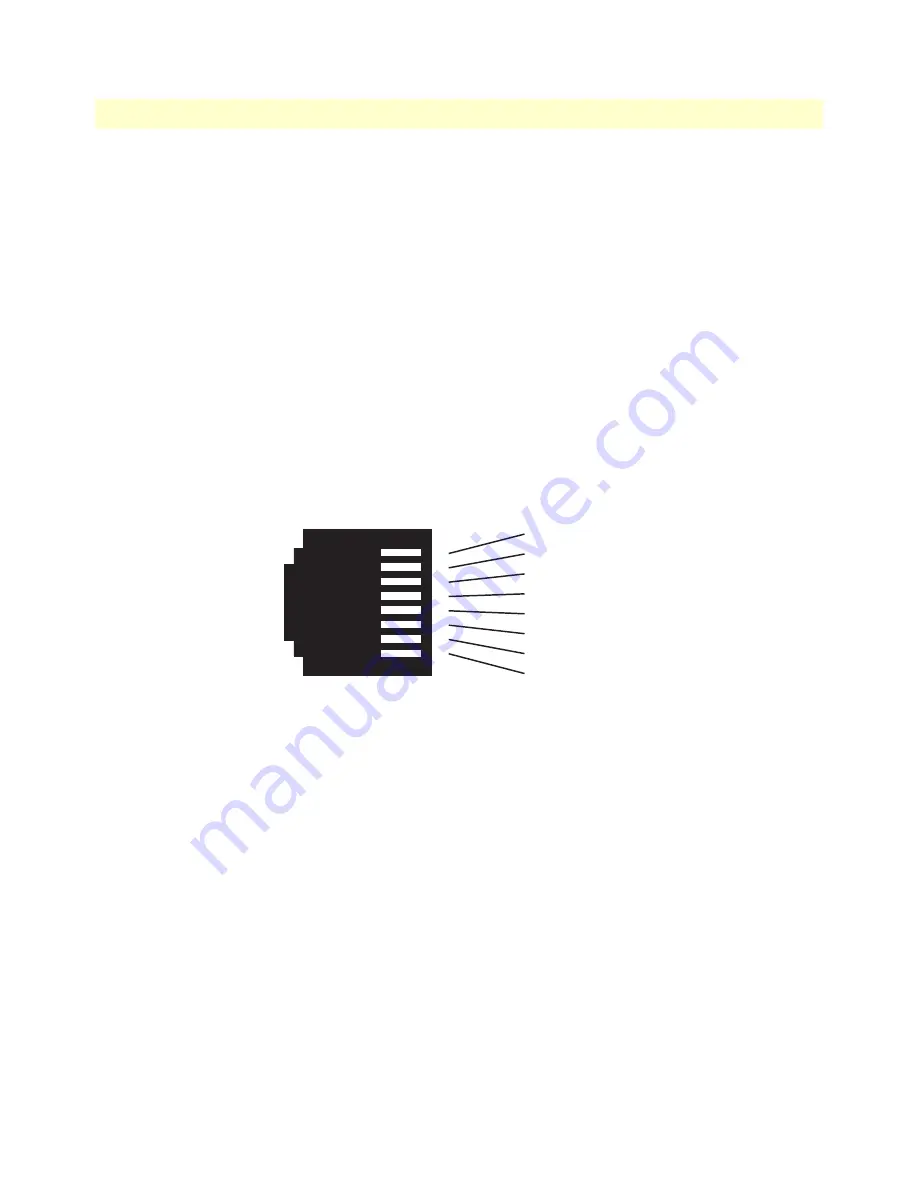
Figure 12. RJ-45 pin-out

3.

The RJ-45 connector on the CL1200E’s twisted pair interface is polarity insensitive and is wired for a two-
wire interface. The signal/pin relationship is shown in (see 

figure 12

).

Connecting the Terminal Block Line Interface

Do the following to connect the 

Line

 interface:

1.

To function properly, the two CL1200Es must be connected together using twisted-pair, unconditioned, 
dry, metal wire, between 19 (0.9mm) and 26 AWG (0.4mm). Leased circuits that run through signal 
equalization equipment are not acceptable.

2.

The CL1200E is equipped with a terminal block (see 

figure 13

)

1 (no connection)

2 (no connection)

3 (no connection)

4 (RING)

5 (TIP)

6 (no connection)

7 (no connection)

8 (no connection)

1
2
3
4
5
6
7
8

Summary of Contents for CopperLink CL1211E

Page 1: ...ender User Manual Sales Office 1 301 975 1000 Technical Support 1 301 975 1007 E mail support patton com WWW www patton com Part Number 07MCL1211E CL1212E UM Rev G Revised March 11 2020 This is a Clas...

Page 2: ...be free from defects and will at our option repair or replace the product should it fail within one year from the first date of the shipment This warranty is limited to defects in workmanship or mater...

Page 3: ...on 12 2 Installation 16 3 Configuration 27 4 Operation 32 5 Contacting Patton for assistance 34 A Compliance Information 37 B Specifications 40 C Factory Replacement Parts and Accessories 42 D Interfa...

Page 4: ...Mounting Plate Installation Kit INS KIT MNTPLATE 23 Connecting the Line Interface 23 Connecting the RJ 45 Line Interface 24 Connecting the Terminal Block Line Interface 24 Connecting the 10 100Base T...

Page 5: ...Representative 39 Service 39 B Specifications 40 Line Connector 41 LAN Connectors 41 Transmission Line 41 LED Status Indicators 41 Power Supply 41 Physical 41 Operating Temperature Range 41 Humidity 4...

Page 6: ...nstalling the mounting ears 22 10 Installing the rear panel 22 11 Installing the mounting plate 23 12 RJ 45 pin out 24 13 CL1200E terminal block twisted pair line interface 25 14 CL1212E 10 100Base T...

Page 7: ...mote Unit Configuration 30 3 Symmetric Asymmetric Selection Chart 30 4 Signal to Noise Ratio 31 5 Front panel LED description 33 6 Line Rate Reach Chart Using Twisted Pair Long Range 48 7 Line Rate Re...

Page 8: ...Chapter 3 on page 27 provides information about the CL1211E CL1212E configuration Chapter 4 on page 32 provides information about the CL1211E CL1212E operation Chapter 5 on page 34 describes how to co...

Page 9: ...n The alert symbol and CAUTION heading indicate a potential hazard Strictly follow the instructions to avoid property dam age The shock hazard symbol and CAUTION heading indicate a potential electric...

Page 10: ...ich have 3 conductor power plugs L1 L2 GND or Hot Neutral Safety Protective Ground the wall outlet or socket must have an earth ground For DC powered devices ensure that the interconnecting cables are...

Page 11: ...c printed cir cuit cards are improperly handled and can result in complete or intermittent failures Do the following to prevent ESD Always follow ESD prevention procedures when removing and replacing...

Page 12: ...12 Chapter 1 General information Chapter contents Overview 13 Features 13 Description 13 Front panel description 15...

Page 13: ...ote Ethernet 0 and 1 Eth 0 and Eth 1 and Ethernet Link Activity 4 to 158 F 20 to 70 C operating temperature optional conformal coating for protection against con densing humidity and corrosion Descrip...

Page 14: ...User Manual 1 General information Figure 1 Typical applications The pair of CL1200E models work together to create a transparent extension between two peered Ethernet LANs using twisted pair 2 wire or...

Page 15: ...for two four six or eight wires pin out to TIA EIA T568A B see section RJ 45 on page 46 for more information Terminal Block Interface for a single pair of wires 16 28 AWG see section Terminal Block on...

Page 16: ...ount Adjustable Depth 35MM DIN Rail Kit NS 1001R 19ADJDIN 20 Installing the Mounting Ears Installation Kit INS KIT MNTEARS 21 Installing the Mounting Plate Installation Kit INS KIT MNTPLATE 23 Connect...

Page 17: ...h the CL1200E DIN Rail Installation Kit 35MM see section Installing the DIN Rail Installation Kit 35MM INS A DIN 35 19 Rackmount Adjustable Depth 35MM DIN Rail Kit see section Installing the 19 Rackmo...

Page 18: ...r panel 2 Install the 35mm DIN clip onto the rear panel using the self tapping screws included in the installation kit package as shown in figure 4 Figure 4 Installing the 35 mm DIN clip 3 Install the...

Page 19: ...Manual 2 Installation Figure 5 Installing the rear panel 4 The mounting clip can be attached to the following types of DIN rail see figure 6 Top hat section types NS 35 7 5 35 H 7 5 D mm and NS 35 15...

Page 20: ...l lip fits into the appropriate slot on the 35mm clip see call out 2 on figure 7 The CL1200E has been installed on the DIN rail proceed to section Connecting the Line Interface on page 23 Installing t...

Page 21: ...17 and per form steps 1 through 5 to install the CL1200E onto the rail The CL1200E has been installed on the rack proceed to section Connecting the Line Interface on page 23 Installing the Mounting E...

Page 22: ...ng ear into the top slot closest to the CL1200E back panel as shown in figure 9 3 Slide the remaining mounting ear into the bottom slot closest to the CL1200E right side panel see figure 9 4 Install t...

Page 23: ...l the mounting plate onto the CL1200E enclosure using the screws removed in step 1 as shown in figure 11 3 Place the CL1200E at the desired location and install it using hardware appropriate for the t...

Page 24: ...that run through signal equalization equipment are not acceptable 2 The CL1200E is equipped with an RJ 45 interface jack see figure 2 on page 15 Figure 12 RJ 45 pin out 3 The RJ 45 connector on the C...

Page 25: ...T interfaces These ports are designed to connect directly to a 10 100Base T device or network Figure 14 shows the signal pin relationships on this interface You may connect this port to a hub or PC u...

Page 26: ...via the power supply jack to the CL1212 must meet the following requirements DC power supplied must be regulated 5 VDC 5 1 0A minimum Center pin is 5 V The barrel type plug has 2 5 5 5 10mm I D O D S...

Page 27: ...ion 28 Accessing DIP Switch S1 28 Configuring the DIP Switch 30 Switch S1 1 Local Remote Configuration 30 Switches S1 2 and S1 3 Symmetric Asymmetric Operation 30 Switch S1 5 General Protection Signal...

Page 28: ...itch locations and explains the different configurations Accessing DIP Switch S1 1 Using a small flat tip screwdriver remove the protective cover located on the right side panel of the CL1200E see fig...

Page 29: ...Accessing DIP Switch S1 29 CopperLink CL1211E CL1212E User Manual 3 Configuration Figure 16 DIP switch S1 orientation...

Page 30: ...Use switches S1 2 and S1 3 to configure the line rate type and operation Note See Appendix E Line Rate Reach Chart on page 47 for line rate dis tances Table 1 S1 Summary Position Description S1 1 Loca...

Page 31: ...nfigure line noise protection 6dB Original line noise protection with 6dB SNR 9dB Better line noise protection with SNR up to 9dB Installing the Protective Cover Install the protective cover that was...

Page 32: ...32 Chapter 4 Operation Chapter contents Introduction 33 Front Panel LED Status Monitors 33...

Page 33: ...remote local setting Figure 17 shows the front panel location of each LED Table 5 on page 33 describes the LED functions Figure 17 CL1212E front panel Table 5 Front panel LED description LED Status D...

Page 34: ...ton for assistance Chapter contents Introduction 35 Contact information 35 Warranty Service and Returned Merchandise Authorizations RMAs 35 Warranty Coverage 35 Out of Warranty Service 35 RMA Numbers...

Page 35: ...EST 1300 to 2200 UTC by calling 1 301 975 1007 Warranty Service and Returned Merchandise Authorizations RMAs Patton Electronics is an ISO 9001 certified manufacturer and our products are carefully tes...

Page 36: ...gineer By sending an e mail to returns patton com All returned units must have the RMA number clearly visible on the outside of the shipping container Please use the original packing material that the...

Page 37: ...rmation Chapter contents Regulatory Information 38 EMC Directive 38 Low Voltage Directive Safety 38 PSTN 38 Radio and TV Interference FCC Part 15 38 CE Declaration of Conformity 38 Authorized European...

Page 38: ...o or television reception which can be determined by disconnecting the unit the user is encouraged to try to correct the interference by one or more of the following measures moving the computing equi...

Page 39: ...1BE UK Service All warranty and non warranty repairs must be returned freight prepaid and insured to Patton Electronics All returns must have a Return Materials Authorization number on the outside of...

Page 40: ...endix B Specifications Chapter contents Line Connector 41 LAN Connectors 41 Transmission Line 41 LED Status Indicators 41 Power Supply 41 Physical 41 Operating Temperature Range 41 Humidity 41 Dimensi...

Page 41: ...l Green R Remote Green Eth Ethernet 0 and 1 Green when linked flashing green when transceiving data Power Supply AC 120 VAC 220 VAC and UI 120 240 VAC DC 12 VDC 24 VDC and 48 VDC 5 VDC Power consumpti...

Page 42: ...42 Appendix C Factory Replacement Parts and Accessories Chapter contents CL1211E CL1212E Factory Replacement Parts and Accessories 43...

Page 43: ...Patton Model Description Base Models 07MCL1212E UM User Manual Power Supplies PS 03671H1 004 100 240 VAC 5 V DC 3 A Wall mount power adapter 12V PSM 12 VDC Input Adapter 24V PSM 24 VDC Input Adapter...

Page 44: ...44 Appendix D Interface Pin Assignment Chapter contents 10 100Base T Interface 45 RJ 45 45 Line Interface 45 RJ 45 45 Terminal Block 46...

Page 45: ...RJ 45 Connector Pin out Line Interface RJ 45 Figure 19 CL1212E RJ 45 Twisted Pair Line Interface Connector Pin out 1 TX RX 2 TX RX 3 RX TX 4 no connection 5 no connection 6 RX TX 7 no connection 8 no...

Page 46: ...Line Interface 46 CopperLink CL1211E CL1212E User Manual D Interface Pin Assignment Terminal Block Figure 20 CL1212E Line Interface Terminal Block Pin out...

Page 47: ...47 Appendix E Line Rate Reach Chart Chapter contents Line Rate Reach Chart Based on 24 AWG 0 5 mm 48...

Page 48: ...Reach Chart Using Twisted Pair Long Range Mode Long Range Distance in Feet Mbps ft m km DS US Asymmetric S1 2 ON S1 3 ON 250 ft 76 m 67 16 1000 ft 305 m 59 16 2 000 ft 610 m 45 11 3 000 ft 914 m 31 5...

Reviews: