background image


4


DiamondLink 3201 & 3241 Quick Start Guide


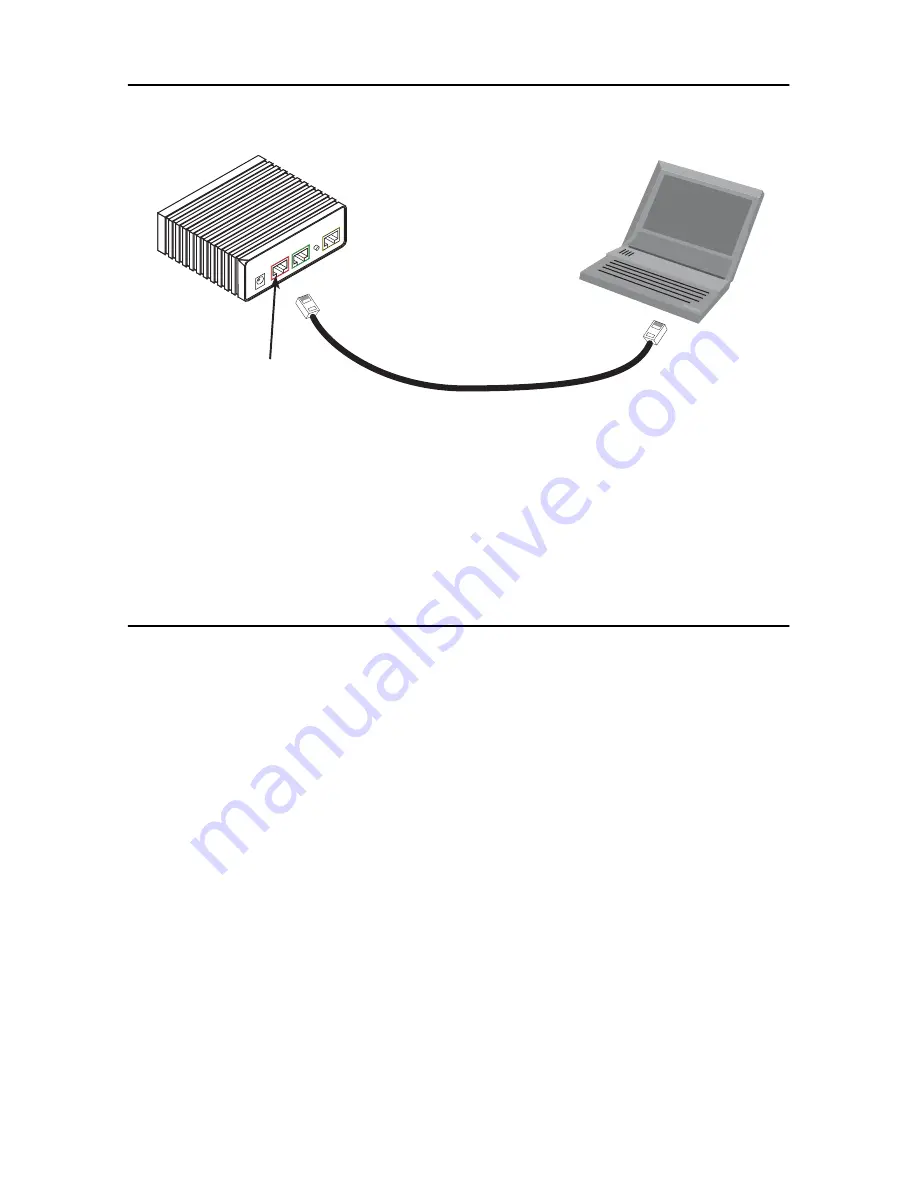
2.1  Connect a PC and log in


   1.


Using the included combination RS232/Ethernet cable and DB9-RJ45 adapter, connect a PC’s serial port 
to the on the DiamondLink’s (red) 


Console


 port (see 


figure 2


). 


Figure 2. 


Connecting DiamondLink to the PC’s serial port


   2.


Start a HyperTerminal session on the PC using the settings:
9600 bps, 8 data bits, 1 stop bit, no parity, no flow control


   3.


Log in to the DiamondLink using the factory-default login and password:


 Login: 


superuser


 Password: superuser
 Login successful


2.2  Modify the IP address


   1.


Display current IP interface settings for the DiamondLink 


Ethernet


 LAN port.


ip list interfaces <enter>


 IP Interfaces:
 ID | Name | IP Address     | DHCP     | Transport
 ---|------|----------------|----------|--------------
 1  | ip1  | 192.168.200.10 | disabled | <bridge>


----------------------------------------------


------


   2.


Modify the IP address for the LAN port according to your network requirements.


ip set interface ip1 ipaddress 10.10.10.5 255.255.255.0 


Note


The above IP address (


10.10.10.5/24) 


is only an example. You must choose an IP address on the same 

subnet as your PC


.


   3.


Verify the new address is correct and save it in system boot memory.


ip list interfaces <enter>


system config save <enter>

Power

Console

Ethernet

Line

MDI-X

Connect to Console port

(red port)

Serial port

PC with

terminal emulator

Summary of Contents for DIAMONDLINK 3201

Page 1: ...for use in a light industrial environment It is not intended nor approved for use in an industrial or residential environment Document Number 03321U7 001 Rev B Part Number 07M3201 QS Revised October 1...

Page 2: ...The mains outlet that is utilized to power the devise shall be within 10 feet 3 meters of the device shall be easily accessible and protected by a circuit breaker If an AC power adapter is used ensure...

Page 3: ...up indication The Power LED blinks as the DiamondLink is powering up When the Power LED stops blinking and remains lit the DiamondLink is ready for you to configure 2 0 Configure the IP address The Di...

Page 4: ...Login successful 2 2 Modify the IP address 1 Display current IP interface settings for the DiamondLink Ethernet LAN port ip list interfaces enter IP Interfaces ID Name IP Address DHCP Transport 1 ip1...

Page 5: ...ping command For example you would ping 10 10 10 5 from your PC 4 0 Log onto the web management interface You will now access the web management Graphical User Interface GUI to configure the DiamondLi...

Page 6: ...nual located on the CD ROM shipped with your Model 3201 or 3241 and available online at www patton com manuals for detailed information about Installing configuring operating and troubleshooting Warra...

Page 7: ...will notify you in advance that temporary discontinuance of service may be required But if advance notice isn t practical the telephone com pany will notify the customer as soon as possible Also you...

Page 8: ...ower utility telephone lines and internal metallic water pipe system are connected together This protection may be particularly important in rural areas B 4 Radio and TV Interference FCC Part 15 This...

Page 9: ...DiamondLink 3201 3241 Quick Start Guide 9 B 6 Authorized European Representative D R M Green European Compliance Services Limited Avalon House Marcham Road Abingdon Oxon OX14 1UD UK...

Page 10: ...demarks presented in this doc ument are the property of their respective owners Warranty Trademark Compliance Information For warranty trademark and compliance information refer to the DiamondLink 320...

Page 11: ...DiamondLink 3201 3241 Quick Start Guide 11...

Page 12: ...12 DiamondLink 3201 3241 Quick Start Guide...

Reviews: