background image

6

Mount Assembly

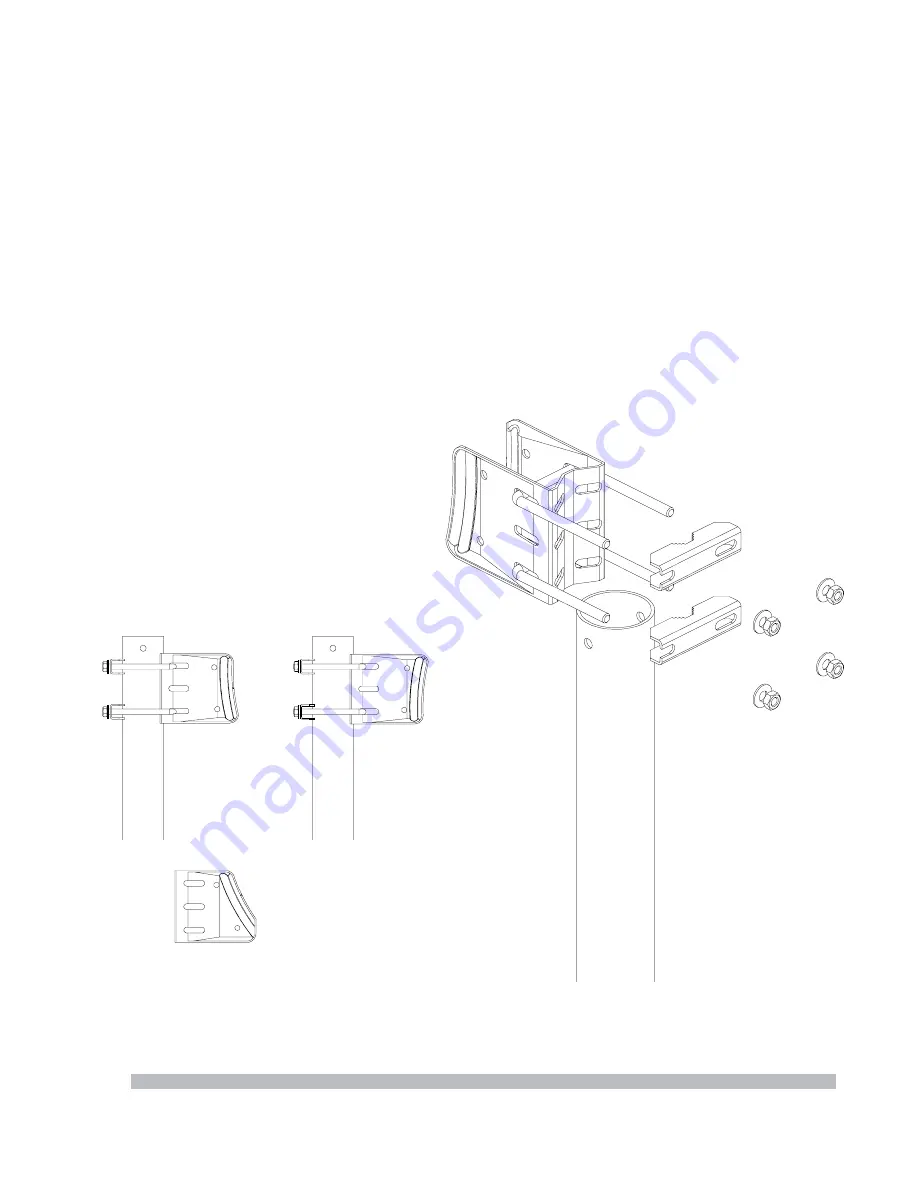
1.  Determine the desired elevation angle required for the satellite of choice.  The standard Az-el
bracket is capable of two ranges of adjustment-

25 to 55 degrees  and 10 to 45 degrees.

NOTE:  The resulting location of the reference notch will read the appropriate scale.

NOTE:  If the desired elevation is between 50 to 85 degrees an optional Az-El bracket must be
used.  Call Patriot Antenna Systems if this was not previously determined upon ordering.

Assemble the Az-El bracket in the proper orientation to the mast pipe using the u-bolts, clamp
brackets and hardware  shown.

25 to 55
degrees

10 to 45
degrees

Optional
50-85deg
bracket

(flipped over)

Summary of Contents for PTX.60

Page 1: ...INSTALLATION ASSEMBLY INSTRUCTIONS PTX Offset Antenna 60 76 90 1 1m ANTENNA SYSTEMS...

Page 2: ...iance with any part of this claim procedure may invalidate this warranty in whole or in part THIS WARRANTY IS EXPRESSLY IN LIEU OF ALL OTHER AGREEMENTS AND WARRANTIES ANY IMPLIED WARRANTY OF MERCHANTA...

Page 3: ...e serial number of the unit on page 2 for future reference and read the warranty information The serial number can be found on the antenna back structure 1 Metric Combination Wrench and socket set thr...

Page 4: ...m 75cm antennas Follow the diagram for assembly and mounting of the Mast assembly 1 Assemble and mark location 2 Drill Anchor hardware holes 3 Anchor with proper hardware not supplied Then level mast...

Page 5: ...5 Mast Assembly for 90cm 110cm antennas Follow the diagram for assembly and mounting of the Mast assembly Support Struts only on 60mm mast 1 Assemble 2 Level 3 Anchor with proper hardware not supplied...

Page 6: ...f the reference notch will read the appropriate scale NOTE If the desired elevation is between 50 to 85 degrees an optional Az El bracket must be used Call Patriot Antenna Systems if this was not prev...

Page 7: ...rame assembly into the Az El bracket as shown using the hardware provided to clamp the back support into its rough elevation setting 2 Assemble the reflector to the Back Frame using hardware from pack...

Page 8: ...r end of the feed support tube NOTE It is important to insert the cable through the tube at this time 2 Pull down on the feed support tube until the arm is locked in place with the plastic insert prop...

Page 9: ...mbly 1 Determine which style feed support arm the dish came with and install per the diagrams shown below Feed or LNBF with 25 or 40mm clamp size DBS plug in style Hole is on top Clamp style Will have...

Page 10: ...connection between ground wire and a ground source should be used Grounding Non Penetrating Mount Frame if applicable 1 Ground the Non Penetrating mount frame The illustration shows a typical groundi...

Page 11: ...overs for Commercial Antennas as well as Home System Keep snow from interfering with your signal Prevent Snow Ice from accumlulating on your system with a De Icing System Complete line of Antenna Cont...

Page 12: ...1 1m Gain Ku 11 7Ghz dBi 35 8 37 1 38 8 40 2 3dB Beamwidth degrees 3 1 2 6 2 0 1 8 Cross Polarization dB 27 27 27 27 Operational Freg range 10 7 to 12 75 typical Mechanical Antenna Size 60cm 76cm 90cn...

Reviews: