- 8 -
1. Connect a suitable adapter (14V 3A) to the DC input of the photo light.
2. Connect the adapter to an appropriate power source.
3. Set the power switch on the photo light to "II".
4. The LCD lights up, the photo light is ready to use.
»
Switch off the photo light
1. Set the power switch to "0".
2. The photo light turns off.
Ź
Using the photo light
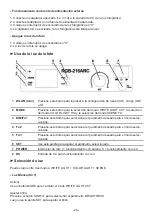
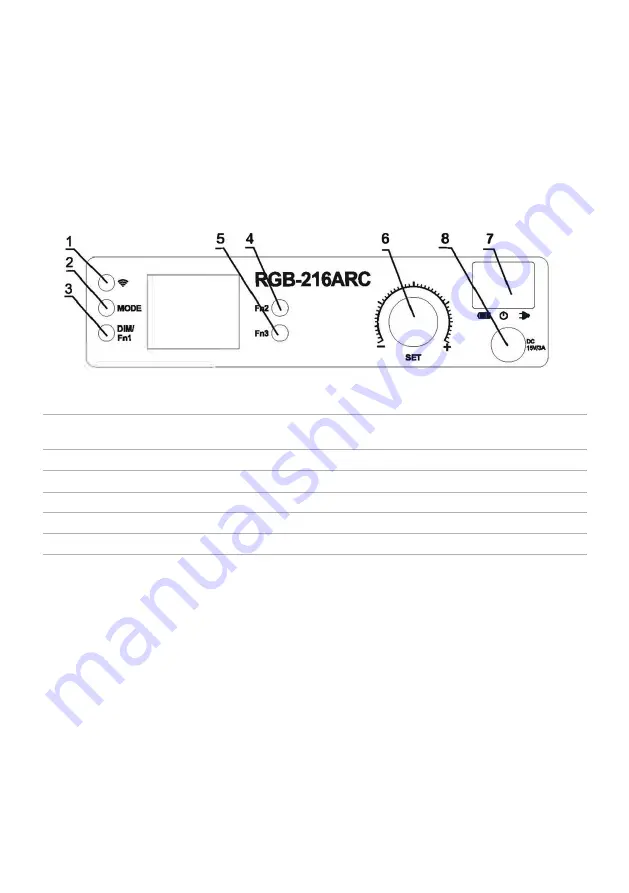
1 WLAN (Icon)
Press this button to enter Channel (CH), Group (GR) and ID settings.
2 MODE
Press this button for WHITE LIGHT CCT mode selection, COLOR LIGHT HSI
mode selection and SCENE FX mode selection.
3 DIM/Fn1
Press this button to select the desired parameter for the selected mode.
4 Fn2
Press this button to select the desired parameter for the selected mode.
5 Fn3
Press this button to select the desired parameter for the selected mode.
6 SET
Use this knob to adjust the selected parameter.
7 POWER
Mains switch: I = battery operation, II = mains operation
8 DC
DC input for mains operation
Ź
Light Selection
You can choose between three modes: WHITE LIGHT > COLOR LIGHT > SCENE.
»
White Light (CCT)
Activate:
Use the MODE button to change the WHITE LIGHT CCT mode.
Adjust brightness:
Press the DIM/Fn1 button to select the BRIGHTNESS parameter.
Then use the SET knob to adjust the brightness.
Set color temperature:
Press the Fn2 button to select the color temperature (COLOR TEMPERATURE) parameter.
Then use the SET knob to adjust the color temperature.
Summary of Contents for RGB-216ARC
Page 1: ......
Page 13: ...12...
Page 43: ...42...
Page 49: ...48...
Page 61: ...60...
Page 62: ...61 SR Photo Video LED 216ARC RGB...
Page 63: ...62 1 2 3 4 5 6 7 8 7 7 COLOR LIGHT SCENE...
Page 64: ...63 95 0 100 120...
Page 65: ...64...
Page 66: ...65...
Page 67: ...66 V...


