Pathport DIN-Mount DMX/RDM Ethernet Gateway
PWPP DIN P1
Manual
03/08/22
© 2022 Acuity Brands, Inc. • One Lithonia Way, Conyers GA 30012
Pathway Connectivity | #103 - 1439 17th Ave SE Calgary, AB Canada T2G 1J9
Phone: + 1 866 617 3074 www.pathwayconnect.com
INSTALLATION
•
Disconnect all power before proceeding with installation.
•
Securely mount DIN rail (if not already installed in an enclosure).
To mount the PWPP DIN P1, hook the upper slots on the back
of the plastic extrusion to the DIN rail and then gently but firmly
press on the bottom front corners of the extrusion to snap the
module onto the rail.
DO NOT press directly
on the PCB card
itself.
•
If the PWPP DIN P1 is using an auxiliary power supply, connect
the power IN terminal block, after checking that polarity is being
observed. The earth ground terminal must be connected to the
enclosure’s chassis or electrical ground terminal to ensure EMC
compliance. Restore power and the card will boot up.
•
Attach the network cable to the RJ45 connector. Because good
wiring practice requires building wire to terminate with a female
connector, typically a short (12”/30cm) male-to-male jumper is
used. If PoE is being used, the card will boot up. Both auxiliary
power and PoE may be connected simultaneously without
damaging the PWPP DIN P1.
•
The system is now ready for testing.
•
To remove the PWPP DIN P1 from the DIN rail, use a flathead
screwdriver to gently pry the hooked foot on the end caps of the
device away from the DIN rail. The corner of the device should life
free; repeat at the other side and unhook the device from the rail.
A large number of parameters may be customized for the PWPP
DIN P1, including: port direction, output channel patch, input
universe number, transmit and receive protocols and DMX speed.
Network properties such as IP address and subnet mask are also
customizable by the user.
Detailed gateway configuration and overall network system
management are done using Pathscape software, which is available
for download from www.PathwayConnect.com
Please refer to the
Pathscape manual
for information on
configuring these additional properties.
PATHSCAPE CONFIGURATION
The PWPP DIN P1 ships as a DMX output gateway with
Pathway
ssACN
enabled.
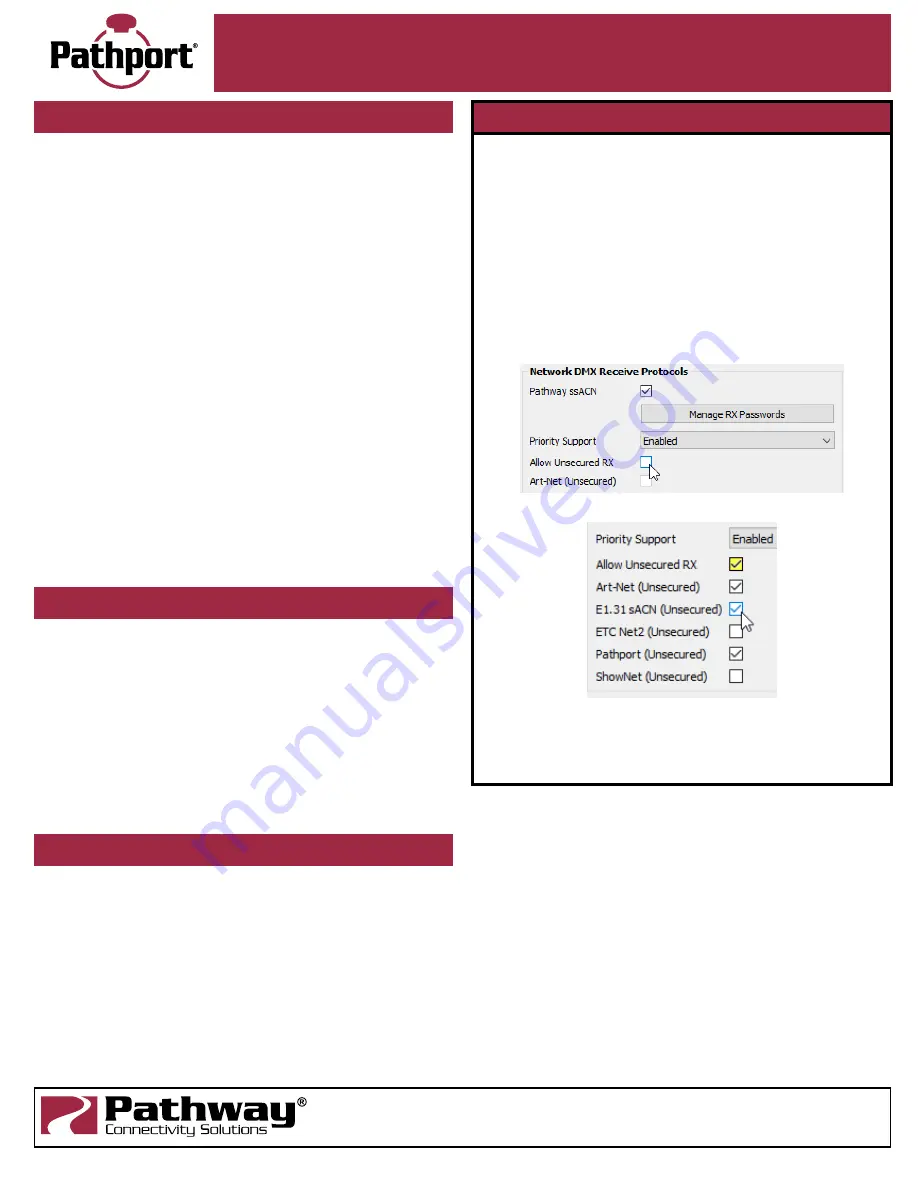
The following Ethernet receive protocols are unsecured and are
NOT ENABLED
by default:
Pathport
,
Strand Shownet
,
ETC Net2
,
E1.31 streaming ACN
and
Art-Net
.
Before configuring and using the PWPP DIN P1, you must add it
to a
Security Domain
using Pathscape.
To use the other listed unsecured protocols, you must
use Pathscape and enable the device property ALLOW
UNSECURED RX
(see below).
DEFAULT SETTINGS
Due to new cybersecurity laws, all Pathport devices shipped after
January 1, 2020 have security properties enabled. This means
that by default, the device is not set up to receive unsecured
network protocols such as Art-Net, E1.31 sACN, ShowNet, NET2
or Pathport Protocol.
You must add the Pathport to a Security Domain using
Pathscape before configuration and use.
Pathway ssACN (Secure sACN) is enabled by default.
To use the above unsecured protocols, open Pathscape. In
the Pathport base device properties, under the
Network DMX
Receive Protocols
section, click the
Allow Unsecured RX
checkbox.
Once checked, you may select the network protocol(s) to receive.
For further information, please see the following sections in the
Pathscape
manual:
Security
,
Pathport Properties >
Network
DMX Receive Protocols .
IMPORTANT - UNSCURED NETWORK PROTOCOLS


