background image

Pathport® OCTO - 64XX - Manual

January 2021

17

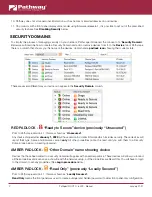
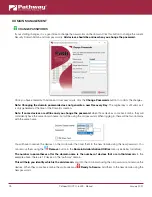
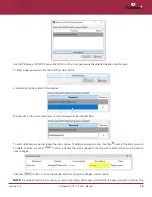
all the listed devices, click the top checkbox next to “Ready to Secure” which will auto-check all the devices’ checkboxes.

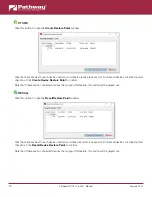
 REMOVE

Click this button to remove devices from the current Security Domain.

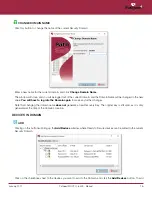
Click on the checkboxes next to the devices you want to remove from the Domain, and click the 

Remove Devices

 button. 

To remove all the listed devices, click the top checkbox next to the Domain Name which will auto-check all the devices’ 
checkboxes.

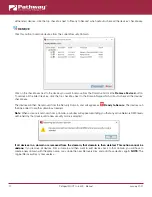
The devices will then be removed from the Security Domain, and will appear as 


Ready to Secure

. The devices can 

then be added to another domain as needed.

Note

: When a device is removed from a domain, a window will appear reminding you that any active Network DMX levels 

will be held by that device until a new security mode is selected.

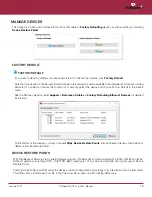
If all devices in a domain are removed from the domain, that domain is then deleted. This action cannot be 
undone.

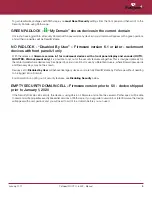
 If you remove all devices from a domain and then want to add devices back to that domain, you will have to 

create a new domain with the same name, copy down the new Recovery Key, and add those devices again. 

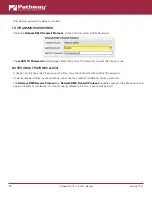
NOTE

: The 

original Recovery Key is now useless.

Summary of Contents for Pathport OCTO 64 Series

Page 1: ...User Guide January 2021 Pathway Connectivity 1439 17 Ave SE Calgary AB T2G 1J9 1 403 243 8110 support pathwayconnect com Pathport OCTO DMX RDM Gateways Models 64XX Running Firmware version 6 1...

Page 2: ...ins valuable trade secrets and proprietary information belonging to Pathway and its licensors WARNING ABOUT UNSECURED PROTOCOLS Enabling an open protocol that does not use encryption or authentication...

Page 3: ...NEL LAYOUTS 4 FRONT PANEL 4 LCD 4 ROTARY ENCODER 4 DMX PORTS IF APPLICABLE 4 LED INDICATORS 4 REAR PANEL 5 DMX PORTS IF APPLICABLE 5 RJ45 etherCON NETWORK CONNECTION 5 CCI CONTACT CLOSURE INPUT 5 AC I...

Page 4: ...ICES 18 RECOVERING A DOMAIN 20 RETAINING DEVICE SETTINGS FROM UNKNOWN DOMAINS 22 USING OLDER VERSIONS OF PATHSCAPE WITH NEW DEVICES 22 LOCAL CONFIGURATION ONLY Using OCTO without Pathscape 23 DISABLIN...

Page 5: ...PATCH 40 NETWORK DMX PROPERTIES 41 SIGNAL LOSS 41 RDM PROPERTIES 42 ADVANCED PROPERTIES 42 INPUT PORT PROPERTIES 43 BASIC PROPERTIES 43 STATUS 43 DMX512 PORT PROPERTIES 44 PORT PATCH 44 NETWORK DMX P...

Page 6: ...ENUS 53 NETWORK SETUP 53 DEVICE INFO STATUS 54 PROTOCOL SUPPORT 55 ADMIN SECURITY 57 PORT STATUS AND CONFIGURATION MENU 59 APPENDIX 1 ELECTRICAL COMPLIANCE OTHER INFORMATION 62 ELECTRICAL INFORMATION...

Page 7: ......
Page 8: ...The standard connector type is 5 pin XLR The standard has been revised several times over the years with the latest being ANSI E1 11 DMX512 A 2013 The Pathport OCTO is designed to work seamlessly with...

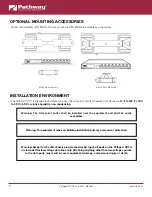
Page 9: ...an RDM gateway to configure DMX based equipment INSTALLATION INSTRUCTIONS The Pathport OCTO is intended for desktop use or to be mounted in a standard 19 equipment rack using the included rack ear acc...

Page 10: ...are 14 F to 122 F 10 C to 50 C 5 95 relative humidity non condensing Warning The AC socket outlet shall be installed near the equipment and shall be easily accessible Warning This equipment relies on...

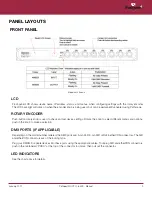
Page 11: ...check and set device settings Rotate the knob to select different menus and options push in the knob to make a selection DMX PORTS IF APPLICABLE Depending on the model number ordered the DMX ports are...

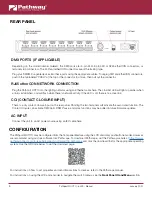
Page 12: ...SURE INPUT There is a dry contact closure input on the rear panel Shorting the two terminals will activate the associated function The Contact Closure can activate DMX Hold RDM Pause and more function...

Page 13: ...after January 1 2020 may only be configured using Pathscape 4 or later 4 Products shipped after January 1 2020 cannot be downgraded to earlier password free firmware Using the Tools Firmware Updater...

Page 14: ...ady to Secure device previously Unsecured Prior to Pathscape version 4 1 this was shown as Unsecured Any device shipped after January 1 2020 will have version 5 or later firmware which includes securi...

Page 15: ...security features altogether This is designed primarily for the rental market where devices may be shipped to various locations for use by different end users where Domain passwords and Recovery Keys...

Page 16: ...to Pathscape Clicking the encoder knob to select Wait for Pathscape to Secure will show the device Serial Number and MAC Address in cases where this may be helpful for device identification If you wan...

Page 17: ...e domain The User can change device properties and save and restore show files but cannot change domain passwords factory default devices or add remove devices There is one User account password for a...

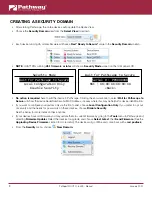
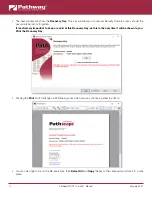
Page 18: ...or forgotten It is extremely important to keep a record of this Recovery Key as this is the only time it will be shown to you Print the Recovery Key Clicking the Print button will open a Print Dialog...

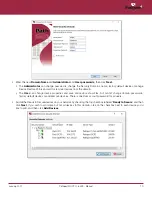
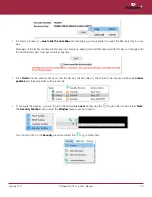
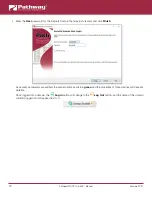
Page 19: ...nge both the Administrator and User passwords at any time Click Finish and the window will close and the devices will be added to the domain The devices will have an amber padlock and their properties...

Page 20: ...created and click Finish As security parameters are verified the amber padlocks will turn green and the properties of those devices will be read writable Once logged into a domain the Log In button wi...

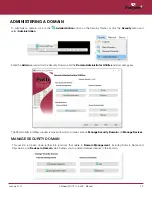
Page 21: ...ord for the Security Domain and the Domain Administrator Utilities window will appear The Domain Admin Utilities window is broken down into to main sections Manage Security Domain and Manage Devices M...

Page 22: ...ange the password when those devices come back online they will coincidently have the same domain name but will be using the old password When logging in there will be two domains with the same name Y...

Page 23: ...w value You will have to log into the Domain again to make any further changes Note that changing the domain name does not generate a new Recovery Key The original key is still valid as it is only gen...

Page 24: ...vices will then be removed from the Security Domain and will appear as Ready to Secure The devices can then be added to another domain as needed Note When a device is removed from a domain a window wi...

Page 25: ...lt in the Device menu See the Pathway website under Support Reference Articles Factory Defaulting Ethernet Devices for detailed instructions At the bottom of the window you may optionally Wipe Device...

Page 26: ...e Point to confirm Note that if there are no connected devices that support this feature this button will be grayed out RECALL Click this button to open the Recall Restore Point window Click the check...

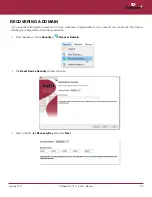
Page 27: ...istrator password or it was maliciously changed without your consent you can recover the domain retaining its configuration and set new passwords From the menu choose Security Recover Domain The Reset...

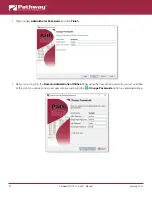
Page 28: ...dministrator Password and click Finish Now you can log into the Domain Administration Utilities Panel using the new Admin password you just specified At this point you can set a new user password as w...

Page 29: ...ing Ethernet Devices for detailed instructions Once they reappear in Pathscape as Ready to Secure add them to a Security Domain and log in Once all devices appear with a Green Padlock open the show fi...

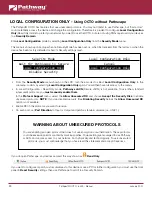
Page 30: ...You will then have full access to the menus In Local Configuration Read Only mode Pathway ssACN Secure sACN is not available To use other standard unsecured protocols you must manually enable them In...

Page 31: ...the factory or after the device has been Factory Defaulted or had its Security Settings reset Security Mode Wait for Pathscape to Secure Local Configuration Only Disable Security Disable Security Can...

Page 32: ...E these transactions will also appear for devices already part of a domain after upgrading those devices to firmware version 6 0 or later NOTE that the Domain Auto password is NOT the same as the Doma...

Page 33: ...levant devices to use Pathway ssACN In the relevant devices base device properties there are two sections called Network DMX Receive Protocols and Network DMX Transmit Protocol These are the same sect...

Page 34: ...re on managing ssACN Passwords below MANAGING PATHWAY ssACN PASSWORDS In most situations you will be using the Domain Auto password In these cases after configuring your devices to receive and transmi...

Page 35: ...custom password into the text field To add additional passwords repeat the steps above To delete a password entry click the next to the entry you wish to delete To finish click the button A transacti...

Page 36: ...d you want this device to use NOTES ABOUT PATHWAY ssACN A device can only have one TX password at a time You cannot transmit with multiple TX passwords However receive devices as shown above can accep...

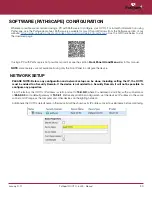
Page 37: ...are not available if using only the Front Panel to configure the device NETWORK SETUP PLEASE NOTE Before any configuration and network setup can be done including setting the IP the OCTO must be adde...

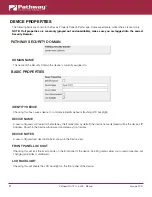
Page 38: ...Checking this box causes device to commence identify behavior flashing LCD backlight DEVICE NAME A user configured soft label for the Gateway If left blank and by default the device name displayed wi...

Page 39: ...Pathscape on FIRMWARE VERSION Shows current operating firmware version See the Firmware Update section on how to update the firmware Read only SERIAL NUMBER Factory set unique identifier Read only MA...

Page 40: ...server ensure that the DNS Server and IP Gateway are set so the device knows how to get to the Internet to find a time server NETWORK PROPERTIES IP ADDRESS Internet Protocol address IPv4 of the Gatewa...

Page 41: ...discover the Partner MAC will be shown Read only PARTNER PORT If the upstream switch supports Link Layer Discovery Protocol LLDP the port the current device is connected to will be shown here Read on...

Page 42: ...red protocols you must acknowledge that you have read this statement and accept these risks After checking this box and sending the transaction a dialog will appear warning you of the above and asking...

Page 43: ...rt Net Strand ShowNet will use transmit using standard unsecured E1 31 sACN E1 31 sACN will use transmit using standard unsecured E1 31 sACN Pathway ssACN will use Pathway s secured sACN for transmitt...

Page 44: ...e s NTP server settings SixEye Init The device is currently initializing a connection with SixEye SixEye Init Error The device could not initiate a connection with SixEye Not Connected The device is n...

Page 45: ...four supported protocols to DMX512 Output ports may also be configured to be RDM controllers There are two tables of properties based on Port Direction OUTPUT PORT PROPERTIES BASIC PROPERTIES SUBDEVIC...

Page 46: ...MX512 PORT PROPERTIES DMX512 ENABLE For debugging purposes or otherwise you may want to disable a DMX port All other properties will remain unchanged Apart from the fact that the line is still termina...

Page 47: ...intended changes once levels are set as desired PORT PATCH OUTPUT PATCH Use the drop down menu to select the output patch for the port By default the drop down menu lists standard Universes 1 16 and C...

Page 48: ...tputting the last received packet indefinitely in the event of Network DMX signal loss HOLD TIME s If Signal Loss Fade to Black or Signal Loss Port Shutdown is enabled the port will continue outputtin...

Page 49: ...RDM DEVICE COUNT This will show the number of RDM devices detected on the selected DMX Port Read only RDM PAUSE Check this box to suspend all RDM discovery quick or background RDM GET and SET command...

Page 50: ...label a port based on where the DMX512 cable is coming from i e Console Port 3 or House Lights SUBDEVICE NOTES A user configured text description field shown in the Device window STATUS NETWORK DMX Sh...

Page 51: ...an Input port DMX FORCE HOLD Check this box to force the DMX512 port to snapshot the current DMX levels and maintain them indefinitely ignoring any further changes Useful to lock out any unintended ch...

Page 52: ...s If the DMX512 source ceases the Network DMX will continue to be refreshed to the network using the levels from the last packet the gateway received until this timer expires ADVANCED PROPERTIES CCI...

Page 53: ...e Firmware Updater menu item This will bring up the Firmware Update window Select the device s you want to upgrade and click the button at the bottom of the window The latest firmware version will be...

Page 54: ...RT A B C D Rotary Encoder Turn to highlight Push to select Base Configuration Network Setup Device Info Status Protocol Support Admin Security Back Scroll the encoder knob until Admin Security is high...

Page 55: ...same issues The device will then reboot having reset itself to the Factory settings Before configuration can be restored the unit must be secured either by adding to a Security Domain or enabling Loca...

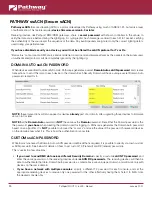
Page 56: ...curity features are Disabled some functionality will not be available such as Pathway ssACN Pathway ssACN needs the device to be part of a Security Domain in order to authenticate and send traffic on...

Page 57: ...Serial Number and MAC Address in cases where this may be helpful for device identification Wait for Pathscape to Secure Serial PPXXXXXXX MAC XX XX XX XX XX XX Back Enable Local Configuration Only Read...

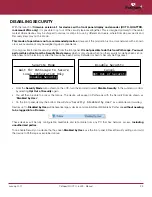
Page 58: ...nly Disable Security Disable Security Cancel Opt Out of Security From the Security Mode menu shown on the LCD turn the encoder to select Disable Security In the submenu confirm by selecting Opt Out of...

Page 59: ...spectively Class A subnet mask of 255 0 0 0 a Class B subnet mask of 255 255 0 00 and a Class C subnet mask of 255 255 255 0 USING THE FRONT PANEL UI With the main screen above showing on the LCD pres...

Page 60: ...mode IP address subnet mask and default gateway Scroll the encoder knob to highlight the property you want to edit and push the knob to edit the value Scroll the knob again to choose the new value an...

Page 61: ...IP Mode is set to Dynamic it is still possible to manually adjust the IP settings This practice is not recommended as the changes will not stick Once the values have been set acceptance options appea...

Page 62: ...pe Read only Network Partner LLDP Opens a sub menu showing the Network LLDP Partner information if applicable Name Shows the name of the LLDP Partner if found IP Address Shows the IP address of the LL...

Page 63: ...e shortened in order to fit on the LCD screen Menu Item Description Pathway ssACN RX Enable default or Disable receiving of Pathway ssACN Allow Unsecured RX Enable or Disable default the receiving of...

Page 64: ...Use Strand ShowNet protocol E1 31sACN Use standard E1 31 sACN protocol Pathway ssACN default Use Pathway ssACN protocol Back Return to previous menu Art Net Alt Mapping When enabled Art Net Universe 0...

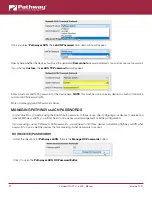
Page 65: ...able Pathway ssACN and configuration using Pathscape the device must be added to a Security Domain If already Locally Secured you must factory default the device or reset its security settings then us...

Page 66: ...oint with the device s current settings Recall Recalls the restore point and overwrites the current device settings with those saved in the restore point Back Return to previous menu Reset Security Al...

Page 67: ...an Output it will show Port x Universe The DMX512 Universe the Port is set to output to if assigned a Standard Universe or Port x Patch Name The name of the Custom Patch assigned to this Port if appli...

Page 68: ...ort remains On however no data is sent or received For Output Ports If you have previously set a Custom Output Patch using Pathscape its name will be shown here NOTE that you cannot select or create C...

Page 69: ...allows selection of the Contact Closure Interface action None default CCI does nothing DMX Hold CCI will force the DMX512 port to snapshot the current DMX levels and maintain them indefinitely ignorin...

Page 70: ...rts 250V protection on DMX ports COMPLIANCE California Title 1 81 26 Security of Connected Devices USITT DMX512 1990 ANSI E1 11 DMX512 A R2013 E1 20 RDM Remote Device Management E1 31 sACN streaming A...

Reviews: