pascom PANDORA-3D Operation Manual Download Page 29

Menu operation (System standard setting)

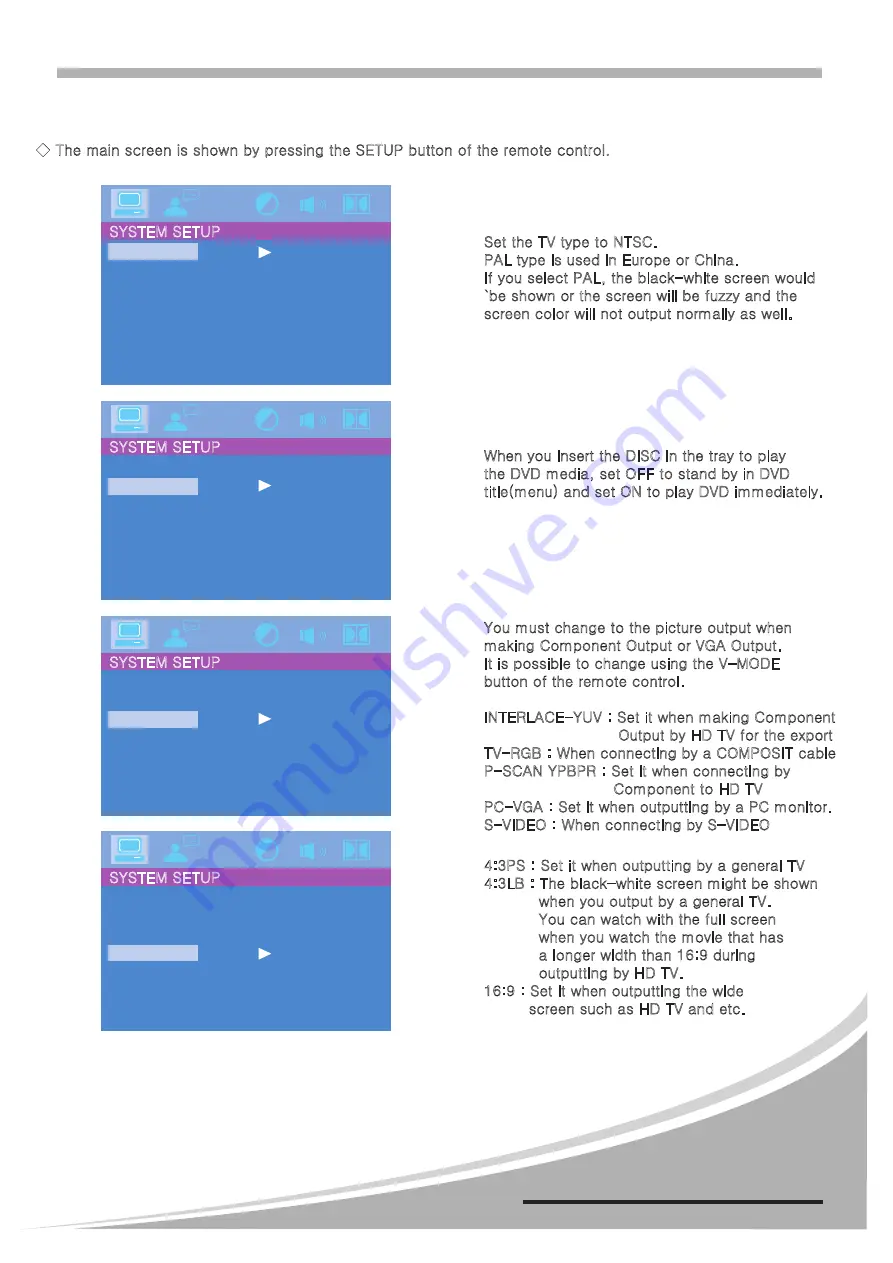
◆ The main screen is shown by pressing the SETUP button of the remote control.

Set the TV type to NTSC.
PAL type is used in Europe or China. 
If you select PAL, the black-white screen would
`be shown or the screen will be fuzzy and the
screen color will not output normally as well.

....

TV SYSTEM
AUTO PLAY
VIDEO
TV - TYPE
PASSWORD
RATING
DEFAULT

NTSC
PAL60
PAL
AUTO

SYSTEM SETUP

When you insert the DISC in the tray to play 
the DVD media, set OFF to stand by in DVD
title(menu) and set ON to play DVD immediately.

....

TV SYSTEM
AUTO PLAY
VIDEO
TV - TYPE
PASSWORD
RATING
DEFAULT

ON
OFF

SYSTEM SETUP

You must change to the picture output when
making Component Output or VGA Output.
It is possible to change using the V-MODE
button of the remote control.

INTERLACE-YUV : Set it when making Component 
                           Output by HD TV for the export 
TV-RGB : When connecting by a COMPOSIT cable
P-SCAN YPBPR : Set it when connecting by
                          Component to HD TV 
PC-VGA : Set it when outputting by a PC monitor.
S-VIDEO : When connecting by S-VIDEO

....

TV SYSTEM
AUTO PLAY
VIDEO
TV - TYPE
PASSWORD
RATING
DEFAULT

INTERLACE YUV
TV-RGB
P-SCAN YPBPR
PC-VGA
S-VIDEO

SYSTEM SETUP

4:3PS : Set it when outputting by a general TV
4:3LB : The black-white screen might be shown
           when you output by a general TV.
           You can watch with the full screen 
           when you watch the movie that has 
           a longer width than 16:9 during 
           outputting by HD TV. 
16:9 : Set it when outputting the wide 
         screen such as HD TV and etc.

....

TV SYSTEM
AUTO PLAY
VIDEO
TV - TYPE
PASSWORD
RATING
DEFAULT

4:3 PS
4:3 LB
16:9

SYSTEM SETUP

MULTI P.A COMBINATION AMPLIFIER

PANDORA-1D/2D/3D .27

Summary of Contents for PANDORA-3D

Page 1: ...MULTI P A COMBINATION AMPLIFIER PANDORA 1D 2D 3D Better Communication Better Communication ...

Page 2: ......

Page 3: ...r gives you unlimited tone control allowing you to shape your sound to meet your environment USB INTERFACE FUNCTION USB storage media and external HDD can use MP3 files and AVI files can play VARIOUS MEDIA POSSIBILITY Audio CD HDCD DVD VCD MP3CD SVCD AVI JPG format file CD CD R CD R CD RW DVD R DVD R DVD RW various media can play FULL LOGIC AUTO REVERSE CASSETTE DECK Full logic dual cassette deck ...

Page 4: ... holding it carefully by the edges 3 Finger marks and dust should be carefully wiped off the disc s recorded surface with a soft cloth 4 Never use such chemicals as record sprays antistatic sprays or fluid benzine or thinner to clean discs Such chemicals will do irreparable damage to the disc s plastic surface 5 Do not expose discs to direct sunlight or high humidity and temperature for extended p...

Page 5: ...UALIZER 0dB 10dB 10dB 1kHz 2 5kHz 6 3kHz 16kHz 400Hz 160Hz 63Hz PAUSE NORMAL MEMO RESET REC PLAY RELAY HIGH SPEED CHIME POWER OFF ON DECK TUNER DVD MP3 MIN MAX REMOTE AUX 1 MIC 2 MIC 3 MIC 4 MIC 5 AUX 2 MIC 1 MAX MIN MASTER MAX MIN MAX MIN MAX MIN MAX MIN MAX MIN MAX MIN MIN MAX MIN MAX MIN MAX MAX MIN MODE STOP PLAY FF PLAY REW STOP PLAY FF PLAY REW REC LEVEL A B 6dB 0 2dB TAPE COUNTER OPEN CLOSE...

Page 6: ...ou can confirm the working status of tuner through this display 11 DVD VFD DISPLAY This vfd display indicates the status of the DVD USB unit 12 LED INDICATOR PHANTOM Condencor Mic power PROTECTION Output Level CLIP 6dB 20dB 40dB Telephone Paging REMOTE AMP DRA 9600 Connection PROT PROTECTION INDICATOR When the Protection LED ON THE PROTECTION Circuitry is active indicating that the unit is not ope...

Page 7: ...trols the MUTE Level MIC 1 2 5 CHIME VOLUME Controls the CHIME Level 6 CHIME TONE SELECTOR Selects 2 tone or 4 tone chime 1 3 6 5 7 8 9 10 11 12 13 14 20 21 22 23 15 16 17 18 19 2 4 TELEPHONE LINE IN OUT 100V 70V REMOTE P형 R형 P24V PGND GND SIG SIG RS485 RS485 GND GND COM 1 2 3 4 5 6 7 8 9 10 4 8 O O AC 240V 50Hz 270W FUSE T2AL 250V AC 220V 60Hz 270W FUSE T2AL 250V AC 230V 50Hz 270W FUSE T2AL 250V ...

Page 8: ...t signals are muted 10 PREOUT This output provides line level output signal for connection to an external amplifier 11 MIC INPUT 2 5 Connect Mic input 2 5 here Phantom power is available 12 PHANTOM POWE SWITCH This switch turns the phantom power supply on or off for Mic 2 5 When the switch is turned on 15V DC power is supplied to pins 2 and 3 of each channel s input connector 13 LINE INPUT AUX Thi...

Page 9: ...rminals are for VIDEO OUT COMPONENT COMPOSITE S VIDEO 20 AUDIO STEREO OUTPUT This output provides line level output signal stereo for connection to an external amplifier 21 VIDEO COMPENSATION SWITCH By tunning this switch on it compensates the loss of output level for long distance cable 22 VIDEO SIGNAL OUTPUT COMPOSITE The video signal is sent through this terminal It is connected to VCR Monitor ...

Page 10: ...from the current track of DISC 6 NEXT BUTTON Move to the next track from the current track of DISC 7 RESET BUTTON Initialize a video output mode that is set related with DVD playback 8 Linkage Terminal of a USB storage device Use it by connecting with a USB storage device or a mass USB storage device HDD It is possible to recognize as dividing into 40Gbyte FAT32 in case of a mass USB storage devic...

Page 11: ...VD menu during playback Move or select the menu title PBC Display index of tracks in VCD TITLE Display index of tracks in DVD ZOOM Enlarge or downsize the image in play PLAY PAUSE to play or pause STOP Stop playing RETURN stop playback and move back to previous menu SLOW Play image slowly STEP Play video by scene PROG sort playlist by the title chapter or music 1 10 Select track to play TIME Displ...

Page 12: ...u power on It reads the track on the DISC After selecting the desired DISC operate by pressing the PLAY button PLAY Function After inserting a DISC press the PLAY button Start playing the DISC By pressing the REPEAT button of the remote control the selected track will be played back repeatedly OFF Repeat one Repeat All OFF By using the A B button of the remote control a designated section will be ...

Page 13: ...nserted disc at discretion by pressing RANDOM button SEARCH Function Wind faster forward or backward by pressing the SEARCH button during playback The winding speed is adjusted by X2 X4 X8 X20 in speed unit as pressing this button once STEP Function A movie changes to a pause picture by each scene as pressing the STEP button once while playing DVD movie SLOW Function A movie changes to a pause pic...

Page 14: ...arating the partition in 40Gb unit and formatting to FAT32 When using an exterior hard disc recommend you the product in 3 5 inches that supports its own power supply to the exterior hard disc In case of the product in 2 5 inches if the power consumption is larger than the supply power the recognition doesn t become occasionally AVI Movie File Play It is possible to play a DVIX movie file of AVI f...

Page 15: ...ton is used for when you set a desired broadcasting 6 Address Select Button There are 10 numbers from 1 to 10 you can save totally 60 address of FM AM From 6 to 10 press a right number longer than usual 7 MEMO BUTTON Use to remember the frequency of the broadcasting station After tuning the desired frequency press the MEMO button And then press a button between 1 and 6 so that the listening broadc...

Page 16: ...Section To play back B section of tape 5 STOP Button To stop the tape recording 6 Play back Button To play back A section of tape 7 Fast Forward Button To fast forward play back to direction 8 RECORDING LEVEL INDICATOR These led meters indicate the record input level PAUSE NOR MEMO RESET REC PLAY RELAY HIGH MODE STOP PLAY FF PLAY REW DECK MODE EJECT AUTO REVERSE COUNTER STOP PLAY FF PLAY REW REC P...

Page 17: ...HIGH 12 Record Button Record ready level when turn on the Record button 13 MEMO RESET Button Turn on the MEMO RESET button counter lettering is 000 level that level of present is memory 14 PAUSE Button A moment stop when turn on the button on recoding or play back 15 RELAY PLAY Button RELAY PLAY On relay play A deck to B deck 16 NORMAL Copy Button NOR Turn on the Normal button normal copy B deck t...

Page 18: ...th the LEVEL control Then press the NOR DUB button for normal speed dubbing For high speed dubbing press the HI DUB button It is not necessary to adjust the record level in high speed mode as the record level is set to the level of the source tape High speed dubbing copies at 1 5 times normal speed We recommend normal speed dubbing for best audio quality Press the STOP button to stop dubbing RECOR...

Page 19: ...before making high quality recordings 1 Set the POWER switch to OFF and remove cassette door lid by pushing it up and then taking it out toward the front side after opening the door 2 Wipe the heads using a cleaning tip slightly moistened with commercially available head cleaner 3 Wipe the capstan and pinch roller using another cleaning tip slightly moistened with the commercially available rubber...

Page 20: ...e cassette deck is turned off CLEANING CABINET Clean the cabinet panel and controls with a soft cloth lightly moistened with mild soap solution Do not use any type of sourcing powder or solvent such as alcohol or benzine Note on Cassette Note on Cassette TO PROTECT RECORDING FROM ACCIDENTAL ERASURE Remove the tab as illustrated so that the REC cannot be activated To record on a cassette after tabs...

Page 21: ......

Page 22: ...e by pressing the CHANNEL button of the broadcasting region Change On Off as pressing the CHANNEL button once To start the broadcasting press the BROADCASTING button After ringing the chime the broadcasting is started When the broadcasting is finished press the BROADCASTING button After ringing the finish chime the broadcasting is ended How to synchronize a Fire Receiver Fire Receiver Port of P ty...

Page 23: ...KFS 40 60 80 KWS 03 10 AS 03A 06A HS 15 20 30 TELEPHONE LINE TV MONITOR REMOTE AMP FIRE RECEIVER TELEPHONE LINE IN OUT 100V 70V REMOTE P형 R형 P24V PGND GND SIG SIG RS485 RS485 GND GND COM 1 2 3 4 5 6 7 8 9 10 4 8 O O AC 240V 50Hz 270W FUSE T2AL 250V AC 220V 60Hz 270W FUSE T2AL 250V AC 230V 50Hz 270W FUSE T2AL 250V AC INPUT ANT TERMINAL MONITOR OUT OFF ON CABLE COMPENSATOR FM 75 COM AM L SL CEN FL Y...

Page 24: ...nd connect the R terminal of PANDORA Lastly white cable is the Left Sound connect the L terminal of PANDORA After finishing the connection switch TV to External Input and then switch to External Input by pressing the TV External Input button of the TV remote control You need a STEREO RCA transfer gender when you connect the Sound Output to stereo channel2 not to TV and connect to the red terminal ...

Page 25: ...nt picture terminal of HD TV and the component terminal of PANDORA as matching in color Sound L terminal white R terminal Red For the sound connect AV cables in red white to the component sound terminal Red White and PANDORA Finishing the connection power on the HD TV and change the setting to P SCAN YPBPR in System Set Up Video of the set up menu If the picture sign doesn t come up change to P SC...

Page 26: ...ing the connection power on the PC monitor and change the setting to PC VGA in System Set Up Video of the set up menu If the picture sign doesn t come up change to PC VGA using V MODE button of the remote control so that the picture is out putted normally You need a STEREO RCA transfer gender when you connect the Sound Output to the stereo channel 2 speaker for PC and connect to the red terminal M...

Page 27: ...tereo output terminal of the sound card and the 5 1 IN input terminal FRONT output terminal Stereo Connect to each FR Red FL White terminal SW CEN output terminal Stereo Connect to each SW Red CE White terminal REAR output terminal Stereo Connect to each SR Red SL White terminal 5 1IN CD R L FL FR CE SW SL SR L SL CEN FL Y Pb Cb Pr Cr OPT VIDEO S VIDEO VIDEO COAX R SR SUB FR 5 1CH 2CH VGA PANDORA ...

Page 28: ... connect only the product which has an amplifier You should disconnect pull out the plug the power of a TV PANDORA while connecting cables L SL CEN FL Y Pb Cb Pr Cr OPT VIDEO S VIDEO VIDEO COAX R SR SUB FR 5 1CH 2CH VGA PANDORA 1 2 3 4 5 6 7 8 1 5 1CH Analog Out 2 Audio Line Out 3 Digital Audio Out Coaxial 4 Video Out Composite 5 S VIDEO Out 6 Digital Audio Out Optical 7 Video Out VGA 8 Video Out ...

Page 29: ...It is possible to change using the V MODE button of the remote control INTERLACE YUV Set it when making Component Output by HD TV for the export TV RGB When connecting by a COMPOSIT cable P SCAN YPBPR Set it when connecting by Component to HD TV PC VGA Set it when outputting by a PC monitor S VIDEO When connecting by S VIDEO TV SYSTEM AUTO PLAY VIDEO TV TYPE PASSWORD RATING DEFAULT INTERLACE YUV T...

Page 30: ...e to reset if you forget the password after changing it Therefore please use the product carefully and write down the password The grade is divided into grade 8 and it is the function only for DVD playback The change is impossible if you don t enter the password The product is set by grade 8 when it is shipped Initialization By selecting the Restore Order all setting value is restored to the defau...

Page 31: ...as condensing the dynamic range It is possible to use when LINE OUT is selected in OP mode You can hear the sound clearly as condensing the dynamic range when you set the Movement Range to FULL if you set it OFF it plays without condensing the dynamic range OP MODE DYNAMIC RANGE DUAL MONO FULL 6 8 4 8 2 8 OFF DIGITAL SETUP This menu is used for setting the L R mono output and selecting the Karaoke...

Page 32: ...LANG MENU LANG ENGLISH KOREAN JAPAN FRENCH SPANISH GERMAN OFF LANGUAGE SETUP AUDIO Language This function comes under only for the playing DVD If there are several languages on DVD you can select the right language SUBTITLE Language This function comes under only for the playing DVD If there are several languages on DVD you can select the right language OSD LANGUAGE AUDIO LANG SUBTITLE LANG MENU L...

Page 33: ...d Sound Effect while playing the disc that is recorded by channel 5 1 5 1CH Select it when connecting the speaker of channel 5 1 Centering Delay Adjust the centering delay time of the surround speaker Rear Delay Adjust the rear delay time of the surround speaker Brightness The default is 6 and you can adjust the brightness You can adjust by the Direction Key the setting is completed by pressing En...

Page 34: ...A 2D 70V 21Ω 100V 42Ω PANDORA 3D 70V 14Ω 100V 28Ω Frequency Response 1 3dB 80Hz 18KHz T H D Rated Out 1KHz Less than1 S N 30KHz LPF Better than 65dB Power Source AC 220V 50Hz Power Consumption PANDORA 1D 240W PANDORA 2D 450W PANDORA 3D 700W Weight PANDORA 1D 16Kg PANDORA 2D 23Kg PANDORA 3D 30Kg Dimensions 420 W 266 H 340 D mm Specifications and design are subject to change without notice for impro...

Page 35: ......

Page 36: ...MADE IN KOREA www ipascom com Better Communication Better Communication ...

Reviews: