Getting star
Getting started
ted
Before using this device in the classroom, you need to charge the
battery, install data collection software, and check for a firmware
update.
Char
Charge the batter
ge the batteryy
The Wireless Soil Moisture Sensor contains a rechargeable battery
that lasts an entire school day when fully charged. Charge the battery
before using the Wireless Soil Moisture Sensor for the first time since
it is not shipped with a full charge.
To charge the battery, connect the sensor to a USB wall charger or
powered USB port using the USB cable. The battery status light will be
solid yellow while the battery is charging. The light will change to solid
green when the battery is fully charged.
Install or update data collection softwar
Install or update data collection softwaree
The latest update of PASCO Capstone or SPARKvue is required to use
the Wireless Soil Moisture Sensor. Download and install the software
from the PASCO website. Check if an update is available if the
software is already installed.
SP
SPARK
ARKvue
vue
Windows and Mac Computers
Windows and Mac Computers
Download: Go to pasco.com/sparkvue
pasco.com/sparkvue then click Downloads
Downloads.
Update: Click
then select Check for Updates
Check for Updates.
Mobile Devices and Chromebooks
Mobile Devices and Chromebooks
Search for SPARKvue in your device's app store. SPARKvue will
automatically install future updates.
P
PASCO Capst
ASCO Capstone
one
Windows and Mac Computers
Windows and Mac Computers
Download: Go to pasco.com/capstone
pasco.com/capstone then click Downloads
Downloads.
Update: Click Help
Help then select Check for updates
Check for updates.
Check for a firmwar
Check for a firmware update
e update
Update the sensor firmware to access the latest features and bug
fixes. Sensor firmware is installed using SPARKvue or PASCO
Capstone. Connect the sensor to SPARKvue or PASCO Capstone to
check for a firmware update.
SP
SPARK
ARKvue
vue
1. Turn on the Wireless Soil Moisture Sensor.
2. Open SPARKvue then click Sensor Data.
3. Select the sensor that matches the device ID.
4. If a notification appears, click Yes
Yes to update the firmware. If a
notification does not appear, the firmware is up to date.
P
PASCO Capst
ASCO Capstone
one
1. Turn on the Wireless Soil Moisture Sensor.
2. Open Capstone then click Hardware Setup.
3. Select the sensor that matches the device ID.
4. If a notification appears, click Yes
Yes to update the firmware. If a
notification does not appear, the firmware is up to date.
Using the sensor
Using the sensor
Connect the pr
Connect the probe t
obe to the sensor
o the sensor
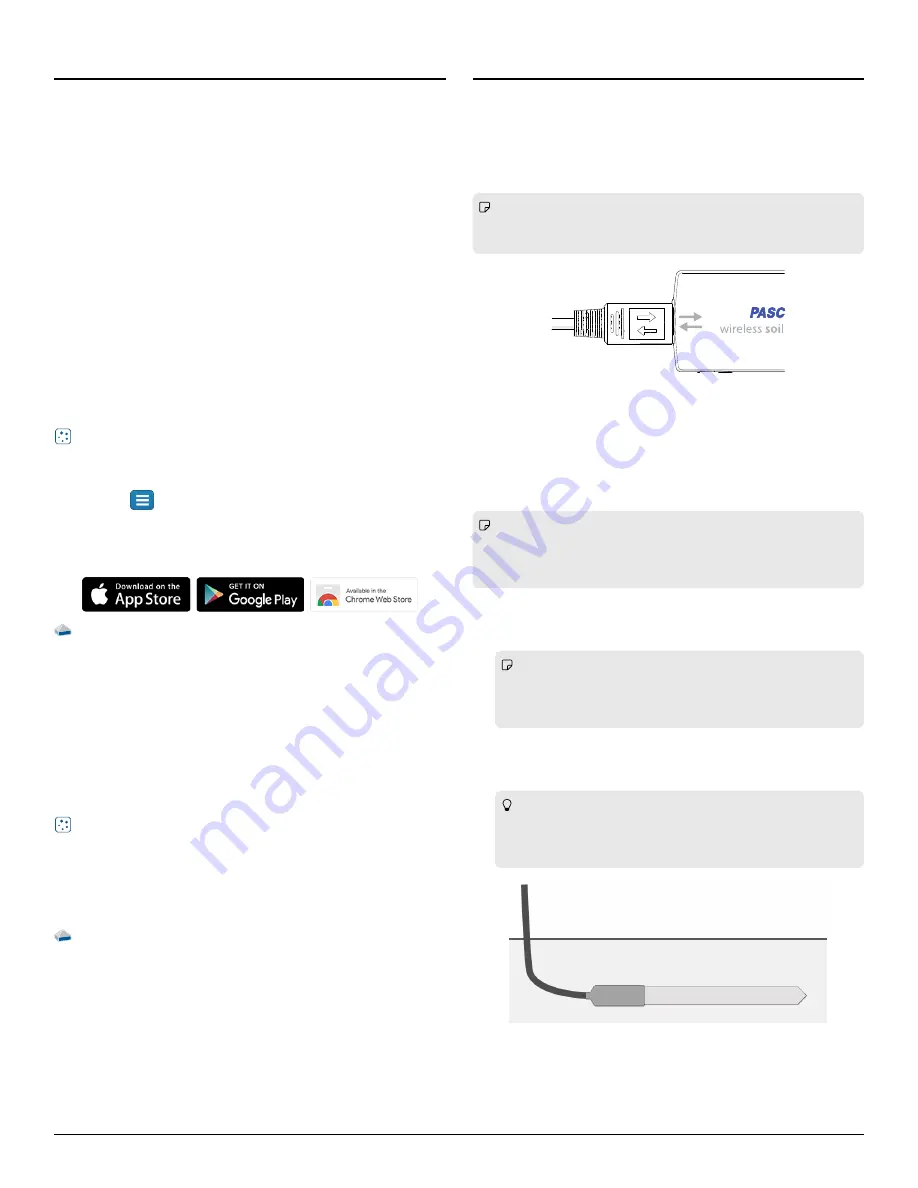
The plug on the soil moisture probe connects to the port on the
sensor box in a specific direction. Line up the arrows on the front of
the sensor box with the arrows on the plug to connect the plug in the
correct direction (Figure
Note: If you are not getting any response from the sensor while
recording data, make sure that the probe plug is firmly connected
to the sensor.
Figure 1. The arrow on the plug lined-up with the arrow on the sensor box.
Install the pr
Install the probe in soil
obe in soil
When installing the probe, it is best to maximize contact between the
probe and the soil. Any air gaps or excessive soil compaction around
the probe can affect the readings.
Note: The sensor box is not waterproof. Seal the sensor box
and the probe plug inside of a waterproof bag when taking
measurements in wet environments. Keep the sensor box off the
ground.
1. Dig a narrow, 10-inch long trench in the soil to a desired depth.
2. Place the probe into the trench horizontally with the flat size
perpendicular to the soil surface (Figure
Note: Be careful when inserting the probe into dense soil.
The probe will break if excessive sideways force is used when
pushing it in. Do not pull the probe out by the cable when
removing the probe from soil.
3. Cover the entire probe with soil. Tamp down the soil along the
probe with your fingers to match the compaction of the
surrounding soil.
Tip: To obtain the most accurate measurement of soil
moisture, repeat this step several times. Record a new
measurement each time and find the average the
measurements.
Figure 2. Soil moisture probe installed in soil.
2 | Wireless Soil Moisture Sensor


