


®
M o d e l N o . P S - 2 1 6 8
S p e c i f i c a t i o n s
5
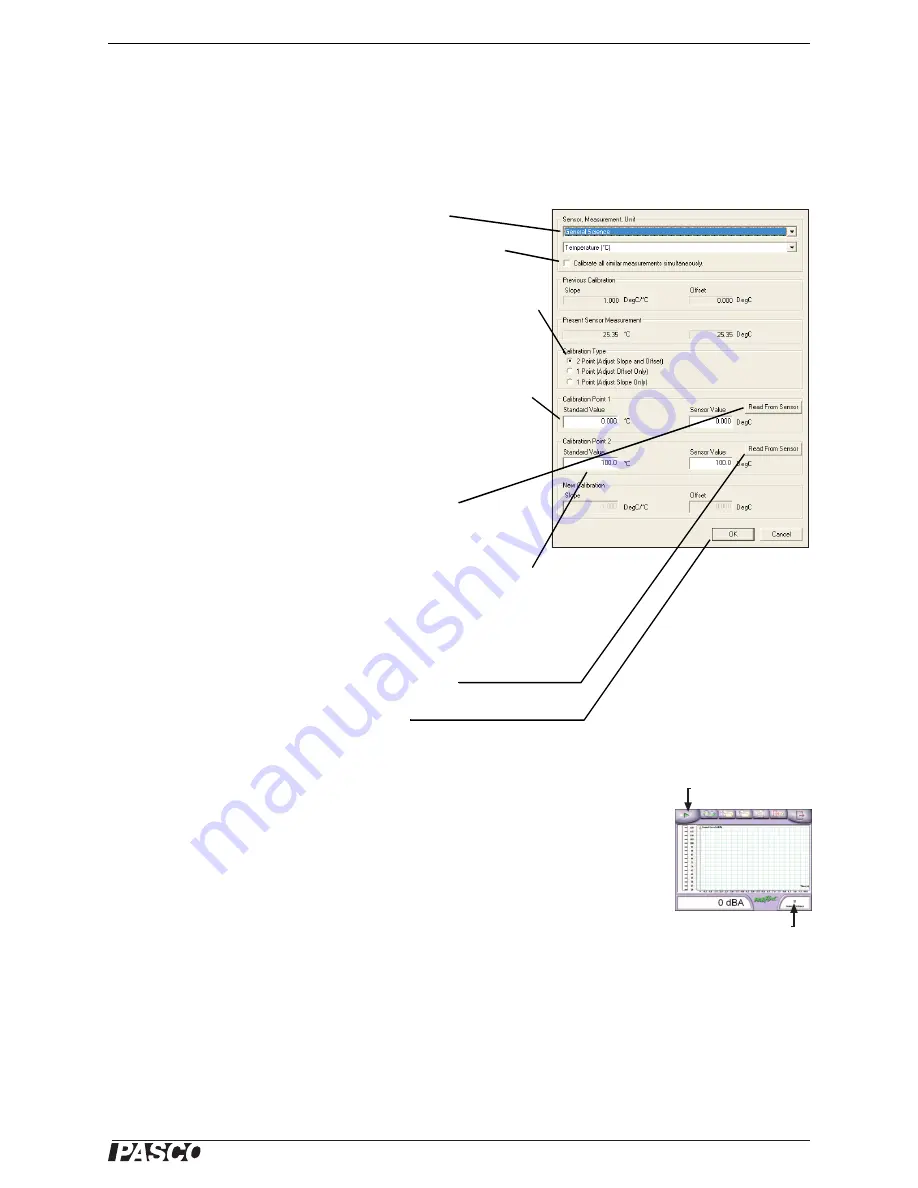
Appendix A: DataStudio Temperature Calibration
In DataStudio, click the Setup button to open the Experiment Setup window; in that
window, click the Calibrate button to open the Calibrate Sensors dialog box. For a
two-point calibration, you will need two “known standards,” or liquids that you know
the temperature of, such as ice water and boiling water.
1.
From the Sensor field, select
General Science
.
2.
Ensure that “Calibrate all similar measurements simulta-
neously” is
not
selected.
3.
From the Calibration Type menu, select
2 Point (Adjust Slope
and Offset)
, if it is not already selected.
4.
Place the probe in the first known standard.
5.
Enter the known temperature of the standard in the
Standard
Value
field for Point 1.
6.
Observe the
Present Sensor Measurement
and wait until it
has stabilized.
7.
Click the
Read From Sensor
button for Point 1.
8.
Place the probe in the second known standard.
9.
Enter the known temperature of the standard in the
Standard
Value
field for Point 2.
10.
Observe the
Present Sensor Measurement
and wait until it
has stabilized.
11.
Click the
Read From Sensor
button for Point 2.
12.
Click
OK
to accept the new calibration.
Appendix B: EZ Screen
If you are using the General Science MultiMeasure Sensor with a PASPORT interface
connected to a computer, you can use EZ-Screen software instead of DataStudio.
When the sensor is connected to the computer through the interface (if DataStudio is
not running) a window automatically launches giving you the option of launching
EZ-Screen. In EZ-Screen, click the green arrow button to start data collection. Click
the General Science Sensor icon in the lower-right corner to cycle through
sound-level, voltage, temperature, and light measurements.
Click to start
data collection
Click to change
measurements
EZ-Screen


