888 291-4615 (toll free)
PARTY TENTS DIRECT
.COM
6
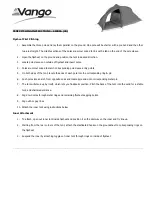
• Place all tent poles and fittings on
the ground, in the location you have
selected for the finished tent
• This layout is illustrates a 20 x 40 tent
— see (
appendix
) for your specific
size, layout and pole sizes
• Connect and form full length poles, by
connecting shorter poles together—
(connections will be made using either
an eye-screw or nut-bolt, supplied)
• See (
figure A.
) for eye-screw usage
1
) Start with the crown and its connecting
poles—the drawing shows the correct
postion of the crown—secure these parts
using apropriate eye-screw or nut-bolt
• Stand these two end assemblies up, to
connect the ridge parts next
Reminder:
Frame plans and connector positions, for
your tent, appear in the appendix
2
) Connect the ridge line next, crowns
and spreaders
• While standing on a ladder(s) make
all connections from end to end
• If you are short of people, use a tent jack
to hold horizontal poles
3
) Connect all perimeter bars to
the upper spreaders and rafter bars
• When working around the perimeter,
the last connection should be at a
corner, not a side tee
4
) For sizes; 20x20, 20x30 and 20x40
attach Cross Bar to rafter poles
— see (
appendix
)
5
) Double check all nut-bolt/eye-screws
— so they are secure
• The frame should now be complete
FIGURE A. ‘EYE-SCREW’ VS. ‘NUT-BOLT’
STEP 4. RIDGE AND PERIMETER
NUT-BOLT
passes through pole
Welded nut
indicates
the use of
Eye-Screw
STEP 3. LAYOUT FRAME
EYE-SCREW
tightens to inside pole
Position parts in the exact location of finished tent
Start with the parts indicated in black
Connect the 5 poles
while crown is still
on ground—
Stand crown on end
to begin, like so
The last connect should be a corner
1
2
3