background image

7

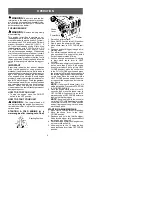
MOWING -- Your trimmer is ideal for mowing
in places conventional lawn mowers cannot
reach. In the mowing position, keep the line
parallel to the ground. Avoid pressing the
head into the ground as this can scalp the
ground and damage the tool.

Mowing

SWEEPING -- The fanning action of the rotat-
ing line can be used for a quick and easy
clean up. Keep the line parallel to and above
the surfaces being swept and move the tool
from side to side.

Sweeping

MAINTENANCE

WARNING:

Disconnect the spark

plug before performing maintenance except
for carburetor adjustments.

CHECK FOR LOOSE
FASTENERS AND PARTS

S

Spark Plug Boot

S

Air Filter

S

Housing Screws

S

Assist Handle Screw

S

Debris Shield

CHECK FOR DAMAGED OR
WORN PARTS

Contact an authorized service dealer for re-
placement of damaged or worn parts.

S

ON/OFF Switch -- Ensure ON/OFF switch
functions properly by moving the switch to
the OFF position. Make sure engine stops;
then restart engine and continue.

S

Fuel Tank -- Discontinue use of unit if fuel
tank shows signs of damage or leaks.

S

Debris Shield -- Discontinue use of unit if
debris shield is damaged.

INSPECT AND CLEAN UNIT AND
LABELS

S

After each use, inspect complete unit for
loose or damaged parts. Clean the unit and
labels using a damp cloth with a mild deter-
gent.

S

Wipe off unit with a clean dry cloth.

CLEAN AIR FILTER

A dirty air filter decreases engine perform-
ance and increases fuel consumption and
harmful emissions. Always clean after every
5 hours of operation.
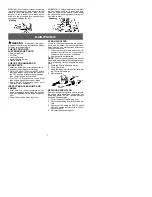
1. Clean the cover and the area around it to

keep dirt from falling into the carburetor
chamber when the cover is removed.

2. Remove parts as illustrated.

NOTE:

Do not clean filter in gasoline or other

flammable solvent to avoid creating a fire haz-
ard or producing harmful evaporative emis-
sions.
3. Wash the filter in soap and water.
4. Allow filter to dry.
5. Add a few drops of oil to the filter; squeeze

the filter to distribute oil.

6. Replace parts.

Air Filter
Cover

Air Filter

Screws

REPLACE SPARK PLUG

Replace the spark plug each year to ensure
the engine starts easier and runs better. Set
spark plug gap at 0,6 mm. Ignition timing is
fixed and nonadjustable.
1. Twist, then pull off spark plug boot.
2. Remove spark plug from cylinder and dis-

card.

3. Replace with Champion RCJ-6Y spark

plug and tighten securely with a 19 mm
socket wrench.

4. Reinstall the spark plug boot.

Summary of Contents for COLIBRI 25

Page 1: ...Verwenden Sie es erst wenn Sie sicher sind da Sie alle Anweisungen verstanden haben und gut aufbewahren MANUAL DE INSTRUCCIONES INFORMACI N IMPORTANTE Lea atentamente las instrucciones y aseg rese de...

Page 2: ...ith this tool D WARNING The trimmer line can throw objects violently You can be blinded or injured Always wear eye protection E Always use Ear protection Protective glasses or visor F Assist handle to...

Page 3: ...clothing or clothing with loosely hanging ties straps tassels etc They can be caught in moving parts S Being fully covered also helps protect you from debris and pieces of toxic plants thrown by spinn...

Page 4: ...rone to circulation disorders or abnormal swellings Prolonged use in cold weatherhas beenlinked toblood vessel dam age in otherwise healthy people If symptoms occur such as numbness pain loss of stren...

Page 5: ...uffler A hot muffler can cause serious burns STARTING A COLD ENGINE or a warm engine after running out of fuel Starting Position Choke Lever Primer Bulb Starter Handle Muffler 1 Set unit on a flat sur...

Page 6: ...line Othersizes andshapesof line will notad vance properly andwill result in improper cut ting headfunctionor cancause serious injury Do not use other materials such as wire string rope etc Wire can b...

Page 7: ...of unit if debris shield is damaged INSPECT AND CLEAN UNIT AND LABELS S After each use inspect complete unit for loose or damagedparts Clean theunit and labels using a damp cloth with a mild deter gen...

Page 8: ...is off the ground and will not make contact with any object Hold the unit by handwhile runningand makingad justments Keep all parts of your body away from the cutting attachment and muffler Idle Spee...

Page 9: ...horized service dealer 3 Contact an authorized service dealer 1 Air filter dirty 2 Spark plug fouled 3 Carburetor requires adjustment 4 Carbon build up on muffler outlet screen 5 Compression low Engin...

Page 10: ...CLARATION OF CONFORMITY relating to 98 37 EC EC Declaration of Conformity Directive 98 37 EC Annex II A Only applies to Europe We Electrolux Home Products Inc Texarkana TX 75501 USA T l 1 903 223 4100...

Page 11: ...cordance with ISO 8893 g kWh 768 WEIGHT Without cutting attachment or shield empty tank kg 3 7 CUTTING ATTACHMENT Cutting head assembly part number 952715588 NOISE LEVELS Octave Band Analysis 100 1000...

Reviews: