[©Copyright
2011
ParTech,
Inc.
All
rights
reserved.]
page
2
772228802
EverServ ™ 6000 POS Terminal Setup Guide
Connecting
Your
Peripherals
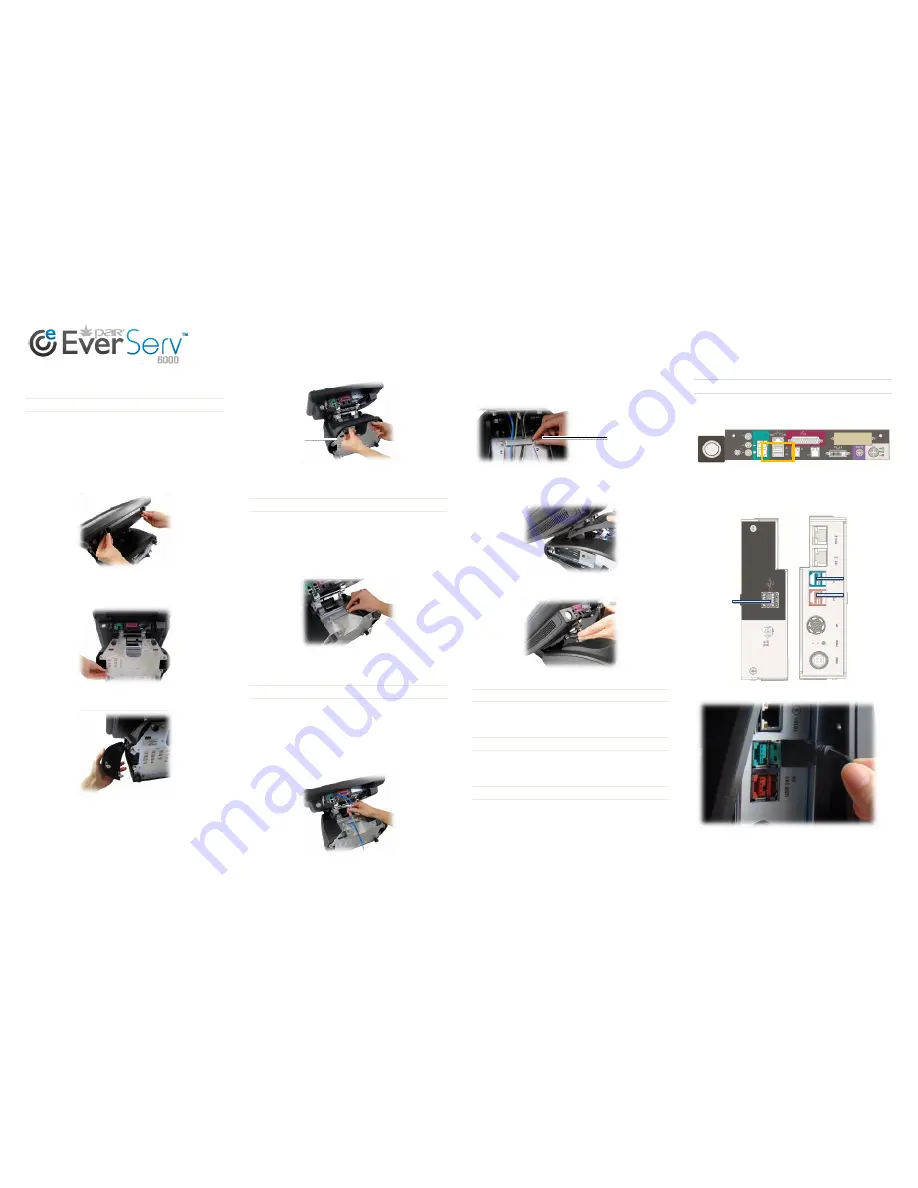
Remove
Covers
to
Access
Connection
Panels
1.
Lay
the
terminal
on
the
counter
on
its
back
with
the
bottom
facing
you.
2.
Tilt
the
top
cover
up.
3.
Loosen
the
knurled
thumb
screws
and
remove
the
main
cable
connection
cover
from
the
display
assembly.
Set
the
cable
connection
cover
aside.
4.
Loosen
the
two
captive
screws
that
secure
the
left
side
connection
panel
cover
to
the
terminal.
5.
Remove
the
side
connection
panel
cover.
6.
Repeat
steps
4
and
5
on
the
right
side
of
the
terminal
to
remove
the
right
side
cable
connection
panel
cover.
7.
On
the
bottom
of
the
terminal,
loosen
the
top
two
screws
and
lift
up
to
remove
the
cable
chase
cover
from
the
terminal
base.
Now
you
have
complete
access
to
the
connection
ports
on
the
POS
terminal.
Remove
Cable
Retainers
Your
EverServ
6000
POS
terminal
has
two
cable
retainers
that
secure
your
cables
in
places
to
keep
them
neat
and
organized
and
prevent
unintentional
disconnection.
8.
Locate
the
bottom
cable
retainer
and
loosen
one
screw
to
loosen
the
cable
retainer
and
swing
it
aside.
9.
Locate
the
top
cable
retainer
and
loosen
one
screw
to
loosen
the
cable
retainer
and
swing
it
aside.
Connect
Peripherals
to
POS
Terminal
Connect
your
peripherals
to
your
POS
terminal.
Refer
to
the
“Main
Cable
Well”
section
on
page
1.
When
you
have
finished,
use
the
cable
retainers
to
secure
and
organize
your
cables.
10.
Gather
the
cables
in
one
hand
and
replace
the
top
cable
retainer,
securing
the
cables
neatly
in
place.
Ensure
the
cables
are
not
kinked
or
stressed.
11.
Arrange
the
cables
so
they
are
in
a
row
on
the
cable
chase
and
replace
the
bottom
cable
retainer.
12.
Replace
the
cable
chase
cover
by
aligning
the
tabs
with
the
slots
and
tightening
the
thumb
screws
on
the
base
of
the
POS.
13.
Replace
the
main
cable
well
cover
by
aligning
the
tabs
with
the
slots
and
tightening
the
knurled
thumb
screws
on
the
cover.
14.
Stand
the
POS
upright
on
its
base.
Connect
Additional
Peripherals
to
POS
If
your
POS
terminal
has
the
optional
expansion
board,
F7820,
connect
additional
peripherals
as
necessary.
Refer
to
“Optional
Expansion
Board
(F7820)”
on
page
1
of
this
guide.
Replace
the
Side
Cable
Well
Covers
15.
Replace
the
side
cable
well
covers
and
secure
them
in
place
by
tightening
the
thumb
screws
on
the
base
of
the
terminal.
You
may
need
to
rest
the
terminal
on
its
back
to
do
this.
Power
on
the
POS
Equipment
16.
Power
on
the
POS
terminal.
The
power
button
is
located
on
the
bottom
left
side
of
the
top
cover.
17.
Power
on
your
peripherals.
Connecting
USB
Devices
The
PAR
EverServ
6000
POS
Terminal
has
6
available
USB
Ports.
On
the
main
cable
connection
panel
under
the
top
cover,
there
are
two
standard
USB
ports:
If
your
POS
terminal
has
the
optional
expansion
board,
F7820,
on
the
left
side
cable
connection
panel,
there
are
two
standard
USB
ports.
On
the
right
side
cable
connection
panel,
there
are
two
powered
USB
ports:
Standard
USB
cables
can
be
plugged
into
these
powered
USB
Ports:
Remove
Cable
Chase
Cover
Ensure
cables
are
flat
and
untwisted
2
Standard
USB
Ports
12V
Powered
24V
Powered
USB
Port


