Parrot DISCO-PRO AG Checklist Download Page 5

8.

 Adjust the flight altitude:

9.

  Take the drone and press 
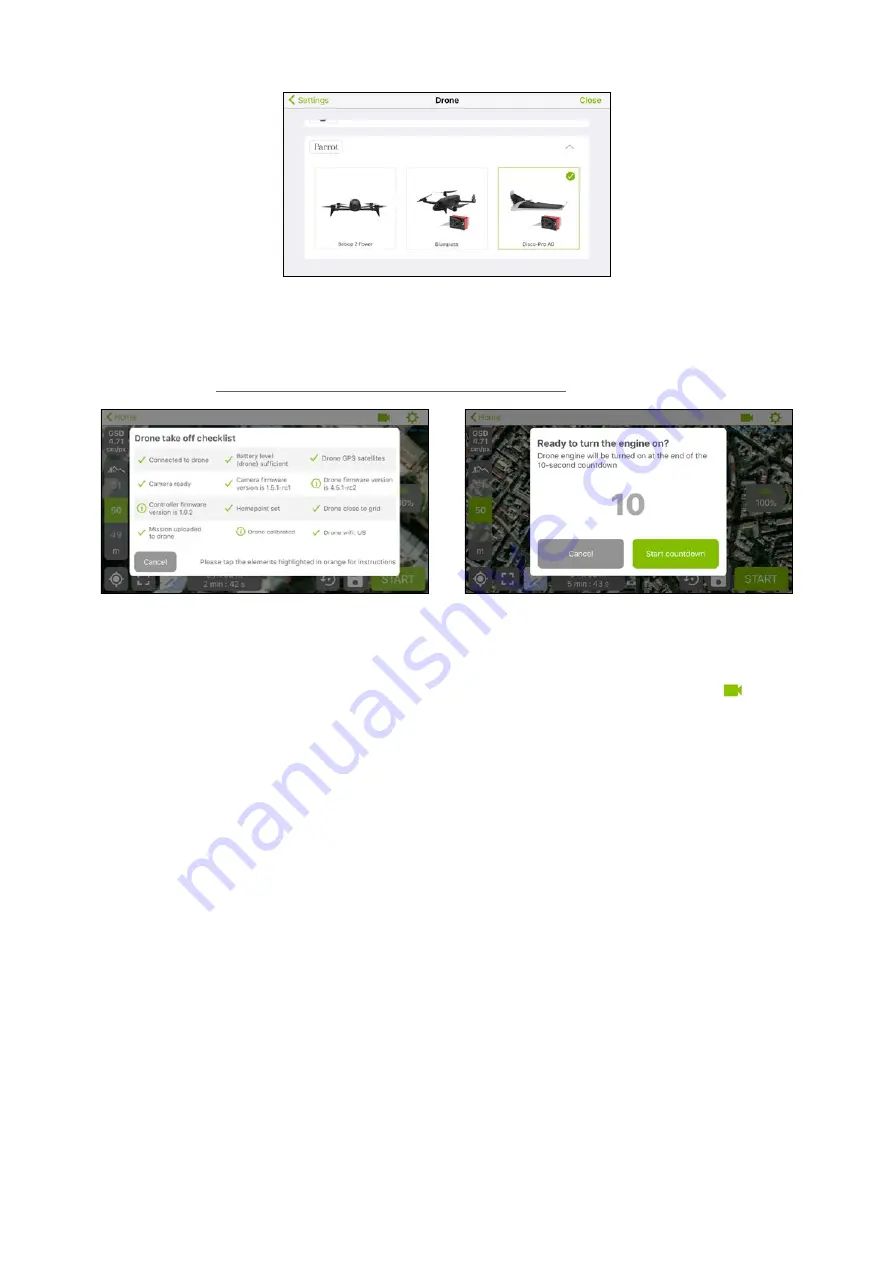
START

 when your flight plan is correctly set up. 

Note

: Check if an update is required by pressing 

FIRMWARE UPDATE

.

10.

  Please confirm by pressing 

START

, a drone connection and take-off checklist is performed. In case of failure, please 

refer to the chapter 

Main common causes of warnings for take-off checklist

.

11.

  Launch the drone, it starts the mission and flies automatically from the point selected on the map (represented by a 

flag).

12.

  During the flight, you can watch live video streaming from the drone by pressing the ‘camera’ icon  

To come back to the mapping view, press the ‘map’ icon.

13.

  At the end of the flight, the drone comes back to the starting point and lands automatically. If needed, you can take 

control of the drone to land it at different location.

14.

 The photos are stored on the SD card. Remove the SD card from the drone to put it on your computer.

15.

 Go to 

parrot.airinov.com

 or 

cloud.pix4D.com

 and enter your email adress to create an account.

16.

   Select the photos from your SD card. In case you have performed the radiometric calibration of your Sequoia, add 

the images coming from the calibration to the selected photos. The upload will start and may take a few minutes 
depending on your internet connection.

17.

 A report will be emailed to you within 24 hours.

Summary of Contents for DISCO-PRO AG

Page 1: ...the supplied adapter depending on your country and insert it into the charger 3 Connect the cable to the charger 4 Connect the battery to the charger cable and then plug the charger into the AC outlet The charge time is approximately 55 minutes for an approximate flight time of 25 minutes The light indicator is red during charge and turns green when the battery is charged CHARGE THE BATTERY OF PAR...

Page 2: ...ective lens and the protective film 4 Insert the SD card in Parrot Sequoia 5 Place Parrot Sequoia in the dedicated slot 6 Connect the micro USB cable of Parrot Sequoia into the plug provided on Parrot C H U C K and put on the cover 7 Attach the drone s wings to the drone s body and make sure the wing is fully slotted into the arm of the servomotor ...

Page 3: ... on Parrot Skycontroller 2 and install the smart device in it 3 Connect the USB cable of your smart device from Parrot Skycontroller 2 to your smart device 5 Turn on Parrot Disco Pro AG The button must be green If the button is blue it means that the drone does not have a GPS signal Stand in a clear open space to pick up a signal 6 The Parrot Skycontroller button is green when it is connected 7 Pa...

Page 4: ...Pro AG 3 Select the mission GRID 4 The Pix4D Dashboard will appear 5 In the chosen mission menu display the local map by pressing the button Zoom out and scroll the map to the area you intend to go Then display the default flight plan by pressing the RESET button 6 Place this flight plan above the crops you intend to map by dragging it with your finger Rotate or adjust its size by dragging the cor...

Page 5: ...pressing the camera icon To come back to the mapping view press the map icon 13 At the end of the flight the drone comes back to the starting point and lands automatically If needed you can take control of the drone to land it at different location 14 The photos are stored on the SD card Remove the SD card from the drone to put it on your computer 15 Go to parrot airinov com or cloud pix4D com and...

Page 6: ...e immobile as shown in step 3 Do not cover the sunshine sensor with your shadow or your hand Make sure the calibration target is not covered by anything this includes shadows 3 Start the calibration process by pressing the start button 2 Follow the instructions 1 Access the Drone take off checklist and select Sequoia Radiometric Calibration 5 Once the calibration process has been completed the pic...

Page 7: ...ission of an interrupted one is described here 1 Tap Save when the mission is interrupted to SAVE the incomplete portion 2 In the HOME screen tap PROJECT LIST 3 In the PROJECT LIST screen tap the project name of the interrupted mission 4 In the MISSION 1 view the incomplete mission appears 5 In the MISSION 2 view the remaining mission has been created 6 Tap Open to OPEN the remaining mission 7 Tap...

Page 8: ...the chapter Set up a flight plan with Pix4Dcapture HOW TO IMPROVE QUALITY If the photos are not satisfactory you can relaunch a new mission with relevant modifications In windy conditions the flight may be longer as the drone try to stabilize before taking the picture Increase the overlap For advanced users the Front Overlap and Side Overlap can be changed in the settings section Note that the mem...

Page 9: ...also be done with FreeFlight Pro app BATTERY NOT CHARGED ENOUGH Charge the battery GPS POSITIONING NOT ACCURATE or HOME POINT DISTANCE UNKNOWN Put the drone in an open space as it may be too close to a wall or in a dark spot GEOFENCE Open the free FreeFlight Pro application Activate Wi Fi on your phone and open the application Connect Parrot Disco Pro AG Check in the settings if the default geofen...

Reviews: