background image

12 

     Kit contents

The kit contains:
• An LCD frame
• A power plug
• A USB cable
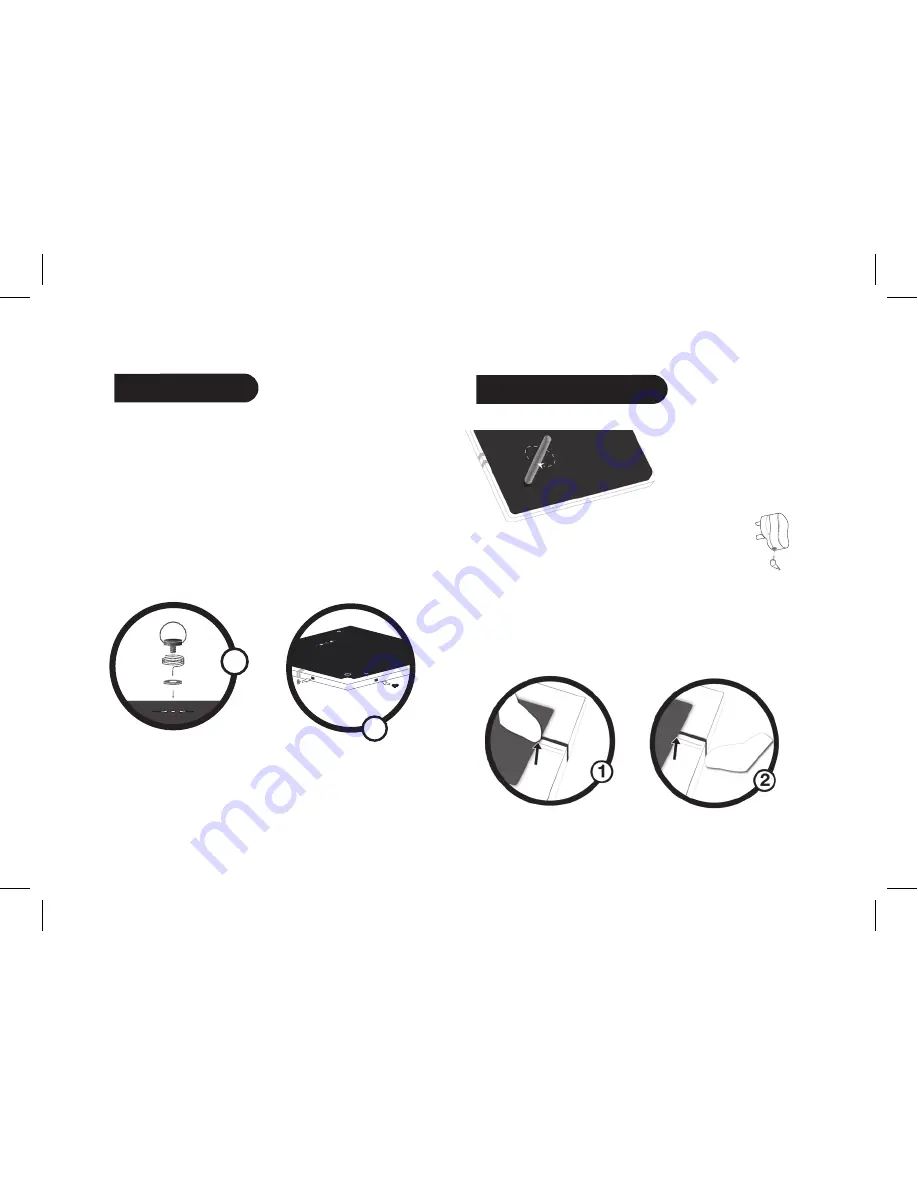
• A metal rod to be screwed into the frame  
• Four sets of four clips  
• A wall bracket (1) 
• A clip system (for fixing the power cable along the side of  
   the frame) (2)
• A user guide
• A Parrot product guide
 

     Quick Start Guide

• Screw the metal rod into the back of the frame.

• Connect the power cable connector to the  
   transformer and plug it into an electrical socket. 
   > The Parrot DF7220 automatically switches on. 
• Place the frame either in portrait or in landscape position.
• Choose the language to be used by the Parrot DF7220  
   (refer to the section entitled «Description of the Icons and  
   Features» in the «Settings» chapter)  

NOTE: USE THE CLIPS AS SHOWN IN THE DIAGRAM BELOW. 

1

2

1

Summary of Contents for DF7220

Page 1: ...TA DEU DUT ESP POR NOR Parrot DF7220 For Bluetooth mobile phones smartphones PDAs Bluetooth digital cameras and Bluetooth enabled computers 7 Digital photo frame Cadre photo numérique 7 USER MANUAL GUIDE UTILISATEUR FRA ENG ESP HEB 日本語 TÜR ˉˉ ARA 㻘幼 NOR SVE ČES PYC POL DAN Wireless 300 pictures USB SD card ...

Page 2: ......

Page 3: ... English 7 Français 21 Español 37 Italiano 53 Português 67 Deutsch 81 Dutch 97 ...

Page 4: ...laration of Conformity We ParrotS A of174quaideJemmapes 75010Paris France declareunderoursoleresponsibilitythatour product theParrotDF7220towhichthisdeclarationrelatesisinconformitywithappropriatestandards EN300328 EN301489 1 EN60950 following the provision of Radio Equipment and Telecommunica tion Equipment directive 1999 5 EC R TTE with requirements covering EMC directive 89 336 EEC Identificati...

Page 5: ... mechanical photocopy recording or otherwise is strictly prohibited without prior consent from Parrot General precaution Do not expose the Parrot DF7220 system to outside temperatures below 0 C or above 40 C The system could be damaged or the cabinet warped Avoid placing the system near a source of heat or exposing it to sunlight even through a window Similarly excessively low temperatures and hum...

Page 6: ......

Page 7: ...English ...

Page 8: ... menu 14 2 3 Settings menu 14 Sending pictures to the Parrot DF7220 15 1 Via Bluetooth 15 1 1 Pairing Your Phone or Computer with the Parrot DF7220 15 1 2 Sending from a Phone or PDA 16 1 3 Sending from a Computer 16 2 Via USB 17 3 Using a memory card 17 Settings 18 1 Picture Display Order 18 2 Deleting pictures 18 3 Frame Orientation 18 4 Choosing and Creating a Slideshow 19 Updating the software...

Page 9: ...el described in this guide If so a later version of this guide might be available in electronic format at Parrot s website at www parrot com 2 Correct Disposal of This Product Waste Electrical Electronic Equipment Applicable in the European Union and other European countries with separate collection systems This marking shown on the product or its literature indicates that it should not be dispose...

Page 10: ...s and a third grounding prong The wide blade or the third prong are provided for your safety If the provided plug does not fit into your outlet consult an electrician for replacement of the obsolete outlet 12 Only use attachments accessories specified by the manufacturer 13 Unplug this apparatus during lightning storms or when unused for long periods of time 14 Refer all servicing to qualified ser...

Page 11: ...ts long years of experience in the Bluetooth technology to offer you the Parrot DF7220 an innovative photo frame You can send your photos to the Parrot DF7220 via Bluetooth USB connection or an SD card The Parrot DF7220 is an LCD photo frame 410 x 234 pixels with a stylish design that can store over 300 photos It allows you to configure the display by programming slideshows or by rotating the fram...

Page 12: ...e Quick Start Guide Screw the metal rod into the back of the frame Connect the power cable connector to the transformer and plug it into an electrical socket The Parrot DF7220 automatically switches on Place the frame either in portrait or in landscape position Choose the language to be used by the Parrot DF7220 refer to the section entitled Description of the Icons and Features in the Settings ch...

Page 13: ...on Enters the selected menu or selects a photo The icon takes you back to the previous menu or exits the menus 2 Description of the Icons and Features 2 1 Main menu Returns to the previous menu or exits the menus Turns the photo to the right Displays the photos as thumbnails For choosing and creating slideshows Organises the order in which the photos are displayed Note photos on the memory card ca...

Page 14: ...the memory status and the picture displayed 2 3 Settings menu The Settings menu can be accessed from the main menu Returns to the main menu Time Adjust the time using the Select buttons Press the Enter button to confirm Visibility Enable Disable the permanent time display This is the default setting Format Select the format of the displayed time AM PM Visibility makes the Parrot DF7220 visible or ...

Page 15: ...tory settings doing so does not delete your photos Sending pictures to the Parrot DF7220 1 Via Bluetooth Depending on the model of your phone computer you may have to pair your Parrot DF7220 with your device before sending pictures on it for the very first time This procedure allows both devices to exchange information in order to configure a Bluetooth connection 1 1 Pairing Your Phone or Computer...

Page 16: ...rot DF7220 Several pictures can be sent at a time though this feature will depend on your device During transmission the Bluetooth icon appears on the screen and the picture is displayed 1 3 Sending from a Computer Windows Linux Mac Ensure that the Parrot DF7220 is visible to all Bluetooth devices Refer to the Settings chapter in this guide Activate the Bluetooth feature on your computer Right cli...

Page 17: ...s displayed Then reconnect the cable and transfer the remaining pictures 3 Using a memory card 1 Insert the memory card into the appropriate slot The JPEG and GIF pictures stored on the memory card are displayed You can now navigate through the memory card content using the Select buttons 2 Select the Copy icon Select one of the following options as required Copy current picture Copy selected pict...

Page 18: ... The selected photo is placed at the top of the screen on the Parrot DF7220 and a cursor indicates the photo s position in the album Press the Select buttons to change the photo s position You can change its position in all the pages of your album Once the cursor is in the position where you want to place the image press the Enter button 2 Deleting pictures The Delete submenu provides you with the...

Page 19: ...ailable for the default slideshow Timer defines the slideshow display time Picture order used to define the order in which the photos are displayed in the slideshow not available for the default slideshow Random arranges the photos in the slideshow at random Delete slideshow resets the slideshow the selected images will no longer be part of the slideshow but they will not be deleted from the frame...

Page 20: ...ours Internal memory of 32 MB for storing over 300 photos Light sensor for the automatic backlight mode Weight frame only 340 g Dimensions 193 x 147 mm Power supply Input 100 240 V 50 60 Hz 0 2A Output 12Vdc 1A Temperature Max Rating 40 C 2 Bluetooth Bluetooth 2 0 EDR qualified Bluetooth PIN Code 0000 Profiles supported FTP File Transfer Profile OPP Object Push Profile BIP Basic Imaging Profile SP...

Page 21: ...Document imprimé par une entreprise IMPRIM VERT FRA ENG ITA DEU DUT ESP POR NOR FCC ID RKXKORO w w w p a r r o t c o m FRA ENG ESP FCC ID RKXKORO w w w p a r r o t c o m FRA ENG ESP ...

Reviews: