ANAFI assembly and disassembly processes
21
-
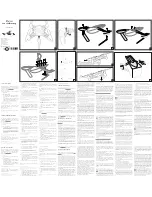
Looking the drone from the bottom, position the left side antennas, take the rear foot
antenna (rear antennas have a white fool proof device), slide it under the vertical camera
and plug it to the second connector on the right side. Insert the wire on the cross-shaped slot
(step 12). Finish the process by plugging the wire on the ground reminder (step 13).
-
Connect the front antenna (left side) to the first connector on the left, then connect it on the
ground reminder.
-
Connect the right rear antenna to the second connector on the left side before inserting the
wire in the cross-shaped slot and plugging it to the ground reminder.
-
Finally, connect the right front antenna to the first connector on the right side, after sliding it
under the vertical camera, and connect the ground reminder.
Follow those steps:
11 → 12 → 13 → 21 → 22 → 31 → 32 → 33 → 41 → 42
-
Once every antenna wire has been positioned, conclude the process by plugging them to the
holders near the vertical camera.
-
Insert the plastic holder which holds the flex cable to the motherboard by attaching the left
side first, then the right side. Make sure the stamp is positioned on the dedicated hole.
-
Insert the ventilator in the dedicated slot of the bottom cover. The sticker on the ventilator
must be turned toward the inside of the drone.
-
Connect the LED card.
-
Make sure there is enough free wire to let the gimbal move in any direction.
-
Insert the bottom cover, starting from the front side, before clipping it; make sure no wire is
visible.
-
Conclude the assembly process by screwing the bottom protection back.