


F4701
Installation & Operating Instructions for the
Owner’s Installation ,Manual
WARNING: SHUT POWER OFF AT FUSE OR CIRCUIT BREAKER
Parrotuncle Lighting, 218 Black Tie Lane, Chapel Hill, NC
www.parrotuncle.com
Parrot Uncle YOU CAN BE SURE OF are
trademarks of Eileen Grays LLC.
Used under license by Eileen Grays LLC.
All rights reserved.
Made in
China
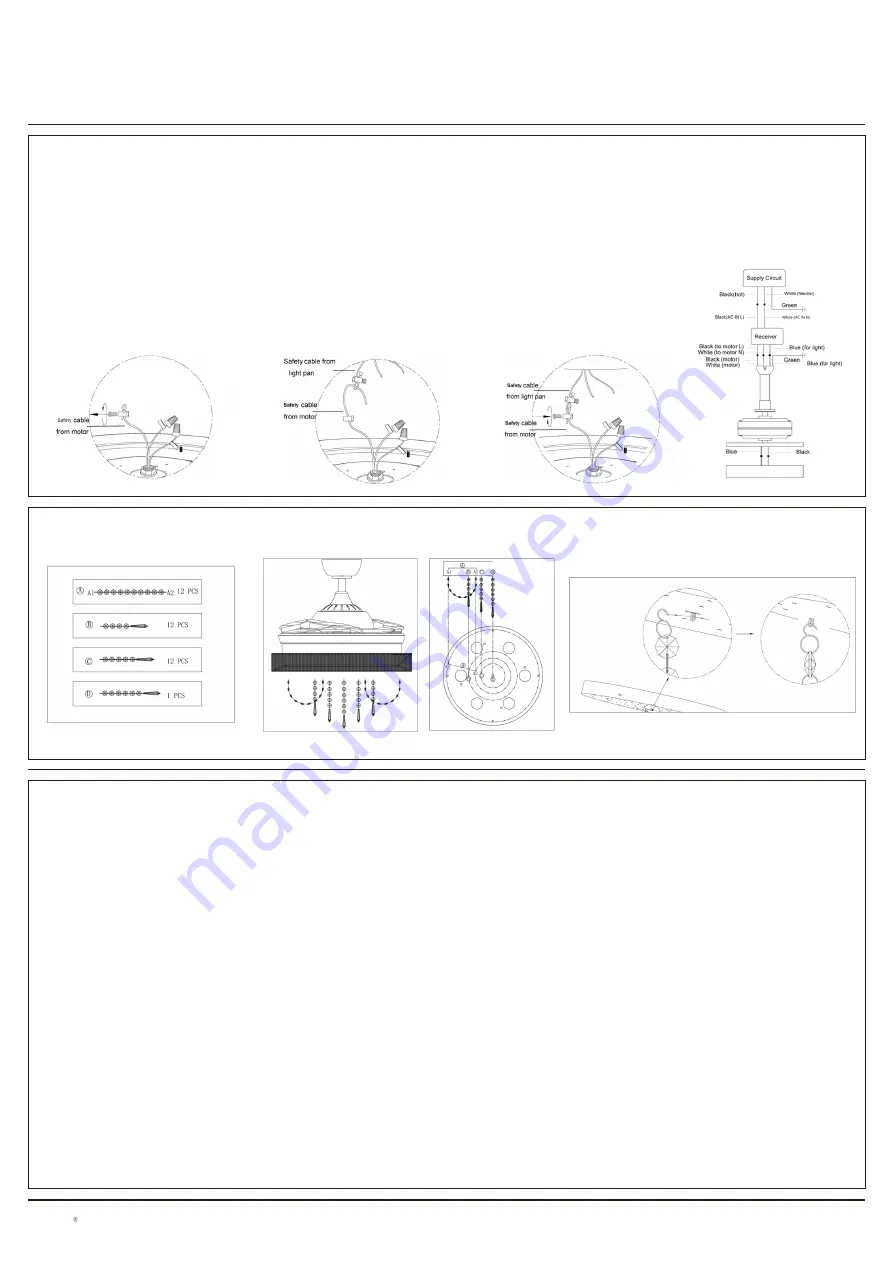
MAKE THE ELECTRIC CONNECTIONS
WARNING: To avoid possible electrical shock, be sure electricity is turned off at the main fuse box before wiring NOTE: Do not connect the motor supply cable to a dimmer switch.
AFTER INSTRUCTION
WOBBLE
The fan blades have been adjusted in the factory to minimize any wobble
NOTE:CEILING FANS TEND TO MOVE DURING OPERATION DUE TO THE FACT THAT THEY ARE MOUNTED ON A RUBBER CROMMET. IF THE FAN WAS MOUNTED RIGIDLY TO THE CEILING,
IT WOULD CAUSE EXCESS VIBRATION. MOVEMENT OF A FEW CENTIMETERS IS QUITE ACCEPTABLE AND DOES NOT SUGGEST ANY PROBLEM
TO REDUCE THE FAN WOBBLE: PLEASE CHECK THAT ALL SCREWS WHICH SECURED THE MOUNTING BRACKET AND DOWNROD ARE SECURE.
BALANCING A WOBBLING CEILING FAN:
For your convenience, a Balancing Kit is included; please follow this procedure when balancing the fan:
1) Install fan without light dome before balancing the fan.
2) Define the base plate into four areas(point A,B,C&D). Use one weight from the balance kit to lightly stick on the edge of the base plate(Point A), if the wobble worsens, then take off the balance
kit to lightly stick on the opposite side(Point B); if the wobble is worse,then go to the adjacent point C or D, if the wobble gets better, then securely stick on the weight at this location on the base
plate.
3) After balancing the fan, assemble the light dome to the light base.
NOISE
When it is quiet(especially at night) you may hear occasional small noises. This is normal. Please allow a 24-hour “breaking-in” period, most noises associated with a new fan disappear during
the time.
CARE AND CLEANING
1. Periodic cleaning of your ceiling fan is the only maintenance required. Use a soft brush or lint free cloth to avoid scratching the paint finish. Please make sure to turn off electricity power before
you clean your fan
2. Do not use water when cleaning your ceiling fan. It could damage the motor or the blades and create the possibility of an electrical shock.
3. Motor has permanently lubricated ball bearing. No need to oil
NOTE: MAKE SURE THE POWER IS OFF AT THE ELECTRICAL PANEL BOX BEFORE YOU ATTEMPT ANY CLEANING OR REPAIRS.
INSTALLING THE DECORATIVE PENDANTS
You should have below contents for assembly:
Please follow the below instructions to assemble the crystal chains properly
1.
Insert the receiver into the mounting bracket with the flat side of the receiver facing the ceiling.
2.
Motor to Receiver Electrical Connections: Connect the Black wire from the fan to Black wire from the receiver. Connect the white wire from the fan to the white wire from the receiver. Connect
the blue wire from the fan to the Blue wire from the receiver. Secure wire connections with the wire nuts provided.
3.
Receiver to House supply wires Electrical Connections: Connect the black(hot) wire from the ceiling to the black wire from the receiver. Connect the white(neutral) wire from the ceiling to the
white wire from the Receiver. Secure the wire connections with the wire nuts provided.
4. Grounding wire connection: Connect the grounding wire from the ceiling to green wire from mounting bracket and downrod. Secure wire connection with
wire nuts provided.
5. Light kit to motor wires Electrical Connections: Connect the two white wires from light pan to the black and blue wires from fan. Secure the wire
connections with the wire nuts provided.
NOTE: The safety cables must be installed into the light kit during the wire connection. Please follow the below steps for safety cables installation into the
light kit.


