background image

3

3. 

Prior to Using for the First Time

Before using your dishwasher for the first time:

A.  

 Fill the rinse aid dispenser

B.  

 Fill in detergent

A. Fill the Rinse Aid Dispenser

The rinse aid is released during the final rinse to prevent water from forming droplets on your dishes, which can 
leave spots and streaks. It also improves drying by allowing water to roll off the dishes. Your dishwasher is 
designed to use liquid rinse aids. The rinse aid dispenser is located inside the door next to the detergent dispenser. 

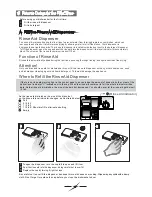
To fill the dispenser, open the cap and pour the rinse aid into the dispenser until the level indicator turns completely 
black. The volume of the rinse aid container is about 110ml.

Rinse Aid  Dispenser 

Function of Rinse Aid

Rinse aid is automatically added during the last rinse, ensuring thorough rinsing, and spot and streak free drying.

Attention! 

Only use branded rinse aid for dishwasher. Never fill the rinse aid dispenser with any other substances, such 
as dishwasher cleaning agent and liquid detergent. This would damage the appliance. 

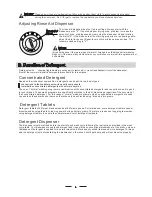
As the rinse aid diminishes, the size of the black dot 
on the rinse aid level indicator changes, as illustrated below.
       Full
       3 / 4 full
       1 / 2 full
       1 / 4 full - Should refill to eliminate spotting
       Empty

If there is no rinse aid warning light in the control panel, you can judge the amount of rinse aid by the colour of the 
optical level indicator "C" located next to the cap. When the rinse aid container is full, the whole indicator will be 
dark. As the rinse aid diminishes, the size of the dark dot decreases. You should never let the rinse aid get below 1 

/ 4 full.

When to Refill the Rinse Aid Dispenser

      To open the dispenser, turn the cap left to open and lift it out.
       Pour the rinse aid into the dispenser, being careful not to overfill.  
       Replace the cap by turning it right to close.

Be careful not to overfill the dispenser, because this could cause over suding. Wipe away any spills with a damp
cloth. Don’t forget to replace the cap before you close the dishwasher’s door.

1

2
3

1

2

3

C (Rinse Aid indicator) 

Summary of Contents for PD6-PSDF-1

Page 1: ...of Parmco Appliances commitment to improving and upda ng product ranges we reserve the right to alter change and update technical speci ca ons and appearance a ributes of all Parmco Appliances product...

Page 2: ...te of all detailed technical information and installation instructions It is essential that you only allow a qualified technician to install this appliance to ensure the safety and reliability of this...

Page 3: ...the buzzer of the dishwasher will sound 8 times then stop Turn off the appliance using the Power button If the appliance is switched off during a wash cycle Open the door carefully Hot steam may esca...

Page 4: ...onal technicians Dishwasher Features 2 3 Prior to Using for the First Time 3 4 Loading the Dishwasher Basket 6 Attention before or after loading the Dishwasher Baskets 6 6 Maintenance and Cleaning 10...

Page 5: ...angerously bent or flattened The maximum permissible inlet water pressure is 1Mpa If the supply cord is damaged it must be replaced by the manufacturer its service agent or a similarly qualified perso...

Page 6: ...n the machine is working 5 Power Button to turn on off the power supply 8 Child lock button press the two buttons simultaneously to lock the program 4 Delay Button to delay the wash cycle 3 Program Bu...

Page 7: ...aid dispenser with any other substances such as dishwasher cleaning agent and liquid detergent This would damage the appliance As the rinse aid diminishes the size of the black dot on the rinse aid l...

Page 8: ...of normal washing programs in combination with concentrated detergents reduces pollution and is good for your dishes These wash programs are specifically matched to the dirt dissolving properties of t...

Page 9: ...h detergent The marking indicates the dosing levels Fill with main wash cycle detergent Fill with pre wash cycle detergent Please observe the manufacturers dosing and storage recommendations as stated...

Page 10: ...y in the upper basket Please do not overload your dishwasher This is important for good results and for reasonable consumption of energy Recommendations Consider buying utensils which are identified a...

Page 11: ...Method of Loading Normal Dishware IN IN 7 Folding Spikes of Lower Basket For better stacking of pots and pans the spikes can be folded down as shown in the picture below Folding back the cup shelves F...

Page 12: ...A shorter wash for lightly soiled loads that do not need drying Soak Pre wash Starting a Washing Program Wash Cycle Table NOT means need to fill the Rinse Aid Dispenser For heavily soiled loads such a...

Page 13: ...ased and the appliance may have already drained the wash water If this is the case the detergent dispenser must be refilled see the section entitled Loading the Detergent Press the Start Pause button...

Page 14: ...se filter 2 Fine filter 3 2 3 1 Filter assembly The filter efficiently For best performance and results the filter must be cleaned regularly For this reason it is a good idea to remove the larger food...

Page 15: ...ock them to prevent any contorsion or decrease WARNING To clean the edge around the door you should use only a soft warm damp cloth To avoid water entering into the door lock and electrical components...

Page 16: ...sitioning the Appliance About Power Connection WARNING For personal safety DO NOT USE AN EXTENSION CORD OR AN ADAPTER PLUG WITH THIS APPLIANCE DO NOT UNDER ANY CIRCUMSTANCES CUT OR REMOVE THE EARTHING...

Page 17: ...ime will be shortened by about 15 minutes and the wash efficiency slightly reduced The connection must be made to the hot water line following the same procedures as described in the section for the c...

Page 18: ...extension make sure to use a similar drain hose The total length should not exceed 4 metres otherwise the cleaning effect of the dishwasher could be reduced Water Outlet Ensure that the water drain h...

Page 19: ...ray arm Interrupt the program and rearrange the items of crockery This has no influence on the dishwasher function If in doubt contact a suitably qualified plumber Stained tub interior Detergent with...

Page 20: ...st This prevents water from dripping off dishes in the upper basket In shorter programs the washing temperature is lower This also lowers cleaning performance Choose a program with a longer wash time...

Page 21: ...y see rating label Capacity 14 place settings 17 Technical Information WARNING If overflow occurs turn off the main water supply before calling a service If there is water in the base pan because of a...

Page 22: ...3 Glasses Saucers 2 1 Cups 1 Upper basket 2 Lower basket IN 2 1 1 1 1 1 3 1 1 2 2 3 3 3 1 3 4 Dinner plates 5 Soup plates Dessert dishes 6 IN 4 5 6 6 6 Loading the Baskets 18...

Page 23: ...1 1 2 2 3 3 4 4 5 5 Information for comparability tests in accordance with AS NZS 2007 1 Capacity 14 place settings Position of the upper basket lower position Program Normal Rinse aid setting 6 or ma...

Page 24: ...o Appliances 2 year warranty The Warranty J Z Z __ The Warranty is not valid Z Liability under this warranty will not be accepted for p 09 573 5678 f 09 573 5699 e sales parmco co nz w www parmco co n...

Reviews: