PARKZONE Typhoon 3D Instruction Manual Download Page 5


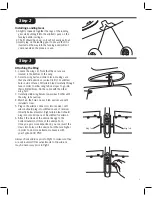
prop are visible from front of airplane.


and tighten securely.

1. Slide propeller on. Make sure pitch numbers on 

2. Slide washer on first. Next, screw the nut on 

3. Attach spinner.


Installing the Propeller and Spinner

Your Typhoon


3D PNP has two props that are included. 

You can select the prop that best works with your 

flying style.

A. 13.5 x 7 (PKZ1006): This prop is recommended for 

the first several flights on your plane. This prop 

will allow your plane to fly a bit slower, but is also 

the setup for maximum vertical power (especially 

with the 9-cell Ni-MH pack).

B. 12 x 8.75 (PKZ1007): This prop will allow you 

to fly at faster speeds and help with certain 

aerobatic maneuvers. This propeller is ideal for the 

Thunder Power 3S 2100mAh Li-Po battery pack.

When you have selected the propeller that best works

for you, install and secure it making sure not to forget

any of the necessary hardware. 

Step 5

Step 6

5

Installing the Receiver

Carefully plug in the servo leads into the 

corresponding channels of the receiver you have 

chosen. The servo plugs may have to be trimmed 

carefully with a hobby knife if you are using a JR

®


or HiTec radio system in order to fit correctly into 

the receiver.
Confirm that the servo leads/plugs are in the 

correct channel of the receiver. Do this by: 

1. Turning on the transmitter

2. Installing a charged flight battery

3. Turning on receiver switch.

4. Check all functions to ensure proper setup. 

Keep all body parts away from the propeller. 

You can also make any trim adjustments to the 

control surfaces at this time. Once you are 

satisfied that the channels are functioning 

correctly, you can turn off the radio system.

Install the receiver into the allotted space within the 

fuselage. Make sure it is secure.
Carefully route the antenna so it exits the fuselage 

just behind the canopy. It should then simply fall 

along the fuselage and can be secured through the 

vertical stab. When the antenna is routed correctly, 

it should hang several inches (5”–7”) below the 

fuselage.

Center of Gravity Information

Your ParkZone  Typhoon

 3D Plug-N-Play

 aircraft can be 

powered by either a 9-cell Ni-MH 1000mAh battery pack 

(PKZ1027), or by the Thunder Power 3S 2100mAh 

battery pack (THP21003S).

The center of gravity (CG) for your Typhoon 3D PNP, with 

the 9-cell Ni-MH pack, is approximately 3.50 inches 

(90mm) back from the leading edge of the wing. The CG 

with the 3S 2100mAh Li-Po is approximately 3.70 inches 

(95mm) back from the leading edge of the wing.

Additionally, you may choose to make the first several 

flights with the included spanner (prop wrench) taped to 

the inside or bottom of the cowl. This will add .3 ounces 

(8.5 g) and may help you to get used to the flight 

characteristics of this 3D airplane.

Aileron, Elevator, and Rudder Throws


The recommended throws in low rate are:

Ailerons: +/- .75 inches (20mm)

Elevator: +/- 1.40 inches (35mm) 

Rudder: +/- 1.00 inch (25mm)

The recommended throws in high rate are:

Ailerons: +/- 1.25 inches (30mm)

Elevator: +/- 2.00 inches (50mm) 

Rudder: +/- 2.00 inches (50mm)

Your Typhoon

 3D PNP should fly great between these ranges.

Summary of Contents for Typhoon 3D

Page 1: ...lyer Wingspan 39 5 in 1000mm Required 4 channel transmitter minimum 4 channel receiver minimum 3S 2100mAh Li Po battery or 9 cell 1000mAh Ni MH battery Overall Length 34 in 862mm Flying Weight 26 oz 740 g Motor ParkZone BL400 15T brushless with gearbox ...

Page 2: ...uch maneuvers as harriers blenders hover ing knife edges and more Warning Although your ParkZone Typhoon 3D PNP comes almost ready to fly this aircraft is for experienced RC pilots only and is not a toy Misuse of the plane can cause serious bodily harm and damage to property Therefore only an experienced RC pilot should fly it 2 Advancing your Flying Skills Once you have begun to fly your Typhoon and...

Page 3: ... hole in side of fuse Pull aileron lead carefully through fuse in order to allow wing tab and spar to go into their allotted holes Do the same with the other wing half 3 Carefully slide wing halves toward each other until the wing tabs overlap 4 Match up the holes on each tab and secure with included screw 5 Plug in the aileron connectors into receiver Left aileron should plug into allotted space ...

Page 4: ... side 4 Locate rudder Carefully snap tail wheel wire into the clip on bottom of fuse as shown 5 Use the three pins that are supplied to connect rudder to stab as shown Do this by pushing pins in carefully 6 Install keepers on backside to secure pins as shown 7 Attach rudder and elevator pushrods to respective control horns outer holes of control horns for both Note It may be necessary to re trim c...

Page 5: ...up Keep all body parts away from the propeller You can also make any trim adjustments to the control surfaces at this time Once you are satisfied that the channels are functioning correctly you can turn off the radio system Install the receiver into the allotted space within the fuselage Make sure it is secure Carefully route the antenna so it exits the fuselage just behind the canopy It should the...

Page 6: ...etting of this parameter the controller will wait approximately 3 seconds before moving to next menu item B Menu Item 2 Brake Setting 2 beeps brake setting Need to act within 5 seconds Brake off up stock setting Brake on down C Menu Item 3 Motor Timing 3 beeps motor timing Need to act within 5 seconds Outrunner and 4 pole or greater motors up Inrunner 2 pole motors down stock setting After setting...

Page 7: ... if you are using a Li Po battery Flying approved site always avoid flying near houses trees wires and buildings You should also be careful to avoid flying in areas where there are many people such as busy parks or school yards Always follow local ordinances We recommend only flying your Typhoon in light winds Prior to each flight Always make sure that your Typhoon 3D PNP is properly trimmed From time...

Page 8: ...free at 1 877 504 0233 If your plane requires inspection please follow these steps in order to return it to us 1 Call our Product Support team for return authorization Warranty and Follow Up Procedures 2 Use the Service and Repair Checklist from www horizonhobby com under the support tab or write a detailed letter that includes Your name address home phone number and daytime phone number A list of...

Page 9: ...arts Typhoon 3D 9 99 PKZ4126 Cowl Typhoon 3D 2 49 PKZ4128 Gearbox with Pinion Typhoon 3D 8 99 PKZ4130 Mini Servo 3W with Arms Typhoon 3D 12 99 PKZ1131 Servo Gear with Accessories 2 49 PKZ1519 1 8A Variable Rate DC Peak Charger 29 99 PKZ1027 10 8V 9 Cell Battery P 51D Typhoon 3D 32 99 Optional Parts THP21003SPL Thunder Power 3S 2100mAh Li Po Battery Pack 84 95 EFLC3005 Celectra 1 to 3 Cell Li Po Ch...

Page 10: ...PKZ4176 ParkZone products are distributed exclusively by Horizon Hobby Inc 4105 Fieldstone Road Champaign IL 61822 2005 Horizon Hobby Inc www parkzone com 7899 1 6 0 5 4 8 2 1 4 5 5 3 1 ...

Reviews: