PARKZONE RTF P-51 MUSTANG BL Instruction Manual Download Page 6

10

11

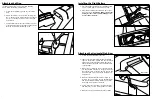
6.  Move the stick full forward. When this is done,  

the elevator control surface should move down.

7.  When the test is complete, be sure to disconnect 

the flight battery first, and then turn off the  

transmitter. This should be done each time you 

turn off the airplane.

Note:

 It is very important to make sure that the  

control surfaces are at 0 degrees when the  

transmitter’s control stick and trim levers are  
centered. (See Steps 5 and 8 for making needed  
adjustments to control surfaces.) 

If your airplane is not responding correctly to the  
transmitter input, do not fly! Some correction is needed. 

Making Adjustments to the Ailerons

Control Throws and Center of Gravity

Choosing a Flying Field

Warning: 

Keep everything clear of the propeller  

before adjusting the ailerons in the event that you  

accidentally turn on the motor.

You may find some adjustment is needed to properly 
trim the ailerons. The ailerons are properly trimmed when 
each aileron is level with the stationary wing surface. To 
do this, follow these simple instructions:

1.  Make sure the throttle slider is in the “off” position 

and then turn on the transmitter.

2.  Install the flight battery and plug it into the lead 

from the fuselage.

3.  Most trim adjustments to the ailerons can be made 

with the aileron trim levers on the transmitter. Make 

sure the gimbal (stick) is at neutral prior to making 

any trim changes.

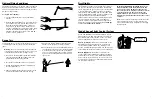
4.  If trimming the ailerons with the trim levers is not 

sufficient, and the ailerons need to be trimmed 

mechanically, you’ll need to do the following:

a.  With the radio system on, return the trim levers and 

gimbal to their neutral positions.

b.  Slide the silicone keeper back and open the clevis 

and remove the clevis from the aileron control 

horn. 

c.  Thread the clevis in or out to move the aileron to 

the neutral position.

d.  Reattach the clevis to the aileron control horn and 

slide the silicone keeper back over the clevis to  

prevent the clevis from opening in flight.

Control Throws:
 

Low Rate 

High Rate

Aileron: 

1/4 inch (6.4mm) 

3/8 inch (9.5mm)

Elevator:  1/4 inch (6.4mm) 

3/8 inch (9.5mm)

Center of Gravity:
2 3/4 inches (70.0mm)  From leading edge of the wing at 
the fuselage.

Note:

 The small oval panel line on the top of the wing 

marks the correct CG location.

• A large, open grassy field is required to fly your 

P-51D Mustang. Your P-51 can cover ground fast. 

The choice of a large field will ensure greater  

success for your flight.

• It is essential to have a minimum of 300 feet of clear 

space in all directions from the pilot.

• Make certain that you do not fly near trees,  

buildings, or other areas that can restrict your view 

or interfere with your flying. NEVER fly near streets, 

parking lots, or people.

Fly in this area 

 (upwind of pilot).

Stand here.

WIND

Summary of Contents for RTF P-51 MUSTANG BL

Page 1: ...Revised 2 10 PKZ1800 14597 1 www parkzone com Instruction Manual ...

Page 2: ...d common sense and requires some basic mechanical ability Failure to operate this Product in a safe and responsible manner could result in injury or damage to the product or other property This product is not intended for use by children without direct adult supervision Do not attempt disassemble use with incompatible components or augment product in any way without the approval of Horizon Hobby I...

Page 3: ...me and protects your Lithium Polymer battery from the dangers of overcharging This charger continually monitors the battery and automatically stops charging when the battery is fully charged DC Li Po Balancing Charger Features Charges 3 cell lithium polymer battery packs at 1 amp LED charge status indicator 12V accessory outlet input cord you must charge the included Li Po battery pack with a Li P...

Page 4: ...ocate the horizontal stab of the tail 2 Slide the horizontal tail stab through the allotted space in the fuselage making sure the control horn attached to the horizontal tail stab will properly align with the pushrod and clevis exiting the back of the fuselage 3 When you are certain the tail is centered correctly use the provided clear tape to properly secure the tail to the fuselage as shown Use ...

Page 5: ... this step each time you need to turn the airplane off When finished with the motor test be sure to disconnect the battery first and then turn off the transmitter Each time you use your airplane you should always place the throttle in the off position and then turn on the transmitter and plug the battery pack into the lead from the fuselage 7 Make any trim adjustments as necessary prior to flight ...

Page 6: ...he aileron trim levers on the transmitter Make sure the gimbal stick is at neutral prior to making any trim changes 4 If trimming the ailerons with the trim levers is not sufficient and the ailerons need to be trimmed mechanically you ll need to do the following a With the radio system on return the trim levers and gimbal to their neutral positions b Slide the silicone keeper back and open the cle...

Page 7: ...e ParkZone 3 channel control system is designed for the experienced radio control pilot and is not intended for the inexperienced flyer If you have successfully flown 3 channel HobbyZone airplanes then you should be ready for the P 51D Mustang However first time pilots of the P 51D Mustang should seek the assistance of an experienced RC flyer until the additional third channel pitch control has be...

Page 8: ... into the wind while keeping the wings level Do not throw it up or down Point it level parallel with the ground when launching THROW IT HARD until you become accustom to the amount of force it takes to launch the plane 7 Keep steering into the wind and hold at full throttle in a slight climb until you have reached an altitude of at least 50 to 70 feet 15 to 21 meters 8 When you have reached this a...

Page 9: ...he missing pieces However if the damage is severe or if the wings and or tail are bent replace the damaged parts prior to flying again See the last few pages of the manual for a complete list of replacement parts for your P 51D Mustang Note Horizontal stabilizer is not compatible with regular CA Use foam safe CA or replace stabilizer if damaged Specifications Continuous Current 18A Max Burst Curre...

Page 10: ...d in a warranty claim Repair or replacement decisions are at the sole discretion of Horizon This warranty does not cover cosmetic damage or dam age due to acts of God accident misuse abuse negligence commercial use or modification of or to any part of the Product This warranty does not cover damage due to improper installation operation maintenance or attempted repair by anyone other than Horizon ...

Page 11: ...Product Support All other products 4105 Fieldstone Rd Champaign Illinois 61822 USA 877 504 0233 productsupport horizonhobby com United Kingdom Horizon Hobby Limited Units 1 4 Ployters Rd Staple Tye Harlow Essex CM18 7NS United Kingdom 44 0 1279 641 097 sales horizonhobby co uk Germany Horizon Technischer Service Hamburger Str 10 25335 Elmshorn Germany 49 4121 46199 66 service horizonhobby de Franc...

Page 12: ...22 23 ...

Reviews: