15
GB
Use / Use of accessories
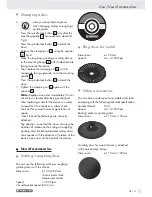
Changing a disc
Always wear protective gloves
when changing cutting or roughing /
grinding discs.
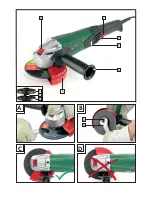
Press the spindle lock button
9
only after the
mounting spindle
7
has reached a standstill,
Fig. A.
Press the spindle lock button
9
to block the
drive.
Release the clamping nut
6
using the spanner
10
, Fig. B.
Place the roughing, grinding or cutting disc on
to the mounting flange
8
with its labelled side
facing towards the device.
Then replace the clamping nut
6
, with its
raised side facing upwards, on to the mounting
spindle
7
.
Press the spindle lock button
9
to block the
drive.
Tighten the clamping nut
6
again with the
spanner
10
.
Note:
Replace a new disc immediately if it runs
unevenly or vibrates after being exchanged.
After replacing a disc let the device run under
no load for 30 seconds as a safety check.
Look out for unusual noises or generation of
sparks.
Check that all the fastenings are correctly
attached.
Pay attention to see that the arrow showing the
direction of rotation on the cutting or roughing /
grinding discs (including diamond cutting discs)
corresponds with the direction of rotation of the
device (see arrow on the head of the device).
Use of accessories
Cutting / roughing discs
You can use the following cutting or roughing/
grinding discs with this device:
Dimensions:
ø 125 x 22,2 mm
to max. 6 mm thick
(depressed centre)
Speed: 12.000
rpm
Circumferential speed: 80 m / sec
Flap discs for metal
Dimensions: ø
125
mm
Speed: min.
12.000
rpm
Other accessories
You can also use abrasive consumables and tools
complying with the following technical specification:
Spindle thread:
M14
Speed: min.
12.000
rpm
Backing plate for grinding discs
Dimensions:
ø 115 mm / 125 mm
Grinding discs for wood / masonry attached
with hook and eye fixings
Dimensions:
ø 115 mm / 125 mm
Summary of Contents for PWS 1010 - MANUEL 2
Page 3: ...A B 9 2 5 6 7 8 C D 6 10 1 3 4...
Page 4: ...E F G...
Page 34: ...34...
Page 48: ...48...
Page 62: ...62...
Page 76: ...76...
Page 90: ...90...


