background image

39

GB

2.  Introduction

Manufacturer:

Scheppach GmbH
Günzburger Straße 69
D-89335 Ichenhausen

Dear customer,

We hope your new tool brings you much enjoyment and suc-
cess.

Note:

In accordance with the applicable product liability laws, the 
manufacturer of this device assumes no liability for damage to 
the device or caused by the device arising from:
• Improper handling,
• Non-compliance with the operating manual,
• Repairs carried out by third parties, unauthorised specialists.
• Installing and replacing non-original spare parts,
• Application other than specified,
• Failure of the electrical system in the event of the electrical 

regulations and VDE provisions 0100, DIN 13 / VDE0113 
not being observed.

Please consider:

Read through the complete text in the operating manual before 
installing and commissioning the device.
This operating manual should help you familiarise yourself with 
your power tool and teach you how to use it for its intended 
purpose.
The operating manual include important instructions for the 
safe, proper and economic operation of the power tool, for 
avoiding danger, for minimising repair costs and downtimes 
and for increasing the reliability and extending the service life 
of the power tool.
In addition to the safety instructions in this operating manual, 
you must also observe the regulations applicable to the opera-
tion of the power tool in your country.
Keep the operating manual package with the power tool at 
all times and store it in a plastic cover to protect it from dirt 
and moisture. They must be read and carefully observed by all 
operating personnel before starting the work. The power tool 
may only be used by personnel who have been trained to use 
it and who have been instructed with respect to the associated 
hazards. 
In addition to the safety instructions in this operating manual 
and the separate regulations of your country, the generally 
recognised technical rules relating to the operation of such ma-
chines must also be observed.
We accept no liability for accidents or damage that occur due 
to a failure to observe this manual and the safety instructions.

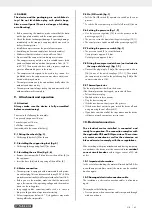
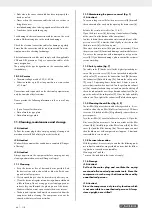
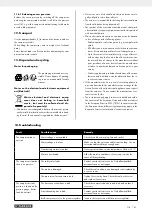
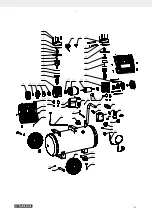
3.  Device description (fig. 1-9)

1.  Transport handle
2.  Pressure switch
3.  On/off switch
4.  Air filter
4a.  Filter housing
4b.  Filter element
4c.  Filter cover
4d.  Hose
5.  Wheel
5a.  Fillister head screw
5b.  Washer
6.  Drain screw for condensate
7.  Supporting foot
7a.  Screw
7b.  Washer
8.  Pressure vessel
9.  Safety valve
9a.  Exhaust nut
9b.  Connection lock
9c.  Cap of exhaust nut
10.  Quick coupling (regulated compressed air)
11.  Quick coupling (regulated compressed air)
12.  Pressure gauge (set pressure can be read off)
13.  Pressure gauge (vessel pressure can be read off)
14.  Compressed air hose (not included in the scope of de-

livery)

14a. Plug nipple
14b. Quick coupling
15.  Pressure regulator
16.  Transport lid

4.  Scope of delivery

1x air filter 
1x supporting foot
2x wheel 
1x compressed air hose
1x assembly material
1x operating manual

5.  Proper use

The compressor is designed to generate compressed air for 
compressed-air driven tools which can be driven with an air 
volume of up to approx. 180 l/min (e. g. tire inflator, blow-out 
pistol and paint spray gun). Due to the limited air output it is 
not possible to use the compressor to drive tools with very high 
air consumption (for example orbital sanders, die grinders and 
hammer screwdrivers).

The compressor may only be operated in a dry and well venti-
lated indoor space.

The machine may only be used in the intended manner. Any 
use beyond this is improper. The user/operator, not the manu-
facturer, is responsible for damages or injuries of any type re-
sulting from this.

Summary of Contents for PSKO 2410 A1

Page 1: ...nalbetriebsanleitung DE BG TIHI KOMPRESOR Upute za poslu ivanje i za Va u sigurnost Prijevod originalnih uputa za uporabu HR QUIET COMPRESSOR Operating and Safety Instructions Translation of Original...

Page 2: ...or dem Lesen die Seite mit den Abbildungen aus und machen Sie sich anschlie end mit allen Funktionen des Ger tes vertraut DE Before reading unfold the page containing the illustrations and familiarise...

Page 3: ...2 15 10 13 6 12 11 5 16 4 7a 7 14 3 5 5b 5a 1 1 7 6 5 8 2 3 4 14b 14a 14 13 12 9 10 11 7b...

Page 4: ...6 4d 4 8 4a 4c 4d 7 9 9c 9a 9b 8 9 4a 4b 4c 4d...

Page 5: ...immungsgem e Verwendung 3 6 Sicherheitshinweise 4 7 Technische Daten 7 8 Vor Inbetriebnahme 7 9 Aufbau und Bedienung 7 10 Elektrischer Anschluss 8 11 Reinigung Wartung und Lagerung 8 12 Transport 9 13...

Page 6: ...Tragen Sie einen Atemschutz Warnung vor hei en Teilen Warnung vor elektrischer Spannung Warnung Die Einheit ist ferngesteuert und darf ohne Warnung anlaufen Warn und Sicherheitshinweise beachten Setze...

Page 7: ...r die damit verbunde nen Gefahren unterrichtet sind Neben den in dieser Bedienungsanleitung enthaltenen Sicher heitshinweisen und den besonderen Vorschriften Ihres Landes sind die f r den Betrieb von...

Page 8: ...rkzeug zu tragen aufzuh ngen oder um den Stecker aus der Steckdose zu ziehen Hal ten Sie das Kabel fern von Hitze l scharfen Kanten oder sich bewegenden Ger teteilen Besch digte oder verwickelte Kabel...

Page 9: ...lle haben ihre Ursache in schlecht gewarteten Elektrowerkzeugen f Halten Sie Schneidwerkzeuge scharf und sau ber Sorgf ltig gepflegte Schneidwerkzeuge mit scharfen Schneidkanten verklemmen sich wenig...

Page 10: ...rbspritzen Halten Sie beim Bef llen das Spr hvorsatzger t vom Kom pressor entfernt damit keine Fl ssigkeit in Kontakt mit dem Kompressor kommt Spr hen Sie nie mit dem Spr hvorsatzger ten z B Farb spri...

Page 11: ...terial sowie Verpackungs und Transportsicherungen falls vorhanden berpr fen Sie ob der Lieferumfang vollst ndig ist Kontrollieren Sie das Ger t und die Zubeh rteile auf Trans portsch den Bewahren Sie...

Page 12: ...ssen Der Anschluss entspricht den ein schl gigen VDE und DIN Bestimmungen Der kun denseitige Netzanschluss sowie die verwendete Verl ngerungsleitung m ssen diesen Vorschriften entsprechen Beim Arbeite...

Page 13: ...muss dieses alle 30 Betriebsstunden mind jedoch 3 Mal j hrlich bet tigt werden Drehen Sie die perforierte Ablassmutter 9a zum ffnen gegen den Uhrzei gersinn und ziehen dann die Ventilstange ber die p...

Page 14: ...n ffentlich rechtliche Entsorgungs bzw Sammelstellen z B kommunale Bauh fe LIDL bietet Ihnen R ckgabem glichkeiten direkt in den Filialen und M rkten an R ckgabe und Entsorgung sind f r Sie kostenfrei...

Page 15: ...icht Kontaktieren Sie Ihr lokales Service Center Reparaturen nur von geschultem Personal durchf hren lassen Dichtungen kaputt Dichtungen berpr fen kaputte Dichtungen bei einer Fach werkstatt ersetzen...

Page 16: ...s Eingriffe vorgenommen wurden Die Garantiezeit betr gt 3 Jahre und beginnt mit dem Kaufdatum des Ger tes Garantieanspr che sind vor Ablauf der Garantiezeit in nerhalb von zwei Wochen nachdem Sie den...

Page 17: ...Sigurnosne napomene 16 7 Tehni ki podatci 18 8 Prije stavljanja u pogon 18 9 Montiranje i rukovanje 19 10 Priklju ivanje na elektri nu mre u 19 11 i enje odr avanje i skladi tenje 20 12 Transport 21 1...

Page 18: ...Nosite titnik za disanje Upozorenje na vru e dijelove Upozorenje na elektri ni napon Upozorenje Jedinicom se daljinski rukuje i mo e se pokrenuti bez upozorenja Pridr avajte se upozorenja i sigurnosni...

Page 19: ...ih propisa valja se pridr avati i op eprihva enih tehni kih pravila za rad konstrukcijski identi nih naprava Ne preuzimamo odgovornost za nezgode ili tete koje nastanu zbog nepridr avanja ovog priru n...

Page 20: ...nog udara Sigurnost ljudi a Budite pozorni pazite na ono to radite i po stupajte razumno prilikom rada s elektri nim alatom Ne rabite elektri ni alat ako ste umor ni ili pod utjecajem droge alkohola...

Page 21: ...za titnih naprava ili lako o te enih dijelova Provjerite funkcioniraju li pokretni dijelovi ispravno i da ne zapinju te jesu li dijelovi o te eni Svi dijelovi moraju biti ispravno montirani i ispunjav...

Page 22: ...ja molimo obratite se radionici servisne slu be Spremite sigurnosne napomene na sigurno mjesto Potencijalni rizik Pridr avajte se propisanih napomena za odr avanje i sigur nost iz priru nika za uporab...

Page 23: ...pka za uklju ivanje isklju ivanje 3 pritisne se prema dolje 9 6 Namje tanje tlaka sl 1 2 Regulatorom tlaka 15 namje ta se tlak na manometru 12 Namje teni tlak mogu e je otpustiti na brzoj spojki 10 11...

Page 24: ...vijak 6 okretanje na desno Prije svakog rada provjerite postoje li hr a i o te enja na tla nom spremniku 8 Kompresor ne smije raditi s o te enim ili hr avim tla nim spre mnikom 8 Ako utvrdite o te en...

Page 25: ...i da otpadne elek tri ne i elektroni ke ure aje nije dopu teno zbrinjavati u ku ni otpad Otpadne elektri ne i elektroni ke ure aje mogu e je be splatno predati na sljede a mjesta Javno pravna mjesta...

Page 26: ...ta Obratite se lokalnom servisnom centru Zatra ite samo od kvalificiranog osoblja da obavlja popravke Brtve su istro ene Provjerite brtve zatra ite od specijalizirane radionice da zamijeni istro ene...

Page 27: ...i ako se na ure aju poduzmu neodobreni zahvati Jamstveno razdoblje traje 3 godine i zapo inje s datumom kupnje ure aja Jamstvene zahtjeve valja uputiti najkasnije dva tjedna prije isteka jamstvenog ra...

Page 28: ...24 BG 1 25 2 26 3 1 9 26 4 26 5 26 6 27 7 30 8 30 9 30 10 31 11 31 12 32 13 33 14 34 15 35 16 47 17 48...

Page 29: ...25 BG 1 dB dB...

Page 30: ...BG 2 Scheppach GmbH G nzburger Stra e 69 D 89335 Ichenhausen VDE 0100 DIN 57113 VDE0113 3 1 9 1 2 3 4 4a 4b 4c 4d 5 5a 5b 6 7 7a 7b 8 9 9a 9b 9c 10 11 12 13 14 14a 14b 15 16 4 1x 1 2 1x 1 1 5 180 l m...

Page 31: ...27 BG 6 m a b c a b c d e f 30 mA a b c d e f...

Page 32: ...28 BG g h a b c d e f g h a m 1 2 3 4...

Page 33: ...29 BG 5 6 7 8 9 7 bar 10 2 50 m 55 C 30 m...

Page 34: ...n 1 24 l 10 bar 257 l min 7 bar 103 l min 4 bar 141 l min 1 bar 180 l min LPA 68 dB o LWA 82 dB KPA WA 3 dB IP30 24 kg 1000 m EN ISO 3744 1995 8 m 5 C 40 C 9 m 1x 14 mm 1x ept 14 mm 1x 9 1 3 5 9 2 4 7...

Page 35: ...31 BG 5 C 9 5 1 3 3 9 6 1 2 15 12 10 11 13 9 7 1 2 5 5 bar 8 bar 9 8 1 2 14a 14 10 11 14b 14 9 9 3 10 VDE DIN 30 mA 10 1 10 2 VDE DIN 10 3 230 V 50 Hz 25 m 1 5 11 m m...

Page 36: ...32 BG m 11 1 11 2 1 m 8 6 11 6 1 6 8 6 6 8 8 11 3 7 9 8 9 9b 9a 9c 9 30 3 9a 9a 9 9a 11 4 8 9 4 4 300 4 4 4c 4b 4b 4c 4a 3 bar 11 5 11 6 m m 11 6 1 8 12 1...

Page 37: ...33 BG 13 ElektroG LIDL 25 2012 19...

Page 38: ...34 BG 14 5 C...

Page 39: ...35 BG 15 3 II 3 IAN 365039_2204...

Page 40: ...36 BG 00800 4003 4003 service BG scheppach com IAN 365039_2204 Provita 92 SD 2 DABENSKO SHOSE str 4300 Karlovo 33 3 II III www kaufland com manual QR www kaufland com manual IAN 365039_2204...

Page 41: ...elivery 39 5 Proper use 39 6 Safety information 40 7 Technical data 42 8 Before commissioning 42 9 Attachment and operation 43 10 Electrical connection 43 11 Cleaning maintenance and storage 44 12 Tra...

Page 42: ...ear respiratory protection Warning against hot parts Warning against electrical voltage Warning The equipment is remote controlled and may start up without warning Observe warnings and safety instruct...

Page 43: ...ve been instructed with respect to the associated hazards In addition to the safety instructions in this operating manual and the separate regulations of your country the generally recognised technica...

Page 44: ...cable reels in the unrolled state f If operating a power tool in a damp location is unavoidable use a residual current device RCD protected supply with a trigger current of 30 mA or less Use of an RC...

Page 45: ...lades bits milling heads 3 Check the power tool for potential damage Protective devices or other parts with minor damage must be carefully inspected to ensure that they function correctly and as inten...

Page 46: ...egulatory authority can instruct necessary monitoring measures in individual cases A pressure vessel must not be operated if it exhibits a defect that poses a danger to personnel or third parties Chec...

Page 47: ...plate Long supply cables extensions cable reels etc cause a drop in voltage and can impede motor start up At low temperatures below 5 C sluggishness may make starting difficult or impossible 9 5 On Of...

Page 48: ...er each use by opening the drain screw 6 Release the vessel pressure first see 11 6 1 Open the drain screw 6 by turning it anti clockwise looking at the screw from the bottom of the compressor In orde...

Page 49: ...f a new device from the manufacturer or taken to another authorised collection point in your vicinity Further supplementary take back conditions of the manu facturers and distributors can be obtained...

Page 50: ...null and void if any attempt is made to tamper with the device The guarantee is valid for a period of 3 years starting from the purchase date of the device Guarantee claims should be submitted be fore...

Page 51: ...8 Eksplosionstegning 18 Robbantott bra 18 Eksplozijska risba 18 Rozpadov v kres 18 Rozlo en v kres 18 16 R j ytyskuva 16 Explosionsm rkning 16 Rysunek eksplozji 16 Perspektyvinis br inys 16 Plahvatusj...

Page 52: ...certain hazardous substances in electrical and electronic equipment L appareil d crit ci dessus dans la d claration est conforme aux r glementations de la directive 2011 65 EU du Parlement Europ en e...

Page 53: ......

Page 54: ......

Page 55: ......

Page 56: ...ausen IAN 365039_2204 Stand der Informationen Stan informacji Stav informac Stadiul informa iilor Stav inform ci Zadnje informacije Last Information Update Update 11 2022 Ident No 365039_2204_ 3906156...

Reviews: