


30
GB
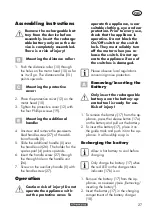
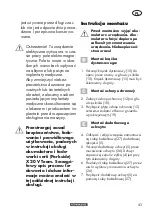
Lawn edge trimming
Setup for edge trimming:
To trim lawn edges, slowly move the appli-
ance along the lawn edges.
• Handle rod: 180° (see
)
• Cutting angle position 5 (see
)
• Spacer bow in parking position
When working, make sure
that the protective cover pro-
tects you from the cutter.
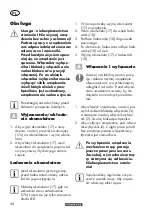
Cleaning and
maintenance
Warning! Risk of injury from
moving dangerous parts!
Contact our Service Centre about
repairs and servicing not described
in this manual. Only use OEM
parts. Risk of injury!
Turn off the appliance and, before
doing any servicing, remove the
battery.
The following cleaning and servicing
should be done regularly. This will ensure
a long and reliable service life.
Cleaning
Do not spray the appliance
with water and do not im-
merse it in water. Electric
shock hazard!
• Keep clean the ventilation slots, motor
housing and handles of the appliance.
Use a damp cloth or a brush. Do not
use cleaning agents or solvents. You
may otherwise irreparably damage the
appliance.
• After every trimming session, remove
grass and soil from the protective cover
and the trimming assembly.
• Be careful with the line cutter. It can
cause serious lacerations.
General maintenance
• Prior to every use, check the appliance
for obvious defects such as loose, worn
or damaged parts. Ensure that the
screws in the cutting device are fi rmly
in place.
• Check covers and safety devices for
damages and correct installation. Re-
place as necessary.
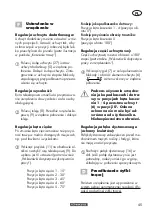
Replacing the spool
The rotation direction of the spool is
indicated in the spool cap (see de-
tailed illustration
) on the spool.
1. Remove the battery (
17) from the
device.
2. Open the spool cap (13) by simultane-
ously pressing the two releases (20) on
the spool cap (13).
3. Remove the cover of the spool cap (13)
and take out the line spool (14).
4. Press the thread ends of the new spool
out of the spool slots (22).
5. Insert the new spool into the spool cap
(13). The side of the spool on which
the rotation direction is indicated by ar-
rows, must be visible after insertion.
6. Insert both ends of the thread through
the opposite line outlet loops (21).
7. Put the back on the spool cap (13).
Make sure that the latches (20) on the
lid fi t precisely into the recesses on the
spool cap (13). They will snap in no-
ticeably.
Summary of Contents for PRTA 20-Li C3
Page 119: ...119 BG X 20 V TEAM...
Page 120: ...120 BG...
Page 121: ...121 BG PARKSIDE a...
Page 122: ...122 BG Parkside X 20 V Team 1 15 10 15 2 12 10 3 12 19 4 27 5 5 5 26 4 6 27 26 7 5 27...
Page 123: ...123 BG 1 17 17a 2 17 17 17b 1 17 2 17 18 3 18 4 18 5 17 18 1 3 2 2 2 27 5...
Page 124: ...124 BG 8 9 11 9 5 1 15 2 30 3 45 4 60 5 75 1 4 0 5 180 90 180 7 6 0 180 6 0 1 4 16 24 14...
Page 125: ...125 BG 23 24 180 5 u...
Page 126: ...126 BG 14 13 1 17 2 13 20 3 14 4 22 5 13 6 21 7 20 8 23 1 24 24...
Page 127: ...127 BG 1 25 2 14 14 0 C 45 C 2012 19...
Page 129: ...129 BG 17 17 17 17 2 2 u 14 13 u 17 17...
Page 130: ...130 BG 3 II 3...
Page 131: ...131 BG IAN 419713_2204 BG 0800 12220 info kaufland bg IAN 419713_2204 20 63762 33 3 II III...
Page 141: ...141 20220915_rev02_mt...
Page 142: ...27 8 9 9 15 1 75 5 11 7 6 16 27 5 4 26 5 2 3 4...
Page 143: ......