background image

7

NI

IE

 6 

Air i lter cover 

 7 

Fuel tank

 8 

Top shaft tube


9  Eyelet for carrying harness

 10 

Multifunction handle 

 11 

Tube i xing screw

 12 

Bottom shaft tube

 13 

Protective cover

 14 

Thread cutter

 15 

Reel capsule

 16 

Thread reel (not visible) 


17  Operating unit


18  Device cable


19  Cable holder

 20 

On/off switch

 21 

Throttle lock

 22 

Throttle

 23 

Maintenance key


24  Hexagon socket wrench


25  500 ml oil/petrol mixing bottle


26  Carrying harness


27  Body protection


28  3-toothed blade


29  4-toothed blade

B

 30  2 screws of the protective cover


31  Shaft holder

C

 32  Safety  lever

D

 33  Star-shaped  knob, 

multi-functional handlebar


34  Handlebar bracket


35  Intake (+ large spring), 

handlebar bracket 

E

 36  Tank  cover

F

 37  Lug of the quick-release device

H

 38  Click lock, spool case


39  Thread outlet eye


40  Recess, thread spool

I

 41  Screw of the air i lter cover


42  Air i lter housing


43  Air i lter

J

 44  Spark  plug

L

 45  Fuel i lter

M

 46  Notch in the thread spool


47  Groove in the thread spool

 48  Mounting spindle


49 Washer


50  Conical spring washer


51 Nut

52   Mounting  screw


53  Click lock, protective cover


54  Extension, protective cover

D

 55  Spring,  large


56  Spring, large

 57  Screw, gear lubrication

 58  Screw,  eyelet

A

59  Transport protection, 

3-toothed blade


60  Transport protection,

4-toothed blade 

Safety Functions 

21 Throttle lock 

Prevents accidental acceleration 
of the engine. The throttle can be 
operated only when the throttle 
lock is depressed.

20 On/off switch 


The on/off switch switches off 
the engine. It must be in position 

 in order to restart the engine.

Summary of Contents for PBS 2 A1

Page 1: ...PETROL GRASS TRIMMER PBS 2 A1 BENZIN SENSE Originalbetriebsanleitung PETROL GRASS TRIMMER Translation of the original instructions IAN 309505...

Page 2: ...yourself with all functions of the device Klappen Sie vor dem Lesen die Seite mit den Abbildungen aus und machen Sie sich anschlie end mit allen Funktionen des Ger tes vertraut IE NI Translation of t...

Page 3: ...A B 1 2 3 4 5 6 7 7 12 13 23 24 25 30 31 14 15 16 17 18 19 17 20 21 22 8 9 28 29 59 60 26 27 11 10...

Page 4: ...D C E G H F 11 10 25 15 16 38 39 38 40 40 36 7 34 55 56 35 8 33 8 12 20 21 8 22 3 4 32 37 9 26 27 37 9...

Page 5: ...of the operating Content Introduction 5 Intended Use 6 General Description 6 Delivery Contents 6 Functional Description 6 Summary 6 Safety Functions 7 Technical Speciications 8 Safety Information 8 Sy...

Page 6: ...is complete Dispose of the packaging material correctly Engine housing with upper shaft tube and unmounted multifunction handle Lower shaft tube Thread spool 3 toothed blade with transport protec tion...

Page 7: ...bracket E 36 Tank cover F 37 Lug of the quick release device H 38 Click lock spool case 39 Thread outlet eye 40 Recess thread spool I 41 Screw of the air ilter cover 42 Air ilter housing 43 Air ilter...

Page 8: ...16 719 m s2 K 1 5 m s2 The vibration values were determined in accordance with ISO 22867 Levels of noise were determined according to the norms and regulations in the decla ration of conformity Safety...

Page 9: ...fety Information Do not allow access by children or by peo ple who are ill or inirm Children must be carefully supervised when they are in the area of machinery Observe the regional and local accident...

Page 10: ...rating the equipment Never work without the protection on the cutting tool Risk of injury from objects being thrown out 11 Remove the socket wrench etc All keys or similar must be removed before the e...

Page 11: ...the service centre for spare parts Warning The use of other mowing heads as well as accessories and attachments that are not explicitly recommended can result in danger to people and objects The tool...

Page 12: ...fore switching on the equipment 13 Do not use metallic cutting reels or saw blades Note that the equipment remains in operation for a few seconds after the switch is released 14 Switch off the engine...

Page 13: ...plug connector If the connector is loose sparks can be formed and thus ignite any leaking fuel air mix Ensure the handles are clean in order to be able to guide the equipment safely serious injury You...

Page 14: ...ing volume of the tank is 1200 ml Avoid direct skin contact with petrol and the inhalation of pet rol fumes Health hazard The equipment is itted with a two stroke en gine and therefore operated exclus...

Page 15: ...6 Hold the device irmly with one hand by the upper shaft tube 8 With the other hand pull the starter cable on the starter handle 4 quickly several times in succession until the engine starts and then...

Page 16: ...head becomes jammed turn the device off immediately re move the spark plug connector and then remove the cause of the blockage Adjusting the carrying harness eyelet balanc ing out the device Select th...

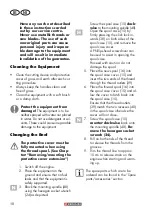
Page 17: ...ng work must always be carried out with the engine switched off and the spark plug connector removed A 2 To cut around trees fence posts or other obstacles go slowly around the obsta cle with the equi...

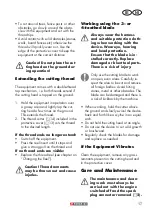
Page 18: ...e equipment is safely supported 3 Block the mounting spindle 48 using the hexagon socket wrench 24 as depicted Screw the spool case 15 clock wise to the mounting spindle 48 Open the spool case 15 by i...

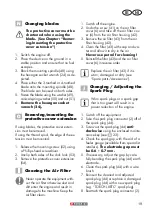
Page 19: ...damage to the machine Keep the air ilter clean 1 Switch off the engine 2 Undo the screw 41 on the air ilter cover 6 and take off the air ilter cov er 6 from the air ilter housing 42 3 Remove the air i...

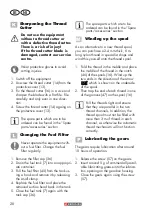
Page 20: ...ction head back in the tank 5 Close the fuel tank 7 again with the tank cap 36 The spare parts which are to be ordered can be found in the Spare parts accessories section M Winding up the spool As an...

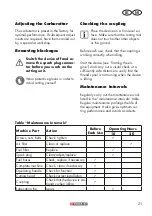
Page 21: ...ing the en gine and carry out a visual check at a suficiently safe distance to verify that the thread spool is not turning when the device is idling Maintenance Intervals Regularly carry out the maint...

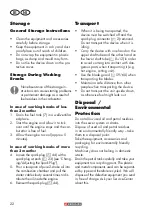
Page 22: ...gine 6 Reinsert the spark plug J 44 Transport When it is being transported the device must be switched off and the spark plug connector A 2 removed Do not transport the device when it is idling Carry...

Page 23: ...Description Order No instruction exploded manual drawing 13 114 121 Protective cover set 91105220 16 122 Thread spool 13800131 69 70 2 70 7 Petrol hoses 91105210 36 70 8 Tank cover 91105212 43 10 Air...

Page 24: ...geable Guarantee Cover The equipment has been carefully pro duced in accordance with strict quality guidelines and conscientiously checked prior to delivery The guarantee applies for all material and...

Page 25: ...rantee can be carried out by our ser vice branch which will be happy to issue a cost estimate for you We can handle only equipment that has been sent with adequate packaging and postage Attention Plea...

Page 26: ...ilter Replace or clean the fuel ilter Engine ticks over too quickly Engine cold Warm up slowly Engine does not give top performance Sooted spark plugs incorrect spark gap Clean adjust or replace the s...

Page 27: ...41 Ger t reinigen 41 Spulenwechsel 41 Messerwechsel 42 Verl ngerung der Schutzabdeckung abnehmen montieren 42 Luftilter reinigen 43 Z ndkerze wechseln einstellen 43 Fadenabschneider sch rfen 43 Krafts...

Page 28: ...eile inden Sie auf der vorderen und hinteren Ausklapp seite Lieferumfang Packen Sie zuerst das Ger t aus und kontrol lieren Sie ob es vollst ndig ist Entsorgen Sie das Verpackungsmaterial ordnungsgem...

Page 29: ...8 3 Zahn Messer 29 4 Zahn Messer B 30 2 Schrauben Schutzabdeckung 31 Schafthalterung C 32 Sicherungshebel D 33 Sternschraube Multifunk tions Handgriff 34 Griffhalterung 35 Aufnahme gro e Feder Griffha...

Page 30: ...esser 98 47 dB A KpA 2 5 dB mit Fadenspule 97 60 dB A KpA 2 5 dB Schallleistungspegel LWA garantiert 114 dB A gemessen mit Messer 108 47 dB A KWA 2 37 dB Fadenspule 106 80 dB A KWA 1 34 dB Vibration a...

Page 31: ...heitsabstand von mind 15 m zu Dritten ein Gefahr durch weggeschleuderte Teile Halten Sie andere Perso nen fern Achtung hei e Fl chen Verbrennungsgefahr Achtung R ckschlag Achten Sie beim Arbeiten auf...

Page 32: ...ckenen m g lichst hoch gelegenen Platz aufbewahrt oder unzug nglich eingeschlossen werden 4 Verwenden Sie f r jede Arbeit immer das richtige Werkzeug Verwenden Sie z B keine Kleinwerk zeuge oder Zubeh...

Page 33: ...r tes kann zu vibrationsbedingten Durch blutungsst rungen der H nde f hren Wei ingerkrankheit Sie k nnen die Benutzungsdauer jedoch durch geeig nete Handschuhe oder regelm ige Pausen verl ngern Achten...

Page 34: ...R umen belkeit Zus tzliche Sicherheitsregeln Um Personen und Sachsch den zu vermeiden 1 Achtung Die H nde und F e stets vom Schneidbereich fernhalten vor al lem beim Start des Ger ts Die Hand auf dem...

Page 35: ...ere Benutzung des Motor ger tes kann zu vibrationsbedingten Durchblutungsst rungen der H nde f hren Sie k nnen die Benutzungsdau er jedoch durch geeignete Handschuhe oder regelm ige Pausen verl ngern...

Page 36: ...Z ndkerzensteckers Bei losem Stecker k nnen Funken entstehen und so austretendes Kraft stoff Luftgemisch entz nden Sauberkeit der Handgriffe um das Ge r t sicher f hren zu k nnen Verwenden Sie nur gut...

Page 37: ...mpfohlene Kraftstoffge misch Das Kraftstoffgemisch altert Verwenden Sie daher kein Kraft stoffgemisch das lter als 3 Mona te ist Bei Nichtbeachten kann der Motor besch digt werden und Sie verlieren de...

Page 38: ...Ger t Motor starten Starten Sie den Motor mindes tens 3 Meter vom Bef llungs ort entfernt Legen Sie das Ger t auf eine feste ebene Unterlage Vergewissern Sie sich dass das Schneidwerkzeug weder Gegen...

Page 39: ...5 cm betragen Damit werden Tiere wie Igel nicht gef hrdet Halten Sie das Ger t stets mit beiden H nden fest und sicher Schneiden Sie nur Gras und Unkraut Achten Sie auf Wurzeln oder Baum st mpfe es be...

Page 40: ...Vermeiden Sie die Ber hrung mit festen Hindernissen Steine Mauern Lattenz u ne usw Der Faden w rde sich schnell abnutzen Verwenden Sie den Rand der Schutzabdeckung um das Ger t auf die richtige Distan...

Page 41: ...ge F hren Sie Wartungs und Rei nigungsarbeiten grunds tzlich bei ausgeschaltetem Motor und gezogenem Z ndkerzen stecker A 2 durch Lassen Sie Arbeiten die nicht in dieser Anleitung beschrie ben sind vo...

Page 42: ...den um die F den aus den Nu ten zu l sen 9 Trimmen Sie die Fadenschnur auf ca 15 cm um den Motor in der Start und Aufw rmphase gerin ger zu belasten Die zu bestellenden Ersatzteile inden Sie im Kapit...

Page 43: ...Wartungsschl ssel siehe 23 heraus 4 Pr fen Sie den Z ndabstand mit Hilfe einer F hlerlehre im Fachhandel er h ltlich Der Elektrodenabstand muss 0 6 0 7 mm betragen 5 Stellen Sie den Abstand gegebenen...

Page 44: ...e auf der Unterseite der Spule ange geben ist auf 2 Klemmen sie anschlie end das Fadenen de jeweils in eine der Nuten 47 an der Spule 16 Ziehen Sie die F den straff an und ach ten Sie darauf dass die...

Page 45: ...Komplette Maschine Pr fen bei Bedarf reinigen Bedienungsgriff Auf Funktion pr fen Schneidkopf Richtige Montage pr fen Kupplung Stillstand im Leerlauf pr fen Getriebe Schmieren Lagerung Allgemeine Lage...

Page 46: ...eilen zu kommen z B hei er Motor Schneideeinheit Verwenden Sie beim Transport der Messer den Transportschutz A 59 60 Halten Sie beim Transport einen Sicher heitsabstand zu Dritten ein Transportieren S...

Page 47: ...eichnung Bestell Nr Betriebs Explosions anleitung zeichnung 13 114 121 Set Schutzabdeckung 91105220 16 122 Fadenspule 13800131 69 70 2 70 7 Benzinschl uche 91105210 36 70 8 Tankdeckel 91105212 43 10 L...

Page 48: ...Ablauf der Garantiezeit anfallende Reparaturen sind kostenplichtig Garantieumfang Das Ger t wurde nach strengen Qualit ts richtlinien sorgf ltig produziert und vor Anlieferung gewissenhaft gepr ft Die...

Page 49: ...rantie unterliegen gegen Berechnung von unserer Service Niederlassung durchf hren lassen Sie erstellt Ihnen gerne einen Kos tenvoranschlag Wir k nnen nur Ger te bearbeiten die ausreichend verpackt un...

Page 50: ...ftstoffilter Kraftstoffilter ersetzen oder rei nigen Motor l uft im Leer lauf zu schnell Motor kalt Langsam warm fahren Motor gibt keine H chstleistung Verru te Z ndkerzen falscher Z ndabstand Z ndker...

Page 51: ...51...

Page 52: ...52...

Page 53: ...as na tional standards and stipulations have been applied EN ISO 11806 1 2011 EN ISO 14982 2009 We conirm the following in accordance with the 2000 14 EC emissions guideline Sound power level with bl...

Page 54: ...nd Bestimmungen angewendet EN ISO 11806 1 2011 EN ISO 14982 2009 Zus tzlich wird entsprechend der Ger uschemissionsrichtlinie 2000 14 EC best tigt Schallleistungspegel mit Messer mit Fadenspule garant...

Page 55: ...3 7 25 24 23 22 21 32 6 5 4 3 2 28 30 31 1 6564 63 62 61 60 59 58 57 56 55 49 50 51 52 53 54 51 1 51 2 51 3 51 4 51 5 51 6 51 7 51 8 51 9 8 9 10 11 12 13 14 15 16 1718 19 20 20 34 45 66 68 36 69 70 71...

Page 56: ...82 1 114 115 116 117 119 120 121 92 97 96 94 104 105 90 89 106 123 87 124 88 87 91 92 93 95 98 99 100 101 102 103 82 82 2 82 3 82 4 82 5 82 6 82 7 82 8 82 9 82 10 82 11 82 12 82 13 73 74 75 76 77 79 8...

Page 57: ...J 41 44 2 6 36 45 7 14 13 46 16 47 43 42 M...

Page 58: ...48 49 29 28 49 50 50 15 51 51 24 53 57 24 53 54 52 24 58 9 8 20 cm...

Page 59: ......

Page 60: ...GRIZZLY TOOLS GMBH CO KG Stockst dter Stra e 20 DE 63762 Gro ostheim GERMANY Last Information Update Stand der Informationen 11 2018 Ident No 76006414112018 IE NI IAN 309505...

Reviews: