Parkside PABS 10.8-LI -  3 Operation And Safety Notes Download Page 10

11 

GB/IE/CY

Before first use / Preparing the tool for use 


 2 Gear Drive

Note: 

Move the gear selector switch 

1

 only 

after the device has come to a standstill. 

In the first gear (Gear selector switch 

1


in Position: 1)  

you achieve a speed of approx. 400 rpm and a high 
torque. This setting is suitable for all screwing tasks.

In the second gear (Gear selector switch 

1


in Position: 2)  

It achieves a speed of up to approx. 1300 rpm, for 
the carrying out of drilling tasks. 

   Torque  control / drill  step

You can use the torque control / drill step 

11

 to ad-

just the torque. When the value of the torque  
setting is reached, the clutch disengages the drive 
connection to the chuck. 

   Select a low setting for small screws, soft work 

material. 

   Select a high setting for large screws, hard 

work materials and for the extraction of screws.

   For drilling work, select the drill setting by putting 

the torque control / drill setting into the   position.

   For drilling tasks, also push the gear selector 

switch 

1

 to the front (Position: 2). 


Preparing the tool for use

   Changing the direction of 

rotation / unlocking  the  device

Unlock the device and change the direction of rota-
tion by pressing the rotational direction switch 

5


to the right or to the left.


 Switching  ON / OFF

Switching on:

   To start the appliance squeeze on the ON / 

OFF switch 

6  

and then keep it pressed down.  

The light 

10

 comes on with a slightly or fully 

pressed  ON / OFF  switch 

6

 and illuminates 

the working area in poor lighting conditions.

Switching off:

   To stop the appliance, release the ON / OFF 

switch 

6

.

Changing the rotational speed:

The  ON / OFF  switch 

6

 has a variable speed 

control. Light pressure on the ON / OFF switch 

6


causes the device to operate at a low speed. In-
creasing the pressure increases the speed.

  Activating the lock

   Press the rotational direction switch 

5

 into the 

middle position. The ON / OFF switch 

6

 is 

now blocked.


 Tips and Tricks

When screwing into wood, metal and 
other materials:

   Screw bits are designated with their dimensions 

and their shape. If you are unsure, always try 
the particular screw bit out to see whether it sits 
in the screw head without any free play.

   Before you use the appliance, check to see 

that the screw or drill bit is properly fitted, i.e. 
located centrally in the chuck.

Torque: 

   Smaller screws and bits in particular can be 

easily damaged if you adjust the appliance 
with too high a torque and/or rotation speed.

Hard screw bed: 

   Particularly high torques can occur, for example 

with metal screws tightened by socket tool bits. 
Select a lower rotation speed. 

Soft screw bed: 


You should also select a low speed in order not 
to damage the wood workpiece surface through  
 

Summary of Contents for PABS 10.8-LI - 3

Page 1: ...PABS10 8 LI LITHIUM ION CORDLESS DRILL Operation and Safety Notes Translation of original operation manual LITHIUM IONEN AKKU BOHRSCHRAUBER Bedienungs und Sicherheitshinweise Originalbetriebsanleitung...

Page 2: ...eitshinweise Seite 15 Before reading unfold the page containing the illustrations and familiarise yourself with all functions of the device Klappen Sie vor dem Lesen die Seite mit den Abbildungen aus...

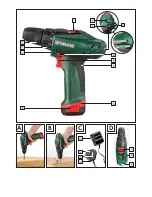
Page 3: ...A B C D 1 4 1 9 12 10 11 6 7 8 5 3 2 4 2 16 14 15 13...

Page 4: ...rvice lines Page 9 Original ancillaries accessories Page 9 Safety advice relating to cordless drill drivers Page 10 Before rst use Removing charging inserting rechargeable battery pack Page 10 Checkin...

Page 5: ...ts 1 Gear selector switch 2 Button for rechargeable battery LED 3 Rechargeable battery LED status indication 4 Bit garage 5 Direction of rotation switch lock 6 ON OFF switch 7 Soft grip 8 Battery pack...

Page 6: ...he vibration load if the electrical power tool is used regularly in particular circumstances Note If you wish to make an accurate assessment of the vibration loads experienced during a particular peri...

Page 7: ...red or under the influence of drugs alcohol or medication One moment of carelessness when using the device can lead to serious injury b Wear personal protective equipment and always wear safety glasse...

Page 8: ...electrical power tools for purposes other than those intended can lead to dangerous sit uations 5 Use and handling of the cord less electrical power tool a Charge a rechargeable battery unit using onl...

Page 9: ...arging inserting rechargeable battery pack Note The battery is supplied partially charged Charge the battery in the charging station for at least three hours before rst use By doing this the battery w...

Page 10: ...ching ON OFF Switching on To start the appliance squeeze on the ON OFF switch 6 and then keep it pressed down The light 10 comes on with a slightly or fully pressed ON OFF switch 6 and illuminates the...

Page 11: ...the device The Cordless Drill Screwdriver is maintenance free Always keep the device clean dry and free of oil or grease Clean the device immediately after you have nished using it Do not allow any l...

Page 12: ...d refuse Defective or worn out rechargeable batteries must be recycled according to Directive 2006 66 EC In this regard read the special safety notices for charging stations and battery packs Contact...

Page 13: ...14...

Page 14: ...19 Achtung Leitungen Seite 20 Originalzubeh r zusatzger te Seite 20 Sicherheitshinweise f r Akku Bohrschrauber Seite 20 Vor der Inbetriebnahme Akku Pack entnehmen laden einsetzen Seite 20 Akkuzustand...

Page 15: ...ersteller keine Haftung Ausstattung 1 Gangwahlschalter 2 Taste Akku LED 3 Akku LED Zustandsanzeige 4 Bitgarage 5 Drehrichtungsumschalter Sperre 6 EIN AUS Schalter 7 Softgri 8 Akku Pack 9 Taste zur Ent...

Page 16: ...wenn das Elektrowerkzeug regel m ig in solcher Weise verwendet wird Hinweis F r eine genaue Absch tzung der Schwingungsbelastung w hrend eines bestimmten Arbeitszeitraumes sollten auch die Zeiten ber...

Page 17: ...g nicht vermeidbar ist verwenden Sie einen Fehlerstromschutzschalter Der Einsatz eines Fehlerstromschutzschalters vermindert das Risiko eines elektrischen Schlages 3 Sicherheit von Personen a Seien Si...

Page 18: ...igt sind dass die Funktion des Elektrowerkzeuges be eintr chtigt ist Lassen Sie besch digte Teile vor dem Einsatz des Ger tes reparieren Viele Unf lle haben ihre Ursache in schlecht gewarteten Elektro...

Page 19: ...ntet WARNUNG Fassen Sie das Elek trowerkzeug nur an den isolierten Grifffl chen an wenn Sie Arbeiten ausf hren bei denen das Einsatzwerk zeug verborgene Stromleitungen treffen kann Kontakt mit einer s...

Page 20: ...die Kupplung den Antrieb W hlen Sie eine niedrige Stufe f r kleine Schrauben bzw weiche Werksto e W hlen Sie eine hohe Stufe f r gro e Schrauben harte Werksto e bzw beim Herausdrehen von Schrauben W h...

Page 21: ...edrige Drehzahl Ziehen Sie den drehenden Bohrer mehrmals aus dem Bohrloch um Sp ne oder Bohrmehl zu entfernen und es zu l ften Bohren in Metall Verwenden Sie Metallbohrer HSS F r beste Ergebnisse soll...

Page 22: ...n wurden erlischt die Garantie Ihre gesetzlichen Rechte werden durch diese Garantie nicht eingeschr nkt DE Schraven Service und Dienstleistungs GmbH Gewerbering 14 47623 Kevelaer Germany Tel 49 0 180...

Page 23: ...en Dokumenten und EG Richtlinien bereinstimmt Maschinenrichtlinie 2006 42 EC EG Niederspannungsrichtlinie 2006 95 EC Elektromagnetische Vertr glichkeit 2004 108 EC Typ Ger tebezeichnung Parkside Lithi...

Page 24: ...IAN 38174 KOMPERNASS GMBH Burgstra e 21 D 44867 Bochum by ORFGEN Marketing Last Information Update Stand der Informationen 12 2009 Ident No PABS10 8 LI122009 GB IE CY DE AT CH...

Reviews: