background image

5

GB/CY

7. Before starting the equipment

Before you connect the equipment to the mains  supp-
ly make sure that the data on the rating plate are iden-
tical to the mains data.

• 

Check the equipment for damage which may have 
occurred in transit. Report any damage immediately 
to the transport company which was used to deliver 
the compressor.

• 

Install the compressor near the point of consumpti-
on.

• 

Avoid long air lines and supply lines (extension cables).

• 

Make sure that the intake air is dry and dustfree.

• 

Do not install the compressor in a damp or wet 
room.

• 

The compressor may only be used in suitable rooms 
(with good ventilation and an ambient temperature 
from +5 °C to 40 °C). There must be no dust, acids, 

vapors, explosive gases or inflammable gases in the 

room.

• 

The compressor is designed to be used in dry 
rooms. It is prohibited to use the compressor in are-
as where work is conducted with sprayed water.

• 

The oil level in the compressor pump has to be che-
cked before putting the equipment into operation 
(see 10.4).

8. Attachment and operation

n


Important!

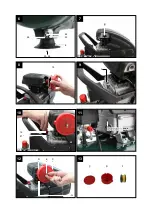
Remove the transportation braces (between the 
compressor pump and cladding, see Fig. 7) prior 
to initial start-up. If the transportation braces are 
not removed, heat can build up and cause the 
compressor to ignite.

n


Important!

You must fully assemble the appliance before us-

ing it for the fi rst time!

You will require the following tools for assembly and 
installation: 2 x open-ended wrench size 13 mm (not 
included)

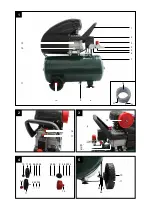
8.1 Fitting the wheels (11)

• 

Fit the supplied wheels as shown in Figure 5.

8.2 Fitting the supporting foot (8

)

• 

Fit the supplied supporting foot as shown in Figure 
6.

8.3 Fitting the air filter (15)

• 

Remove the transportation stop (B) and screw the 

air fi lter (15) to the equipment. (Fig. 7, 8).

8.4 Changing the transportation cover (A)

• 

Remove the transportation cover from the oil filter 

opening (21) and insert the supplied oil sealing plug 

(16) into the oil fi ller opening. (Fig. 9, 10.)

8.5 Mains connection

• 

The compressor is equipped with a mains cable 
with shock-proof plug. This can be connected to any 
230V ~ 50 Hz shock-proof socket which is protected 
by a 16 A fuse.

• 

Before you use the machine, make sure that the 
mains voltage is the same as the operating voltage 
(see the rating plate).

• 

Long supply cables, extensions, cable reels etc. cause 
a drop in voltage and can impede motor start-up.

• 

At low temperatures below +5°C, sluggishness may 

make starting difficult or impossible.

8.6 ON/OFF switch (Fig. 2)

• 

Pull the ON/OFF switch (17) upwards to switch on 
the compressor. To switch off the compressor, press 
the ON/OFF switch down.

8.7 Setting the pressure (Fig. 1-3)

• 

Use the pressure regulator (3) to set the pressure on 
the pressure gauge (5).

• 

The set pressure can be drawn from the quicklock 
coupling (4).

• 

The vessel pressure can be read off the pressure 
gauge (6).

• 

The vessel pressure is drawn from the quicklock 
coupling (20).

8.8 Setting the pressure switch (Fig. 1)

• 

The pressure switch (2) is set at the factory. Cut-in 
pressure approx. 6 bar Cut-out pressure approx. 8 
bar.

8.9 Fitting the compressed air hose (Fig. 1, 3)

• 

Use the compressed air hose (14) if you intend to 
carry out work at a greater distance from the com-
pressor. To do so, connect the nipple (H) on the 
compressed air hose to one of the quickrelease cou-
plings (4, 20). Then attach the compressed air tool 
to the quick-release coupling (G) on the compressed 
air hose.

9. Electrical connection

The electrical motor installed is connected and 
ready for operation. The connection complies with 
the applicable VDE and DIN provisions.
The customer‘s mains connection as well as the 
extension cable used must also comply with these 
regulations.

Damaged electrical connection cable

The insulation on electrical connection cables is often 
damaged.
This may have the following causes:

• 

Passage points, where connection cables are 
passed through windows or doors.

• 

Kinks where the connection cable has been improp-
erly fastened or routed.

Summary of Contents for 109808

Page 1: ...vod Izvorni Upute za uporabu HR COMPRESSOR PKO 270 A1 Operating and Safety Instructions Translation of Original Operating Manual GB CY RO BG GR PKO 270 A1 GR CY KOMPRESSOR PKO 270 A1 Bedienungs und Si...

Page 2: ...GB CY Compressor 1 8 HR Kompresor 9 16 RO Compresor 17 24 BG 25 33 GR CY 34 42 DE AT CH Kompressor 43 51 KOMPRESSOR PKO 270 A1...

Page 3: ...1 2 3 4 5 1 2 3 4 5 6 7 10 9 12 13 11 16 17 14 G H 8 15 4 20 19 18 10 10 11 26 23 24 22 25 26 8 26 23 24 26 2324 11 15 24 22 26 23 11 10...

Page 4: ...10 11 6 7 12 13 8 9 24 23 26 8 25 26 B A 16 21 18 max min 16 D E C C D F 15 G...

Page 5: ...la distan i poate porni f r avertisment BG GR CY DE AT CH Warnung Die Einheit ist ferngesteuert und darf ohne Warnung anlaufen GB CY Caution Before using for the fi rst time check the oil level and re...

Page 6: ...tended use 2 3 5 Safety information 3 4 6 Technical data 4 7 Before starting the equipment 5 8 Attachment and operation 5 9 Electrical connection 5 6 10 Cleaning maintenance and storage 6 7 11 Disposa...

Page 7: ...he instruction manual each time before operating the machine and carefully follow its information The machine can only be operated by persons who were instructed concerning the opera tion of the machi...

Page 8: ...nded Do not use the cable to pull the plug out of the outlet Protect the cable from heat oil and sharp edges 9 Take care of your tools Keep your compressor clean in order to work well and safely Follo...

Page 9: ...otective measures are to be undertaken if necessary particularly the wearing of suitable clothing and masks Do not smoke during the spraying process and or in the work area There is a risk of explosio...

Page 10: ...insert the supplied oil sealing plug 16 into the oil fi ller opening Fig 9 10 8 5 Mains connection The compressor is equipped with a mains cable with shock proof plug This can be connected to any 230V...

Page 11: ...water by opening the drain valve 9 each time after using Release the vessel pressure fi rst see 10 7 1 Open the drain screw by turning counter clockwise looking at the screw from the bottom of the com...

Page 12: ...5 C Allow the motor to cool down If necessary remedy the cause of the overheating The compressor starts but there is no pressure The non return valve leaks The seals are damaged The drain plug for con...

Page 13: ...ress of foreign bodies into the device e g sand stones or dust effects of force or external influences e g damage caused by the device being dropped and normal wear resulting from proper operation of...

Page 14: ...5 Sigurnosne napomene 11 12 6 Tehni ki podaci 12 7 Prije pokretanja opreme 13 8 Priklju ivanje i rad 13 9 Elektri ni priklju ak 13 14 10 i enje odr avanje i skladi tenje 14 15 11 Entsorgung und Wieder...

Page 15: ...je su vezane uz rad stroja Moraju se po tovati zahtjevi o minimalnoj dobi korisnika 2 Opis ure aja Abb 1 13 1 Ru ka za transport 2 Tla na sklopka 3 Regulator tlaka 4 Brza spojka regulirani komprimiran...

Page 16: ...trih rubova 9 Vodite brigu o alatu Odr avajte kompresor istim kako bi radio isp ravno i sigurno Pridr avajte se uputa za odr avanje Redovito provjeravajte priklju ni kabel elektri nog alata i u slu a...

Page 17: ...jive U blizini se ne smiju nalaziti ni koristiti otvoreni plamen svjetlo ili strojevi koji stvaraju iskre Ne uvajte i ne konzumirajte hranu i pi a u radnoj prostoriji Pare boje tetne su za zdravlje Ra...

Page 18: ...u ivanje isklju ivanje slika 2 Za uklju ivanje kompresora povucite sklopku 17 pre ma gore Za isklju ivanje ete sklopku za uklju ivanje isklju ivanje pritisnuti dolje 8 7 Pode avanje tlaka slike 1 3 Po...

Page 19: ...Sna no povu cite za prsten tako da komprimirani zrak ujno iza e Zatim ponovno pustite prsten 10 4 Redovito kontrolirajte razinu ulja slika 11 Kompresor stavite na ravnu vodoravnu povr inu Ra zina ulj...

Page 20: ...Izbjegavajte preduga ke produ ne kabele Koristite produ ne kabele s dostatnim presjekom ice Ne koristite na vanjskim temperaturama ni im od 5 C Ostavite motor da se ohladi po potrebi uklonite uzrok p...

Page 21: ...nepridr avanje propisa o odr avanju i sigurnosti unos stranih tijela u ure aj npr pijeska kamenja ili pra ine u inci primjene sile ili vanjski utjecaji npr o te enje nastalo zbog ispadanja ure aja i...

Page 22: ...conizat 18 19 5 Informa ii privind protec ia muncii 19 20 6 Date tehnice 20 21 7 nainte de a porni echipamentul 21 8 Ata area i operarea 21 9 Conexiunea electric 22 10 Cur area ntre inerea i depozitar...

Page 23: ...a ina i respecta i cu stricte e informa iile pe care le con ine La ma in pot opera numai persoanele care au fost instruite n privin a oper rii ma inii i care sunt informa i desp re pericolele asociate...

Page 24: ...recomandat s purta i m nu i i nc l minte care nu alunec P rul lung trebuie prins cu o plas pentru p r 8 Nu utiliza i cablul n alte scopuri dec t cel destinat Nu trage i de cablu pentru a scoate teche...

Page 25: ...ndica iile cu privire la m suri de protec ie ale produc torilor de astfel de substan e Se vor respecta indica iile i marcajele ordonan ei pentru materiale periculoase de pe ambalaje materialelor de pr...

Page 26: ...8 2 Montarea piciorului fix 8 Monta i piciorul suport al turat a a cum este ar tat in fi gura 6 8 3 Montarea fi ltrului de aer 15 Indep rta i blocajul folosit pe timpul transportului B i fi xa i fi l...

Page 27: ...l cu aer comprimat la o presiune mic Recomand m cur area aparatului imediat dup fiecare utilizare Cur a i aparatul cu regularitate cu o carp umed i pu in s pun Nu folosi i detergen i sau solven i ace...

Page 28: ...ie Compresorul se va p stra numai in locuri uscate inaccesibile persoanelor neautorizate Nu inclina i compresorul p stra i l numai in pozi ie vertical Este posibil scurgerea de ulei 10 7 1 Evacuarea...

Page 29: ...rne de exemplu deterior ri cauzate de c derea dispozitivului i uzura normal care rezult n urma oper rii corespunz toare a dispozitivului Garan ia este declarat nul i neavenit n cazul oric rei ncerc ri...

Page 30: ...25 BG 1 26 2 26 3 26 4 27 5 27 29 6 29 7 29 8 29 30 9 30 10 30 31 11 31 12 32 13 33 14 52...

Page 31: ...1 scheppach Fabrikation von Holzbearbeitungsmaschinen GmbH G nzburger Stra e 69 D 89335 Ichenhausen VDE 0100 DIN 57113 VDE0113 2 1 21 1 2 3 4 5 6 7 8 9 10 11 12 13 14 15 16 17 18 19 20 21 22 23 24 25...

Page 32: ...27 BG 4 270 5 n n 1 2 3 4 5 6 7 8 9 10 11 12 13 14...

Page 33: ...28 BG 15 16 17 18 19 20 21 55 C 30 m3 PVC...

Page 34: ...6 230 V 50 Hz W 1800 S1 1 2850 24 8 bar 270 LWA 97 dB A KWA 4 dB IP20 26 15W 40 l 0 3 1000 m EN ISO 2151 7 5 C 40 C 10 4 8 n 7 n 2 x 13 8 1 11 5 8 2 8 6 8 3 15 15 7 8 8 4 A 21 16 9 10 8 5 230 V 50 Hz...

Page 35: ...30 BG 5 C 8 6 2 17 8 7 1 3 3 5 4 6 20 8 8 1 2 6 8 8 9 1 3 14 4 20 G 9 VDE DIN VDE DIN H 07 RN 230 V 25 m 1 5 10 m m m 10 1...

Page 36: ...31 BG 10 2 1 7 9 9 7 1 m 10 3 3 19 10 4 11 MAX MIN 18 SAE 15W 40 100 500 10 5 1 10 11 12 13 12 21 18 11 16 21 10 6 3 12 13 300 F D 3 10 7 m m n 10 7 1 11...

Page 37: ...32 BG 12 1 2 3 4 1 2 3 5 C 4 1 2 3 9 1 2 3 1 2 3 3 1 2 3...

Page 38: ...33 BG 13 1 2 3 3 4 800 4003 4003 0 00 EUR Min BG lidl service BG scheppach com BG TASHEV GALVING LTD 68 Kliment Ohridski Blvd 1756 Sofia Bulgaria...

Page 39: ...34 GR CY 1 35 2 35 3 35 4 35 36 5 36 37 6 38 7 38 8 38 39 9 39 10 39 40 11 40 12 41 13 42 14 52...

Page 40: ...scheppach Fabrikation von Holzbearbeitungsmaschine GmbH G nzburger Stra e 69 D 89335 Ichenhausen VDE0100 DIN 57113 VDE 0113 2 1 21 1 2 3 4 5 6 7 8 9 10 11 12 13 14 15 16 17 18 19 20 21 22 23 24 25 26...

Page 41: ...36 GR CY min 5 n n 1 2 3 4 N 5 N 6 7 8 9 10 11 12 13 14...

Page 42: ...37 GR CY 15 16 17 18 19 20 21 55 C 30 PVC N O...

Page 43: ...0 S1 min 1 2850 24 8 bar l min 270 LWA 97 dB A KWA 4 dB IP20 kg 26 15W 40 l 0 3 1000 m EN ISO 2151 7 5 C bis 40 C 10 4 8 n n 2 x 13 mm 8 1 11 5 8 2 8 6 8 3 15 15 7 8 8 4 21 16 9 10 8 5 230V 50 Hz 13 5...

Page 44: ...39 GR CY 20 8 8 1 2 6 bar 8 bar 8 9 1 3 14 4 20 G 9 VDE DIN VDE DIN H 07 RN 230 V 25 m 1 5 10 n n n 10 1 10 2 1 7 9 9 7 1 N O...

Page 45: ...40 GR CY n 10 3 3 19 10 4 11 18 SAE 15W 40 100 500 10 5 1 10 11 12 13 12 21 11 16 21 10 6 3 12 13 300 C F D 3 bar 10 7 n n 10 7 1 11...

Page 46: ...41 GR CY 12 1 2 3 4 1 2 3 5 C 4 1 2 3 9 1 2 3 1 2 3 3 1 2 3...

Page 47: ...42 GR CY 13 3 GEORGE C SOLOMONIDES SON LTD PO BOX 56236 169 LEONTIOS A 3305 LIMASSOL CYPRUS 800 4003 4003 0 00 Min e mail GR lidl service GR scheppach com e mail CY lidl service CY scheppach com...

Page 48: ...gsgem e Verwendung 44 45 5 Sicherheitshinweise 45 46 6 Technische Daten 47 7 Vor Inbetriebnahme 47 8 Aufbau und Bedienung 47 48 9 Elektrischer Anschluss 48 10 Reinigung Wartung und Lagerung 48 49 11 E...

Page 49: ...ahren unterrichtet sind Das ge for der te Mindestalter ist einzuhalten Neben den in dieser Bedienungsanleitung enthal tenen Si cherheitshinweisen und den besonderen Vorschriften Ih res Landes sind die...

Page 50: ...eich 7 Tragen Sie geeignete Kleidung Tragen Sie keine weite Kleidung oder Schmuck sie k nnten von beweglichen Teilen erfasst werden Bei Arbeiten im Freien sind Gummihandschuhe und rutschfestes Schuhwe...

Page 51: ...er Ausblaspistole keine Personen anblasen oder Kleidung am K rper reinigen Verletzungsgefahr Sicherheitshinweise beim Farbspritzen Keine Lacke oder L sungsmittel mit einem Flammpunkt von weniger als 5...

Page 52: ...mpe und Verkleidung s Bild 7 Entfernen Sie diese nicht kann es durch Hitzeentwicklung zu einer Entz n dung des Kompressors kommen m Achtung Vor der Inbetriebnahme das Ger t unbedingt kom plett montier...

Page 53: ...or Typenschildes 10 Reinigung Wartung und Lagerung m Achtung Ziehen Sie vor allen Reinigungs und Wartungsarbeiten den Netzstecker Verletzungsgefahr durch Stromst e m Achtung Warten Sie bis das Ger t v...

Page 54: ...ng 21 10 6 Reinigen des Ansaugfilters Bild 3 12 13 Der Ansaugfilter verhindert das Einsaugen von Staub und Schmutz Es ist notwendig diesen Filter min destens alle 300 Betriebsstunden zu reinigen Ein v...

Page 55: ...beseitigen Kompressor l uft jedoch kein Druck R ckschlagventil undicht Dichtungen kaputt Ablass Schraube f r Kondenswasser 9 undicht R ckschlagventil austauschen Dichtungen berpr fen kaputte Dichtung...

Page 56: ...endungen wie z B berlastung des Ger tes oder Verwendung von nicht zugelassenen Einsatzwerkzeugen oder Zubeh r Nichtbeach tung der Wartungs und Sicherheitsbestimmungen Eindringen von Fremdk rpern in da...

Page 57: ...kstu NL verklaart hierbij dat het volgende artikel voldoet aan de daarop betrekking hebbende EG richtlijnen en normen RUS PT declara o seguinte conformidade com a Directiva da UE e as normas para o se...

Page 58: ...e Switch Manocontact Motorbetriebskondensator running capacitor condensateur de fonctionnement Hauptwicklung main winding enroulement principal Hilfswicklung auxiliary winding enroulement auxiliaire T...

Page 59: ...2 19 EF om kasserte elektriske og elektroniske produkter og direktivets iverksettning i nasjonal rett m elektroverkt y som ikke lenger skal brukes samles separat og returneres til et milj vennlig gjen...

Page 60: ...109808 Last Information ultima informa ii Stand der Informationen Update 01 2015 Ident No 109808_5906114980 scheppach Fabrikation von Holzbearbeitungsmaschinen GmbH G nzburger Str 69 D 89335 Ichenhaus...

Reviews: