


7
6
4. Press DOWN key to reach menu option
RETURN
, Press OK
key to return to
MAIN MENU
. Using UP and DOWN key reach
to menu option
SAVE & EXIT
, press the OK key which will
save the settings and will navigate out of the programming
menu.
6.3
CHANGE THE DEFAULT MIRROR IMAGE TO REAL IMAGE
(TO USE CAMERA AS FORWARD FACING OR USE WITH DVR).
1. Press the OK key to enter into
MAIN MENU.
2. Press UP and DOWN key to reach menu option
7, SPECIAL
and press the OK key which will open sub menu page.
3. Using UP and DOWN key select option
2, D-EFFECT
. Press
OK button to enter the sub menu.
4. Pressing UP and DOWN key, select option
2
and press OK key
which will open
V- FLIP
, using LEFT and RIGHT key, change
the orientation of the image to REAL image.
Test the image by pressing "Test" in camera view and you
should be able to read text confirming REAL Image
5. To change back to MIRROR image, follow the same above
mentioned steps.
6.4
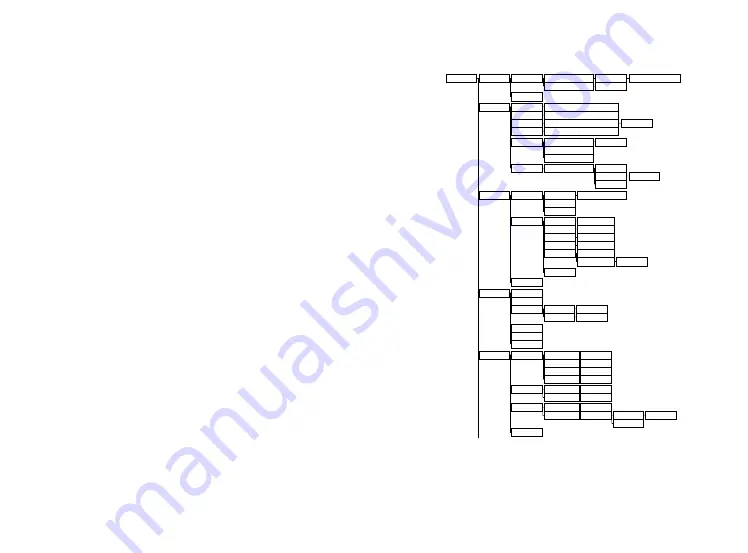
HYBRID CAMERA
OSD MENU TREE
㻌
㻌
㻌
㻌
㻌
㻌
㻌
㻌
㻌
㻌
㻌
㻌
㻌
㻌
㻌
㻌
㻌
㻌
㻌
㻌
㻌
㻌
㻌
㻌
㻌
㻌
㻌
㻌
㻌
㻌
㻌
㻌
㻌
㻌
㻌
㻌
㻌
㻌
㻌
㻌
㻌
㻌
㻌
㻌
㻌
㻌
㻌
㻌
㻌
㻌
㻌
㻌
㻌
㻌
㻌
㻌
㻌
㻌
㻌
㻌
㻌
㻌
㻌
㻌
㻌
㻌
㻌
㻌
㻌
㻌
㻌
㻌
㻌
㻌
㻌
㻌
㻌
㻌
㻌
㻌
㻌
㻌
㻌
㻌
㻌
㻌
㻌
㻌
㻌
㻌
㻌
㻌
㻌
㻌
㻌
㻌
㻌
㻌
㻌
㻌
㻌
㻌
㻌
㻌
㻌
㻌
㻌
㻌
㻌
㻌
㻌
㻌
㻌
㻌
㻌
㻌
㻌
㻌
㻌
㻌
㻌
㻌
㻌
㻌
㻌
㻌
㻌
㻌
㻌
㻌
㻌
㻌
㻌
㻌
㻌
㻌
㻌
㻌
㻌
㻌
㻌
☞
☞
-
-
-
-
-
-
-
-
-
-
-
-
-
-
-
-
-
-
-
-
-
-
AREA
►
►
►
►
►
►
►
►
►
►
►
►
►
►
►
►
►
►
WHITE BAL
ATW
AWB
MANUAL
BLUE
0 ~ 100
RED
0 ~ 100
OUTDOOR
INDOOR
AWC
SET
DAY&NIGHT
AUTO
D
N (CDS)
D
N (DELAY)
N
D (CDS)
N
D (DELAY)
0 ~ 255
0 ~ 60
0 ~ 255
0 ~ 60
EXT
D
N (DELAY)
0 ~ 60
N
D (DELAY)
0 ~ 60
BW
BURST
ON / OFF
IR SMART
ON / OFF
LEVEL
AREA
0 ~ 15
COLOR
EXPOSURE
SHUTTER
AUTO, 1/30(25) ~ 1/50000, x2 ~ x30
AGC
0 ~ 15
SENS-UP
AUTO / OFF
BRIGHTNESS
1 ~ 100
x2 ~ x30
D-WDR
ON
0 ~ 8
OFF
AUTO
DEFOG
AUTO / OFF
POS / SIZE
GRADATION
DEFAULT
0 ~ 2
BACKLIGHT
BLC
LEVEL
HIGH, MIDDLE, LOW
DEFAULT
HSBLC
SELECT
AREA1 ~ AREA4
DISPLAY
BLACK MASK
ON / OFF
ON / OFF
LEVEL
0 ~ 100
MODE
ALL DAY
NIGHT
0 ~ 255
AREA
DEFAULT
OFF
MAIN MENU
LENS
DC
INDOOR / OUTDOOR
MAX SHU
1/60(50) ~ 1/50000
IRIS SPEED
0 ~ 15
MANUAL
►
►
Summary of Contents for PM-81HYR
Page 17: ...31 30 9 0 NOTES...
Page 18: ...33 32...


