Parkmate ClearView 7 User Manual Download Page 13

13

1.  Attach the magnetic mount holder and 3M 

adhesive mount together and lock into place.

2.  Clean the area on the dashboard where the 

mount is to be place.

3.  Remove the 3M tape at the bottom of the 

mount holder.

4.  Place the mount on the cleaned surface and 

press it firmly for two minutes.

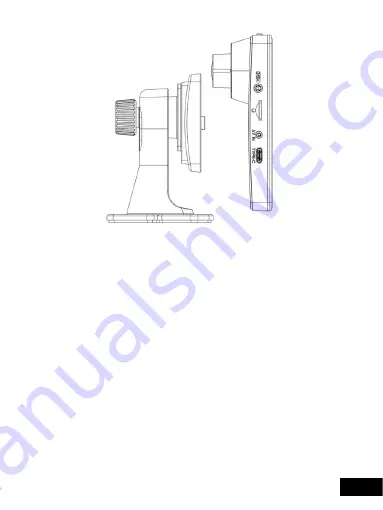
5.  Snap the ClearView 7 on to the magnetic 

mount holder.

6.  Adjust the height and view angle of the 

ClearView 7 using the knob at the back of the 
3M adhesive mount.

Summary of Contents for ClearView 7

Page 1: ...7 0 Smart Screen Monitor With 2 Channel Dash Camera User Manual ClearView 7 PM 72W YOUR SAFETY COMES FIRST...

Page 2: ...0 Product installation 10 5 1 Windscreen suction mount 10 5 2 3M adhesive suction mount 12 6 0 Rear camera installation 14 6 1 Rear camera wiring 16 6 2 Rear camera connection 16 6 3 Rear camera feat...

Page 3: ...oid Auto set up 27 10 0 Audio output 29 10 1 PM 72W Speakers 29 10 2 Car Audio 30 10 3 FM Transmitter 32 10 3 1 FM Transmitter set up 33 10 4 AUX 33 11 0 Vehicles with bluetooth functionality 34 12 0...

Page 4: ...ash Camera are to be used as a guide only Please drive according to the actual conditions on the road The system is for non commercial use only and within the limits permitted by the relevant laws Avo...

Page 5: ...cro SD Cards Class 10 or above with 32GB to 256GB storage capacity The Micro SD card is not included and will need to be purchased separately Please format your Micro SD card before use Please see Sec...

Page 6: ...amera to facilitate hassle free driving and navigation Please read through these instructions before attempting to install this product For the latest manual and product updates please visit our websi...

Page 7: ...7 3 0 PRODUCT OVERVIEW 5 6 10 9 4 3 1 2 11 8 7...

Page 8: ...C connector for power supply 7 Front camera lens 8 3M adhesive magnetic mount 9 Speaker vent 10 Reset button Press this button to restart the device All pre saved information will be lost 11 Power bu...

Page 9: ...9 4 0 MICRO SD CARD INSTALLATION Please insert the memory card into the Micro SD Card slot with the chip contact surface facing up Insert it until you hear a click sound...

Page 10: ...1 Windscreen suction mount 2 3M adhesive mount 5 1 WINDSCREEN SUCTION MOUNT Insert the magnetic mount holder at the back of the ClearView 7 Clean the windscreen area where the suction mount is to be m...

Page 11: ...nt 3 Clean the windscreen area where the suction mount is to be mounted 4 Pull the suction cup lever up to release suction 5 Press the suction mount on the windscreen and lock it by pressing the sucti...

Page 12: ...agnetic mount holder at the back of the ClearView 7 Clean the area on the dashboard where the mount is to be placed Remove the 3M tape at the bottom of the mount Place the mount on the cleaned surface...

Page 13: ...where the mount is to be place 3 Remove the 3M tape at the bottom of the mount holder 4 Place the mount on the cleaned surface and press it firmly for two minutes 5 Snap the ClearView 7 on to the magn...

Page 14: ...mart Monitor Other cables may not work or may damage the product 6 0 REAR CAMERA INSTALLATION 1 Select a flat and central location near the number plate lamp at the rear of your vehicle to mount the c...

Page 15: ...15 5 Mark a position suitable for the second screw and drill a small hole 6 Fasten the second screw and tighten both screws securely Figure 3...

Page 16: ...engaged in reverse gear the red Reversing Light Wire must be connected to the reverse light circuit Otherwise the Rear Camera will not work in conjunction with reverse gear 6 2 REAR CAMERA CONNECTION...

Page 17: ...unit the rear camera images will be displayed on the ClearView 7 display screen Both front and rear camera images will now be displayed on the ClearView 7 display screen and the two cameras will begin...

Page 18: ...Figure 2 The power adaptor has a USB A port with 1A output This port can be used to charge your smartphone and to connect to CarPlay if your smartphone does not support wireless CarPlay or Android Aut...

Page 19: ...D CARD SPECIFICATIONS The quality of Micro SD card you use has a great impact on the stability of video recording It is recommended to use Micro SD cards from these brands for best results ScanDisk Ki...

Page 20: ...Press the Settings Tuesday 12 June 2023 12 30pm PM 72W Android Apple Carplay Screen Audio Output button 2 Press the Format button Your Micro SD card will now begin to format Tuesday 12 June 2023 12 3...

Page 21: ...nterface 4 Date and time Displays the current date and time 5 Apple CarPlay Touch to enter the instructions to connect with iPhone 6 Android Auto Touch to enter the instructions to connect with Androi...

Page 22: ...Connection Indicator 12 Bluetooth Connection Indicator 13 Home Button Touch to return to Home Screen 9 1 DASH CAMERA After the Micro SD card is successfully inserted and formatted the system will star...

Page 23: ...orded video file and protect it from being overwritten 3 Camera Touch to take photo 4 Main menu Touch to return to Main menu 5 Phone menu Touch to return to Phone menu 6 Audio recording Touch to enabl...

Page 24: ...NE SET UP 1 Touch the Apple CarPlay icon on the display screen 2 Use Bluetooth to pair your iPhone with the device 3 After pairing select CarPlay when prompted 4 The Smart Monitor will now automatical...

Page 25: ...ection will be automatic in the future NOTE 1 First time connection will take slightly longer 2 Only compatible with iOS 13 0 or higher version Apple CarPlay Android Auto Please turn on Bluetooth and...

Page 26: ...learView 7 is powered on when your iPhone is within close proximity Press Exit to return to the ClearView 7 Menu 9 3 ANDROID AUTO FOR FIRST TIME CONNECTION Touch the Android Auto icon to show the conn...

Page 27: ...30pm PM 72W Android Auto Apple Carplay Screen Off Audio Output ANDRIOD AUTO SET UP 1 Turn on Bluetooth on your Android smartphone and select the device PM 72W XXXX to connect 2 This needs only to be...

Page 28: ...n connection between the ClearView 7 and your Android phone will be automatic each time the ClearView 7 is powered on when your Android phone is within close proximity Press Exit to return to the Clea...

Page 29: ...29 10 0 AUDIO OUTPUT 10 1 PM 72W SPEAKERS Select PM 72W to play audio through the device s built in speaker...

Page 30: ...Car Audio to play audio either through your smartphone speaker or the car stereo speakers if your smartphone is connected via Bluetooth to the device This selection only needs to be done once to main...

Page 31: ...etooth settings for the ClearView 7 on your smartphone it is suggested to disable the Media Audio so that the default audio is via the ClearView 7 built in speaker when connected to your smartphone Th...

Page 32: ...e used to transmit audio from the ClearView 7 to your vehicle s built in stereo speakers When you turn on the FM Transmitter the ClearView 7 will be muted You will have to match the frequency of the F...

Page 33: ...nnel 3 On your ClearView 7 select the frequency you have chosen on your radio 4 Once the frequencies are matched the ClearView 7 will automatically playback its audio through the vehicle s built in st...

Page 34: ...and ClearView 7 Play through vehicle s audio system or ClearView 7 Played through vehicle s audio system Played through vehicle s audio system Played through vehicle s audio system via ClearView 7 Pla...

Page 35: ...ers will need to download the Android Auto app from the Google Play Store Calls and navigation functions can be initiated by saying Hey Google or OK Google and Hey Siri ClearView 7 will use your smart...

Page 36: ...Front 720P Rear 1080P Front 1080P Rear Loop recording 1min 3min 5min 1min Audio recording On Off On G Sensor Off Low Mid High Low Date and time 12hr 24hr 12hr Auto LCD off Always on 1 min 5mins Always...

Page 37: ...es are turned off they will not show on the display screen when the vehicle is in reverse gear To adjust the guidelines touch Calibration to enter into calibration mode Park the vehicle in the middle...

Page 38: ...3 wire hardwire kit NAME FUNCTION OPTIONS DEFAULT NOTE Time lapse To turn on off time lapse mode On Off Off When time lapse mode is turned on and the car detects the engine is off the recording will b...

Page 39: ...EM SOLUTION Unable to start the device Check whether the DC head of the 12V power cord is damaged or worn Check whether the fuse of the power plug is disconnected or damaged No touch control response...

Page 40: ...ralia Pty Ltd Directed Electronics warrants that this product is free from defects in material and workmanship for a period of 12 months from the date of purchase or for the period stated on the packa...

Page 41: ...nd indemnify and hold harmless Parkmate and its subsidiaries and affiliates from and against any and all claims proceedings injuries liabilities losses costs and expenses including reasonable legal fe...

Page 42: ...ucts and services are provided on an as is and as available basis Parkmate makes no warranty that the Parkmate products and services will meet your requirements or that use of the Parkmate products an...

Page 43: ...annot eliminate occurrences of certain events including and Parkmate makes no guarantee or warranty including any implied warranty of merchantability or fitness for a particular purpose that the Parkm...

Page 44: ...ur non compliance with all applicable federal state or local laws This warranty and warranty disclaimer give you specific legal rights and you may have other rights that vary by state province or coun...

Page 45: ...nce shall be precluded except when these are due to negligent breaches of any significant contractual duty or obligation on the part of Parkmate Any liability for negligence is limited to direct losse...

Page 46: ...usion or limitation of incidental or consequential damages so the above limitation or exclusion may not apply to you Additionally this provision is not intended to limit Parkmate s liability in the ev...

Page 47: ...47...

Page 48: ...d com au www directed co nz All Images Information and Content are Copyright 2023 Directed Electronics Australia Pty Ltd All Rights Reserved V1 0 www parkmate com au www parkmatehd co nz YOUR SAFETY C...

Reviews: