background image

!!

!

!
!

Doc!Rev!1.3!

!

If!you!like!this,!please!tell!your!friends.!!

!

!

!


Please&send&corrections&and&suggestions&to&

[email protected]&

&

!

This!manual!is!a!based!on!the!

er9x!User!Guide

!and!published!under!the!

GNU!Free!Documentation!

License!1.3!or!later.

Summary of Contents for Flyer 9x

Page 1: ...ou like this please tell your friends Please send corrections and suggestions to feedback parkeflyer com This manual is a based on the er9x User Guide and published under the GNU Free Documentation License 1 3 or later ...

Page 2: ...mmunity is supported by your donations If you find this firmware valuable please support this community by making a donation to any of the contributors http 9xforums com wiki index php Donating_to_show_your_support ...

Page 3: ...TUP MENU OVERVIEW RECOMMENDATIONS 10 GENERAL VIEW 10 GENERAL SETTINGS 12 TRAINER PPM IN 15 VERSION INFO 16 DIAGNOSTICS 17 MODEL SETUP MENU OVERVIEW RECOMMENDATIONS 19 MODEL SETUP 19 HELI SETUP 22 EXPO DR 23 MIXER 25 LIMITS 28 CUSTOM SWITCHES 30 SAFETY SWITCHES 31 TEMPLATES 32 QUICK START SETTING UP YOUR MODEL USING THE PARKEFLYER FLYER9X EXAMPLE MODELS 33 BASIC 4ACHANNEL AIRPLANE EXAMPLE 33 FLAPER...

Page 4: ... write their own firmware for the TH9x er9x is one of several firmware projects for the TH9x radio With er9x the TH9x becomes an extremely capable transmitter that rivals the capabilities of radios costing 1 000 or more About this Manual This is a quick start guide to orient to your radio We cover basic setup as well as the ParkeFlyer com Model Examples we ve preYprogrammed for your controller Thi...

Page 5: ...rs crystalYless radios and dramatically lower prices are changing RC for the better Many of the traditional barriers of entry are dropping and a new generation is taking over The challenges with DIY for those of us with limited time are significant time investment specialized skills Y soldering logic boards building PCBs printed circuit boards ordering parts from China etc no single source for all...

Page 6: ...R PURPOSE See the GNU General Public License for more details In no event will the authors and or contributors be held liable for any damages arising from the use of this software Permission is granted to anyone to use this software for any purpose including commercial applications and to alter it and redistribute it freely subject to the following restrictions The origin of this software must not...

Page 7: ...ld switch Don t let this be you NEVER have your aircraft turned on while programming your controller There are multiple scenarios where your throttle could be instantly turned on to full power You don t want you airplane or helicopter instantly flying around your garage living room or office Trust me It sucks and can be extremely painful WARNING Deleting a model causes the memory to jump to the pr...

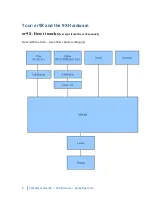
Page 8: ... 6 ParkeFlyer Flyer9x The Manual parkeflyer com Tour er9X and the 9X Hardware er9X A How it works excerpt from the er9x manual Bear with me here some flow charts coming up ...

Page 9: ...use the following conventions This will enable the ParkeFlyer Flyer9x Example Models to work out of the box It also matches the Gyro Gearloose conventions which is a great resource for more sophisticated mixing and automation see the appendix Where to go for more information for a link to his templates Channel 1 Ailerons both ailerons or left flaperon Y negative is down Channel 2 Elevators both or...

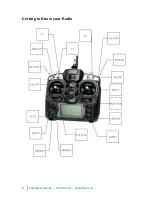
Page 10: ... 8 ParkeFlyer Flyer9x The Manual parkeflyer com Getting to Know your Radio ...

Page 11: ...tion switch These 3 define the 3Yposition switch ID0 is the top position ID1 mid position and ID2 bottom position Y AIL Aileron D R switch Y GEA Gear switch Y TRN Trainer switch This switch is spring loaded Y SW1 SW6 Custom switches More on these later Note It should be stated that every function in er9X is assignable There are no fixed switches You can choose the TRN switch to be throttle cut and...

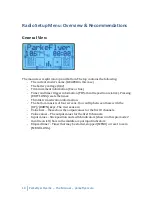
Page 12: ...e position relative Pressing EXIT LONG resets the timer Y Throttle trim activation information Y The bottom consists of four screens You can flip between these with the UP DOWN keys The 4 screens are Y Value bars these show the output values for the first 8 channels Y Value values The output values for the first 8 channels Y Input values Stick position and switch indicators shown in this picYmode2...

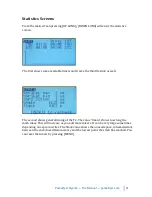
Page 13: ...races the throttle stick as well The second shows general timing of the Tx The value tmain shows how long the math takes This will increase as you add more mixers It can be very large sometimes depending on eeprom writes The Stack value shows the unused space in hexadecimal between the end of used Ram memory and the lowest point the stack has reached You can reset the timers by pressing MENU ...

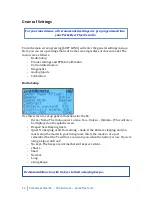
Page 14: ...x Y Owner Name The radio owner s name You Unless hmmm This will also be displayed on the splash screen Y Beeper Sets Beeping levels Y Quiet No beeping at all No warning nada If the kids are sleeping and you must setup the model in your living room this is the mode to use Just remember that the Tx will not even warn you when the battery is low If you re using a Lipo watch out Y No keys The beeps ar...

Page 15: ...o 250 minutes To reset the timer simply move one of the sticks Filter ADC Y SING Single conversion This is the fastest conversion but base resolution is 1024 Y OSMP Oversampling This uses extra samples to increase resolution to 2048 Just slightly slower than SING Y FILT Filtered This is in case you have excessive noise from the conversion servo jitters This will filter the input and prevent that n...

Page 16: ...ow a warning when the switches are not at the default position when the Tx is turned on The Tx will not output a signal until the alert is cleared Default Switch When you first switch the radio on er9x used to require that all the switches were OFF This option lets you choose a default setting with some switches ON and others OFF instead T is THR switch R is RUD switch etc Use the left right butto...

Page 17: ...g purposes The student transmitter does not need to have the same model setup as the instructor All the mixes on the instructors Tx will be applied to the student inputs If for example you have expo on your sticks this will be applied to the raw trainer inputs when they are selected The mode entry selects how the PPMin value is used Y off Y unused Y Y add to instructor stick value Y Y replace inst...

Page 18: ... the trainer function you may disable it and use the selected switch for something else All the PPMin values are available to the mixer Version Info This screen shows the version information for the current FW SVN The SVN name of the current revision DATE Compile date for the current FW TIME Compile time for current FW VERS Version number Since er9x is OPEN SOURCE We all to help out anyone who has...

Page 19: ...Y A1YA4 are the gimbals sticks A5YA7 are the pots Y A8 is battery voltage Y You can press DOWN and highlight the battery voltage Pressing LEFT RIGHT will increase and decrease the value and so enable you to calibrate the battery voltage monitor Recommendation It is very important that you calibrate your battery a Do a full charge of your battery and note the voltage level The battery that ships wi...

Page 20: ...re saved here The values are calculated when you press MENU They are saved when you press MENU to Done Recommendation ParkeFlyer Flyer9x radios come pre calibrated This step is not necessary If you are building your own 9x do this first when setting up your first model Don t do it again unless you feel your radio isn t responding correctly Be sure to have your knobs and sticks at their midpoints w...

Page 21: ...sign This means that the usage is inverted OFF timer is off ABS timer is on RUs RU ELs EL THs TH ALs AL Y chooses to activate the timer based on stick position When a XXs is selected THs for example The timer starts whenever the stick is not at zero The XX sign is the same except the timer speed is determined by stick position When at zero the timer is stopped When at full the timer goes at normal...

Page 22: ...eros the trims This is really neat for new models when you might have a hard time taking your hands off the stick and pressing the trims Simply hold the plane level with the sticks and press the selected trim switch Voilà the plane is trimmed It s magic No it ain t It s er9x Beep Cnt Beep Center Here you set center warnings The string RETA123 corresponds to RUD ELE THR AIL P1 P2 P3 When the letter...

Page 23: ...l shift POSitive or NEGative E Limits Extended limits Allows limits to go to 125 Please test first and make sure this does not cause unwanted mixing between channels Trainer Trainer enabled This allows you to select if the trainer inputs are used on this model DELETE MODEL MENU Guess This deletes the current model You need to press MENU LONG for that to happen though WARNING Deleting a model cause...

Page 24: ...ck 90 90 Y Basically a simple 90 setup where you have a single servo operating the pitch and two operating the roll Collective This defines the collective s source The idea being that you can create a mix with all the required curves and switches and simply plug it in here to mix with the others Swash Ring As the name implies This limits stick movement just like a physical swash ring Notice that t...

Page 25: ...ressing UP DOWN LEFT RIGHT will change both values simultaneously When moving the stick you can see either of these symbols When this symbol is visible you are only changing that side of travel For each control you can set 2 switches The main switch changes between high rate high expo and mid rate If the main switch is low e i mid rate the second switch can switch between mid and low rate At the e...

Page 26: ...T to return to the main Expo Dr screen Triple Dr Example The F Mode switch can be used as a triple rate switch for any one axis or it can be used as a triple rate flight mode switch controlling rates and expos for some or all of the flight axes at once To use it as a triple rate flight mode switch set sw1 to ID2 and sw2 to ID1 If you want rudder elevator and aileron all assigned to this switch for...

Page 27: ...the elevator CH2 throttle CH3 and aileron CH1 Though not visible now you can also see the switch column which will tell you if a switch is assigned to the mix and also a crv curve column which tells you what curve is applied to that mix When you scroll down you ll see that sometimes the weight is being highlighted and sometimes the channel s number is underlined When the weight is highlighted pres...

Page 28: ...e describes in weight This is controlled by the switch FULL Same as MAX but the value is Yweight if the switch is off or weight if the switch is on MAX and FULL can be a little confusing Look in the examples section for well examples CYC1 CYC2 CYC3 The 3 outputs of the heli swashYplate mix Once swash mixing is turned on Heli menu 3 10 these become active and hold the result of the swash mix Genera...

Page 29: ...RVES 6 8 screen You can also press MENU to edit the curve directly Switch Here you select the switch that operates the mix If the switch is not selected then the mix is on by default Warning Here you can select an audible warning that will sound whenever a mix is active This will only work when a switch is defined You have an option of 1 2 or 3 beeps The warnings will sound in succession so you ca...

Page 30: ...responds to a channel in your receiver The limits you set will be used on that channel only Columns subT SubTrim This sets the channel s center point HINT The values of subT can be Y100 to 100 with increments of 0 1 This is done so to have excellent resolution when setting the center of each surface You can use your stick to set the center point as well While the subT is highlighted hold the stick...

Page 31: ...ros Scroll down to the curve you wish to modify and press MENU or RIGHT This will bring up the screen for editing the curve Depending on whether you chose a 5pt or a 9pt curve you will see 5 or 9 editable points Scroll through the points with UP DOWN Change the value with LEFT RIGHT At the bottom you will see a preset entry Pressing LEFT RIGHT on that will populate the values with a linear curve t...

Page 32: ...utput channel An offset can be anywhere between Y100 and 100 This will be the test point for the condition If you ve selected a logical condition the switch results the condition applied to the 2 selected switches For example OR ID1 ID2 will be ON if either ID1 or ID2 is on Cool huh If you ve selected an evaluation you etc you need to select the 2 sources to evaluate between For example Switch on ...

Page 33: ... other value For example you might want to set a switch on the channel your electric esc is placed That way you can work on your model and not worry that a chance programing error will spin up the propellor This does not make your radio fool proof You must be careful at all times Hopefully this can add another level of safety and reduce the risks associated with this hobby ...

Page 34: ...m you ll see an option called CLEAR MIXES MENU Pressing MENU LONG on this will clear all the mixes leaving you with a clean slate WARNING WARNING WARNING selecting clear mixes menu on a live plane will make motor spin at 50 even though the throttle is all the way off The templates are Simple 4YCH Plain vanilla 4Ych airplane TYCut This adds a throttle cut mix on your throttle channel VYTail Elevon ...

Page 35: ... need to invert or reverse your servos to get your servos moving in the correct direction Steps 1 Turn OFF all models You don t want a model on during radio programming Very bad and painful things will happen 2 Complete the Radio Setup Menu chapter of this manual if you haven t already 3 Calibrate your radio if you haven t already Setup Menu 6 6 If you ve already calibrated don t do this again unl...

Page 36: ... are all 0 0 This is where you set your positive and negative servo subtrim 12 Look at the servo horns on each of your servos Are they at perfect 90 angles from the body of the servo and your control rod If not unscrew your server horns and reattach them as close to a 90 angle as possible 13 If one or more of your servos aren t quite at a perfect 90 angle you want to apply subtrim until it is at p...

Page 37: ...ovements will cause your airplane to jump By adding Expo we reduce the amount of control surface movement that occurs on the initial movement of the sticks Expo makes the center of the sticks soft while still enabling 100 control surface movement at the ends You can get quite fancy with these curves The amount of expo you want depends on personal preference and the characteristics of the specific ...

Page 38: ...http 9xforums com wiki index php Main_Page Forums Support Using er9x is not difficult Y one you master the basics If you would like to take your radio to the next level we would strongly suggest you join the forum on http 9xforums com forum The forum has a vibrant and friendly community that will be happy to help with pretty much any query you have Video Tutorials A number of video tutorials have ...

Page 39: ...al parkeflyer com 37 er9X is powered by your Donations If you find this firmware valuable please support this community by making a donation to any of the contributors http 9xforums com wiki index php Donating_to_show_your_support ...

Reviews: