


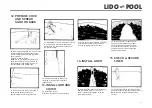

39. The Paramount pool wall is supplied with
a pre-stamped, cut out section, sized for
the paramount Sp1500 Surface Skimmer.
It is positioned 600mm from the outside
end of the coiled wall. Before installing the
wall into the rails, ensure wall is correct
way up and you are starting in the desired
place.
40. Use 2 pieces of hardboard, or similar,
about 61cm square. One to stand the
coiled wall on, the other to move it onto
as you progress.
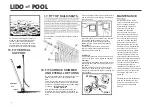
42. A few rails (6) may be placed on top of
the wall to give rigidity whilst uncoiling.
On reaching the end of the roll the bolt
holes may not line up. This alignment is
achieved by moving the rails in or out to suit.
44. Cover the bolt heads with plastic
cover strip (11).
45. Tape it firmly into place starting from
the bottom. Cut off 25mm from the top.
43. When the holes do line up, loosely
assemble all the bolts, nuts and washers.
Note:
It is important to fit a washer to
each side of the wall and have a bolt
head inside the pool. Firmly tighten all nuts.
Although the pool wall is supplied with the
surface skimmer section pre-punched, the
eyeball holes are not cut.
This is to allow you to custom fit the eyeball
returns (2) in the most suitable position.
NOTE - It Is essential that the cutting of
the wall for these eyeballs is completed at
this stage of the pool wall Installation, so
all metal filings and off-cuts etc, cannot
damage the pool liner.
Procedure
- Position the eyeballs where
required,
- Oval pools;
position both eyeball r~turns
at the opposite end to the surface skimmer
- Round pools;
position the eyeball returns
approximately 120
°
and 240
°
, around from
the surface skimmer.
It is recommended to fit the eyeballs at a
distance of 200 to 300mm down from the
top rail.
Cut a 48mm diameter hole for each eyeball
with suitable small side-cutters (Tin Snips)
or similar remove all metal burrs and sharp
edges with a round file, check hole sizing
with actual eyeball before continuing.
DO NOT INSTALL SURFACE SKIMMER OR
EYEBALLS AT THIS STAGE.
This is completed at Step 18.
LIDO POOL
10. INSTALL WALLS
11. CUT WALL FOR THE
PLUMBING OF THE
EYEBALL RETURNS
41. The join should be hidden behind
a vertical support (10) page 9, start
uncoiling the wall with the end directly
over a connector thus covering join
by a vertical. It is advisable to have
someone hold the end of the wall to
prevent creeping along the rail.
Summary of Contents for Poolquip Lido
Page 1: ...LIDO INGROUND OR INDECK POOLS OVAL POOL INSTRUCTION MANUAL ...
Page 2: ...LIDO POOL A few important safety hints Enjoy Your Swimming Safely ...
Page 10: ...LIDO POOL ASSEMBLE FRAMES FOR POOLS ...
Page 19: ...Takapuna 11 Barrys Point Rd Takapuna Auckland 0622 Email northshore paramountpools co nz www ...