MAINTENANCE
1
. Frames:
Wipe all machines down with a damp cloth and dry completely each day. This includes painted,
chrome parts and upholstered pads.
2
. Painted/chrome parts:
Use Simple Green or similar cleaner for light dirt and grime. Use TurtleWax®
Polishing Compound or a good car polish to remove heavier dirt and grease as well as for polishing.
DO
NOT
use solvents, lacquer thinner, acetone or finger nail polish remover. For scuffs and marks that are not
removed by the above methods use a soft scrub cleanser.
3
. Upholstery:
Use cloth towels and warm water daily to remove surface dirt and perspiration. Use a lano-
lin based hand cleaner or Naugahyde® brand upholstery cleaner to condition and deep clean on a weekly
basis.
DO NOT
use Windex, Simple Green, 409, or similar products to clean the upholstery.
4
. Weight stack enclosures (shrouds):
Wipe down with a damp cloth as needed.
5
. Exercise instruction labels:
Clean with soap and water as needed.
6
. Linear bearing shafts:
Wipe down linear rails using a light application of Magnalube® lubricant or a
similar teflon grease on a weekly basis to remove dust, hair, and dirt. Polish the shaft using fine sandpaper
or steel wool if light rust is present.
7
. Guide rods:
Wipe all dirt and dust off the guide rods before applying a light application of Tri-Flow
TM
or
other silicone spray lubricant, spraying the Tri-Flow
TM
on a rag and then wiping the guide rods with the rag.
DO NOT
use oil base lubricants such as WD-40.
Caution: Tri-Flow
TM
will stain carpet and clothing.
8
. Bronze bushings:
Check monthly for signs of wear and replace as needed. Lubricate monthly with Tri-
Flow
TM
.
9
. Seat adjustments:
Clean the chrome seat adjustment tube on a weekly basis using a rag sprayed with
Tri-Flow
TM
. Keep a light layer of Tri-Flow
TM
on these tubes at all times.
We recommend that you purchase the Paramount Performance Kit (P/N KIT-01) to maintain your Para-
mount products. This will insure that the proper maintenance materials required will be used. Please refer
to the General Maintenance Manual (p/n AM-GMM) for other important safety and maintenance informa-
tion.
ASSEMBLY NOTES
1) It is recommended that two (2) people be used to assemble this machine.
2) Read the assembly instructions completely before beginning to assemble the machine. This will
help you to become familiar with the machine and prevent mistakes requiring unnecessary disas-
sembly and reassembly.
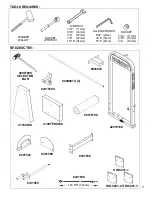
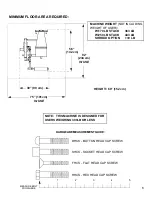
3) Hardware placement is indicated as , etc. Refer to the hardware page for corresponding size
and configuration. You will have some remaining hardware as extra pieces are always included
in one of the bags.
4) Install all plastic end caps on assemblies where necessary before assembling the machine.
5) Initially tighten all hardware by hand, as this will assist in the alignment of the machine. When the
framework of the machine is complete, tighten all nuts, bolts and setscrews.
Be sure all hard-
ware is tight before using the machine.
6) Hex- and Sockethead bolt length is measured from the bottom of the head to the end of the bolt.
Length of Flathead bolts is measured as the total overall length.
7) Bolts should point inward on the machine wherever possible, leaving the bolt heads facing out.
8) Route cables prior to installing pulley wheels.
9) Read and understand all machine warning and instruction labels before using the machine.
2
A


