

3.2 Do not use harsh chemicals to clean the
heating element. Harsh chemicals may
cause corrosion.
4
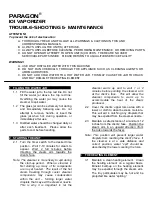
THE STEAM PIPE & NOZZLE
.
4.1 Check to see that the steam pipe is
aligned with the plastic circular nozzle. If
needed, realign the steam pipe w/ the
nozzle.
Figure 4.1
Cap Screw
Steamer Cap
Nozzle Cap
Steam Pipe
Yellow Nozzle
Sponge
4.2 Realigning the steam pipe
4.2.1 You will need a screw driver and a
7mm nut driver
4.2.2 Remove the screw securing the
plastic cap at the top of the steam
arm.
4.2.3 Loosen the two screws located on
the center strip.
4.2.4 Loosen the 7mm nut located
slightly underneath the center
strip.
Figure 4.2.3
4.2.4
2 screws
(Below the
Steamer Cap)
7mm nut
4.2.5 Insert another screw driver, into
the opening of the steam pipe.
4.2.6 Gently adjust the steam pipe to
align with the nozzle.
4.2.7 Tightened the 2 screws & nut.
4.2.8 Reattach the plastic steamer arm
cap.
4.3 Replace the nozzle sponge as needed.
(
item no. 101-NOZL/STR
) The nozzle sponge
helps in trapping and absorbing larger
droplets of water. It is recommended that
the nozzle strip be changed as needed or
once every six months. This nozzle
sponge lies beneath the plastic nozzle cap
and is different from the Aroma Therapy
(AT-1)
attachment
that
also
has
disposable strips for aroma therapy.
Note: Placing oils on the nozzle sponge will
decreases its effectiveness by making it
more repellant to water.
4.4 Cleaning the Steam Pipe
4.4.1 You may need an X-acto knife with
a triangular blade & some Q-tips.
Please use caution when handling
sharp knives.
4.4.2 Unscrew the plastic circular nozzle
cap and nozzle sponge.
4.4.3 Insert the X-acto knife into the
steam pipe opening.
Figure 4.4.3
4.4.4
4.4.4 Using a circular motion, remove
mineral build-up by scraping the X-
acto knife along the inside surface
diameter of the Steam Pipe.
4.4.5 With a Q-tip, remove any loose
debris.
4.4.6 Reattach the nozzle cap & sponge.
*Drawings are not to scale.


