background image

 2

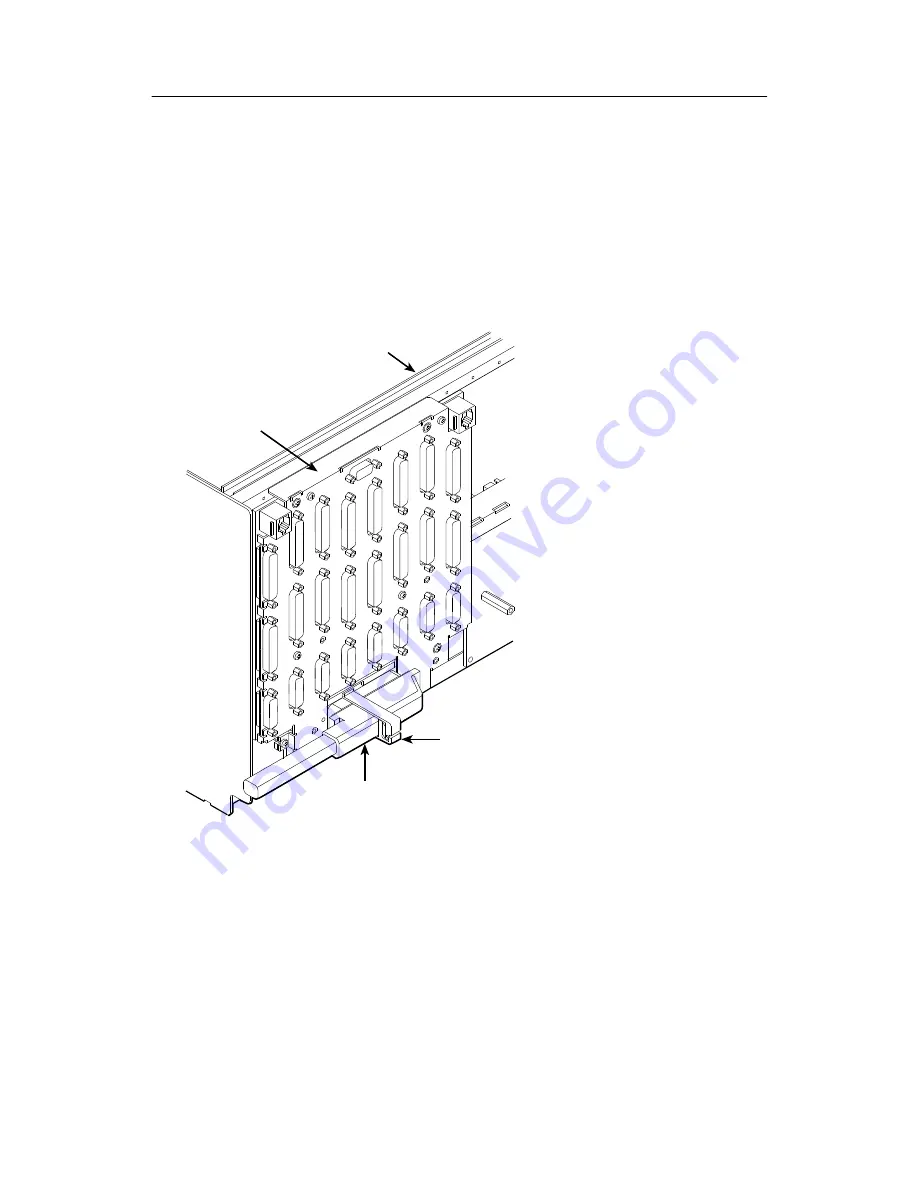
2. Attach the DTE cable (DB15) to the appropriate DTE connector on the Auxiliary

Backplane. (See the 

COMSPHERE 3000 Series Carrier Installation Manual

(3000-A2-GA31) for detailed cable and connector information.) Connect the other
end of the DTE cable to the customer premises equipment.

3. Attach the network cable to the Auxiliary Backplane using either a 50-pin cable or

the T1 Network Interface Adapter. Connect the other end of the network cable to
the connection provided by the telephone company.

496-14386-03

Auxiliary

Backplane

over Slots 9–16

COMSPHERE

3000 Series 

Carrier (Rear)

T1 Network

Cable

Cable

Retainer

4. Turn on the power to the 3000 Series Carrier.

Summary of Contents for ACCULINK 3151 CSU

Page 1: ...ACCULINK 3151 CSU QUICK REFERENCE Document No 3151 A2 GL11 40 ...

Page 2: ...s publication and to make changes from time to time in the contents hereof without obligation of Paradyne Corporation to notify any person of such revision or changes Changes and enhancements to the product and to the information herein will be documented and issued as a new release to this manual Warranty Sales and Service Information Contact your sales or service representative directly for any ...

Page 3: ...SU installation process and have no special requirements for their application See the ACCULINK 315x Channel Service Unit Operator s Guide 3150 A2 GB21 for more information A copy is included with the Auxiliary Backplane 1 Install the Auxiliary Backplane onto the 3000 Series Carrier See the ACCULINK 3151 CSU and 3161 DSU CSU General Information Guide 3100 A2 GK40 for installation procedures ...

Page 4: ... of the DTE cable to the customer premises equipment 3 Attach the network cable to the Auxiliary Backplane using either a 50 pin cable or the T1 Network Interface Adapter Connect the other end of the network cable to the connection provided by the telephone company 496 14386 03 Auxiliary Backplane over Slots 9 16 COMSPHERE 3000 Series Carrier Rear T1 Network Cable Cable Retainer 4 Turn on the powe...

Page 5: ...nfiguration and is appropriate for most networks If this configuration does not work for you try the Factory 2 configuration for D4 framing format and AMI line coding format To further customize configuration options refer to Changing Configuration Options in Chapter 3 Operation and Appendix C Configuration Options in the ACCULINK 315x Channel Service Unit Operator s Guide 8 During the power up se...

Page 6: ...Abort Send Mon QRSS 1in8 PLB DLB RLB LLB Abor Ctrl Call Rel ClrReg Reset CID Passwd DL Mon EQPT NET Stat DevHS STest Perf TStat LED ID User T elco Cur 24T ot Intvl Disc Dial ChDir 1 5 A Directory 1 5 A Directory Load Edit Area From Activ Cust1 Cust2 Fact1 Fact2 Choose Function Edit Save Cust1 Activ Cust2 User Alarm Gen DTE Mgmt Gen Trap NET Cnfig Test ACO ...

Page 7: ...ork interface signal Yellow Enab Enab Transcodes and sends Yellow signal to the DTE on receiving Yellow from the Yellow Disab Disab the DTE on receiving Yellow from the Network Table 2 Network Interface Configuration Options 1 of 2 Option Factory 1 Factory 2 Comments Description NET Framing D4 D4 Selects D4 or ESF framing format NET Framing ESF ESF Selects D4 or ESF framing format NET Coding AMI A...

Page 8: ... the network on receiving Yellow from Yellow Disab Disab g the network on receiving Yellow from DTE Circuit Ident Edit Edit Specifies the transmission vendor s Circuit Ident Clear Clear Specifies the transmission vendor s circuit identifier CRC PThru Enab Enab Determines whether framing bits are CRC PThru Passthrough Disab Disab Determines whether framing bits are passed to the DTE Table 3 General...

Page 9: ...port is used Term Term used Disab Disab ComExtDev AT AT Controls the COM port s external device commands Other Other device commands ComConnPrefix Edit Edit Controls the COM port s connect ComConnPrefix Clear Clear Controls the COM port s connect prefix ComConnected Edit Edit Controls the COM port s connect ComConnected Clear Clear Controls the COM port s connect indication string ComEscapeSeq Edi...

Page 10: ...ies whether the COM port ignores DTR CmInActTm COM Port Inactivity Enab Enab Specifies whether the communication port disconnects COM Port Inactivity Timeout Disab Disab p communication port disconnects after a certain period of inactivity 5 5 CmDiscTm COM Port Up Up Specifies the period of inactivity 1 to 60 minutes that causes a COM Port Disconnect Time Down Down 1 to 60 minutes that causes a di...

Page 11: ...n will disconnect after a trap is sent DialOut Enab Enab Provides the option to allow automatic dial out to send alarm messages on DialOut Disab Disab p dial out to send alarm messages on MODEM port Call Retry Enab Enab Specifies whether an outgoing call is Call Retry Disab Disab Specifies whether an outgoing call is retried on a busy or failed call attempt Dial Delay 1 4 5 6 10 1 4 5 6 10 The tim...

Page 12: ...ice System Location Edit Edit The SNMP system location for this System Location Clear Clear The SNMP system location for this device System Contact Edit Edit The SNMP system contact name System Contact Clear Clear The SNMP system contact name for this device CommunityName1 Edit Edit A community name that is allowed access to this device Defaults to CommunityName1 Clear Clear y access to this devic...

Page 13: ...DL FDL Table 7 Management Trap Configuration Options 1 of 2 Option Factory 1 Factory 2 Comments Description Num Trap Mgrs 1 2 6 1 2 6 The number of trap managers supported by the device Trapn IP Adr Edit Edit Specifies the IP address for each trap manager This configuration Trapn IP Adr Clear Clear trap manager This configuration option is repeated for all n managers None None Trapn Dst IPBus IPBu...

Page 14: ...p Up Up Specifies the link trap type to enable Trap on Link Up Link Link Trap Down Down p p yp enable Trap on Link Up Link Down or both Both Both Down or both NET NET When any link trap types are Trap I F DTE DTE When any link trap types are enabled specifies which links to send traps for Trap I F Both Both p send traps for ...

Reviews: