4
PARADOX.COM
Attaching the IP180 to the Panel
In order to connect the IP180, plug in the Serial cable to panel, refer to Figure 2. After a few seconds, the RX/TX LED starts flashing; this
indicates that the IP180 is powered and is communicating with the panel.
LED Indicators
LED
Description
SWAN-Q
ON - Connected to SWAN-Q (GREEN)
Wi-Fi
ON - Connected to Wi-Fi (GREEN)
Ethernet
ON - Connected to Ethernet (GREEN 100mbps Orange 10mbps,)
CMS1
ON - CMS Receiver 1 (Main) configured successfully
CMS2
ON - CMS Receiver 3 (Parallel) configured successfully
RX/TX
Flashing
– Connected and exchanging data with panel
To connect the IP180 over Ethernet
1) Connect the Ethernet cable to the IP180. Green or yellow LEDs on the socket must light up indicating connecting to router. Ethernet LED on
IP180 will light up.
2) After up to 15 seconds the SWAN-Q LED will turn on, indicating internet available and the IP180 is connected to SWAN-Q and ready to use.
3) Open BlueEye and connect to the site using site token or panel serial number.
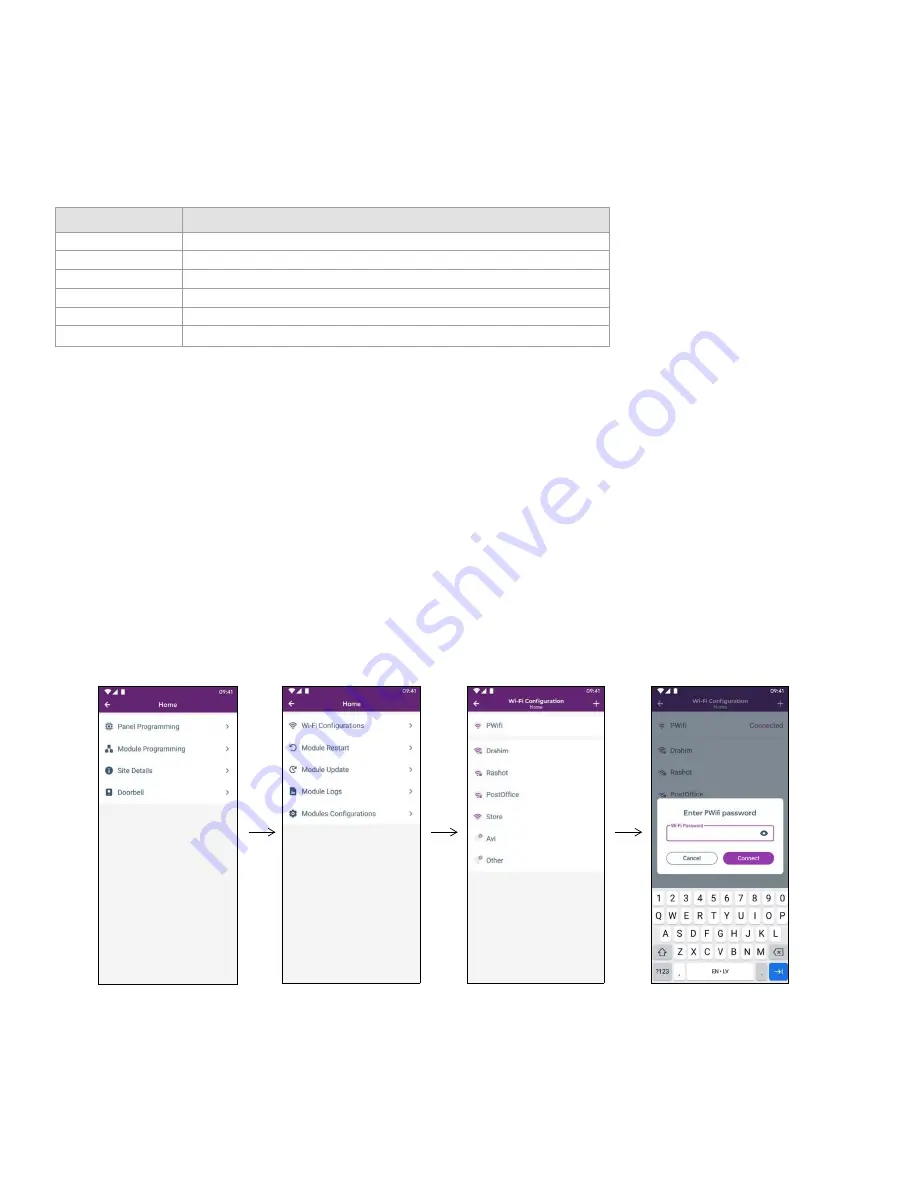
To connect the IP180 over Wi-Fi with Blue Eye
Wi-Fi configuration is also available from the Master Settings menu in BlueEye. There are two possibilities to connect over Wi-Fi, either with or
without Ethernet.
If Ethernet is connected:
1) Using the BlueEye app, connect to the site using the site token or panel serial number.
2) Either via MASTER or INSTALLER menu, select settings, and then Wi-Fi configuration.
3) Select the Wi-Fi network you wish to connect to. Enter the password then press connect. A successful connection will be indicated by
displaying CONNECTED.


