ACM24D - page 3
Assigning a Reader to a Door
After connecting the readers to the ACM24D, you must assign each reader to a door. You can assign them manually at
each ACM24D without the need of the readers’ serial number, or you can assign them through BabyWare (requires
knowledge of reader’s serial). To do so, follow the steps below.
1
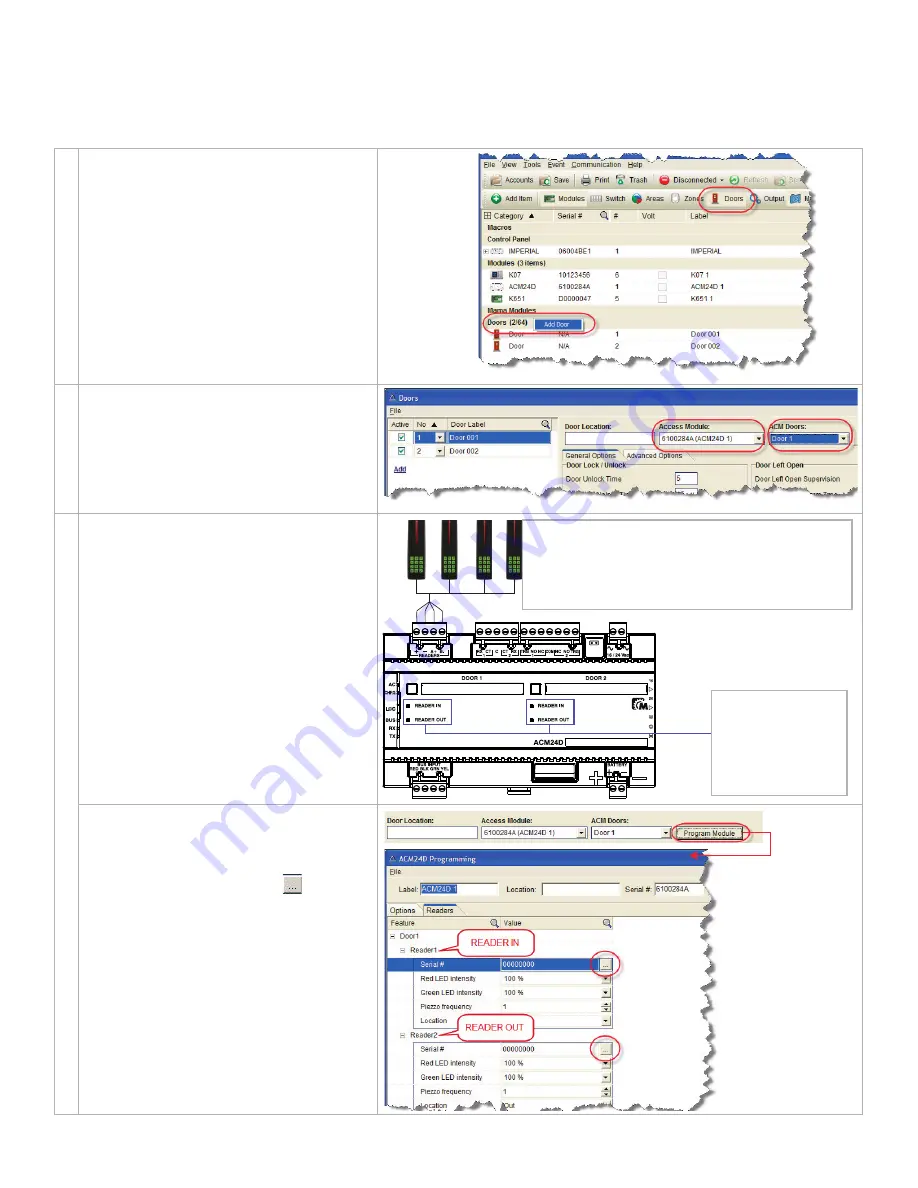
Create Required Doors in BabyWare
A) Open BabyWare and connect to the account.
B) Ensure the
Doors
toggle button is on.
C) Right-click the Doors header and select Add
Door. You can also use the
Add Item
button.
D) Double-click the desired door. This opens the
Doors window
2
Assign ACM24D to Selected Door
A) From the
Access Module
drop-down menu,
select the desired ACM24D module.
B) From the
ACM Doors
drop-down menu,
select either Door 1 or Door 2.
C) Go to step 3 and use Manual Assignment
Mode or BabyWare Assignment Mode
3
Manual Reader Assignment Mode
A) Press and hold the
DOOR 1
button for 3 sec.
B) The
READER IN
LED and the LED of all
readers on the reader bus will flash.
C) Present any access card to the reader you
want to assign, or press the reader’s
3
button.
D) Press the
DOOR 1
button to switch to
Reader Out.
E) The
READER OUT
LED and the LED of all
readers on the reader bus will flash.
F) Present any access card to the reader you
want to assign, or press the reader’s
3
button.
G) Press the
DOOR 1
button to exit this mode.
H) Repeat steps A to F for
DOOR 2
.
BabyWare Reader Assignment Mode
A) From the Doors window (see step 2), click
the
Program Module
button. This opens the
ACM24D Programming window.
B) Under Reader1 (IN), click the
button and
select the reader’s serial number from the list
that appears. You can also type the serial
number manually.
C) Repeat for Reader2 (OUT).
D) Click
OK
.
E) Click
Send
.
READER IN/OUT
Red flash = No
reader assigned
Green flash = Reader
already assigned
READER LED
S
Orange fast flash = Unassigned
Orange slow flash = Not communicating with ACM24D
Green flash = Assigned to flashing READER IN/OUT
Red flash = Assigned to different READER IN/OUT


