1.
Assembly of the light fixture
1.
Assemblage du luminaire
Note :
Le trou d’accès du câble sur l’arrière de la lanterne a été
dimensionné pour permettre une provision pour la connexion d’un
conduit de 1/2 pouce lorsque le passe-fil flexible a été enlevé.
Note:
The wiring access hole on the back of the fixture has been
sized to allow for a 1/2 inch conduit connection provision once the
flexible grommet has been removed.
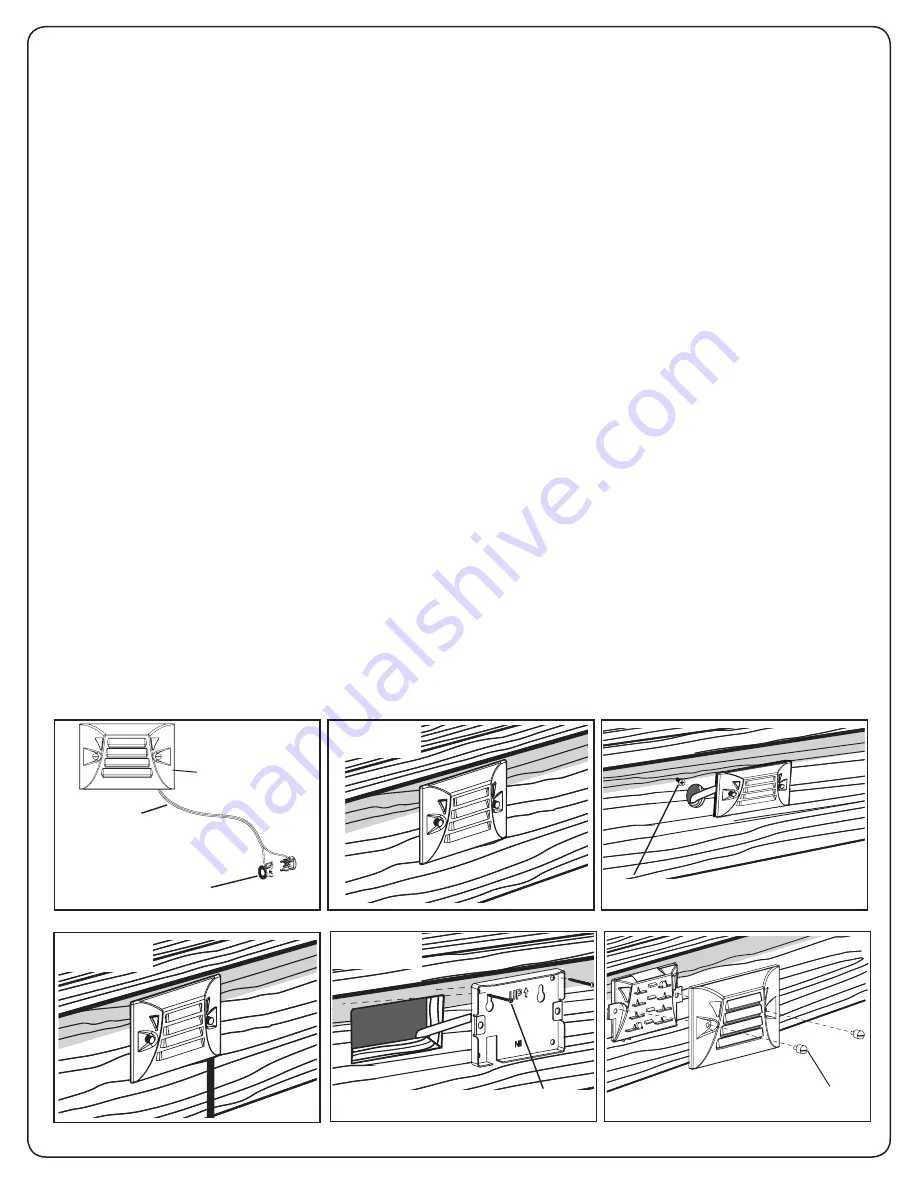
Assembly of the light fixture: Option 1 - Hidden wire
Find a location on the deck where you want to mount the light.
Using the template provided with the instruction manual, place it over
the deck and use a sharp object or a pen to mark where you are going
to put the screws (E) and drill the hole.
Drill a 1 in. hole where specified. Use the two (2) provided screws (E)
and screw them in the deck according to the template.
Pass the wire (C) and the connector (D) through the hole.
Mount the half brick light (B) on the screws (E).
Assembly of the light fixture: Option 2 – Flushmount
Find a location on the deck where you want to mount the light.
Using the template provided with the instruction manual, place it over
the deck and use a sharp object or a pen to mark where you are going
to put the screws (E).
Insert the screws (E).
Mount the half brick light (A) on the screws (E).
Assembly of the light fixture: Option 3 – Flushmount to cover
older models
Remove the diffuser plate and the light component by unscrewing the
two thumbscrews (B)
Pass the wire in the hole.
Secure the fixture onto the surface, covering the hole from the old light
fixture using the two screws from the old model (not included)
Install the diffuser and light component with the two thumbscrews (B)
Make sure the O-ring stays on the thumbscrews (B)
Option 1: Assemblée du luminaire avec fil caché
Trouver un emplacement sur la terrasse où vous voulez installer la
lumière.
En utilisant le gabarit fourni avec le manuel d’instruction, placez-le
sur la terrasse et utiliser un objet pointu ou un stylo pour marquer
l’endroit où vous allez mettre les vis (E) et percer le trou.
Percez un trou où spécifié. Utilisez les deux vis (2) fournies (E) et les
visser dans la terrasse selon le gabarit.
Passer le câble (C) et le connecteur (D) à travers le trou.
Monter la lumière demi-brique (B) sur les vis (E).
Assemblée du luminaire: Option 2 - Flushmount
Trouver un emplacement sur la terrasse où vous voulez installer
la lumière.
En utilisant le gabarit fourni avec le manuel d’instruction, placez-le
sur la terrasse et utiliser un objet pointu ou un stylo pour marquer
l’endroit où vous allez mettre les vis (E).
Insérer les vis (E).
Monter la lumière demi-brique (A) sur les vis (E).
Assemblée du luminaire: Option 3 - Flushmount pour couvrir les
modèles plus anciens
Retirer la plaque de diffusion et de la composante de lumière en dévis-
sant les deux vis (B)
Passer le câble dans le trou.
Fixer le luminaire sur la surface, couvrant le trou de l’ancien appareil
d’éclairage à l’aide des deux vis de l’ancien modèle (non inclus)
Installez le diffuseur et le composant de lumière avec les deux vis (B)
Assurez-vous que les séjours du joint torique sur les vis (B)
Option 2
Option 1
Screw (E)
Vis (E)
Screw (E)
Vis (E)
Wire (C)
Câble (C)
Connector (D)
Connecteur (D)
Half brick light (A)
Lanterne (A)
Option 3
Thumbscrew (B)
Vis à main (B)


