background image

Monitoring Your Heart Rate

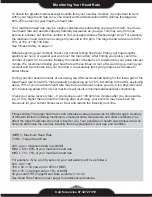
To obtain the greatest cardiovascular benefits from your exercise workout, it is important to work 
within your target heart rate zone. The American Heart Association (AHA) defines this target as 
60%-75% percent of your maximum heart rate.

Your maximum heart rate may be roughly calculated by subtracting your age from 220. Your maxi-
mum heart rate and aerobic capacity naturally decreases as you age. This may vary from one 
person to another, but use this number to find your approximate effective target zone. For example, 
the maximum heart rate for an average 40 year-old is 180 bpm. The target heart rate zone is 60%-
75% of 180 or 108-135 bpm. 
See Fitness Safety on page 17

Before beginning your workout, check your normal resting heart rate. Place your fingers lightly 
against your neck, or against your wrist over the main artery. After finding your pulse, count the 
number of beats in 10 seconds. Multiply the number of beats by six to determine your pulse rate per 
minute. We recommend taking your heart rate at these times; at rest, after warming up, during your 
workout and two minutes into your cool down, to accurately track your progress as it relates to 
better fitness.

During your first several months of exercising, the AHA recommends aiming for the lower part of the 
target heart rate zone-60%, then gradually progressing up to 75%. According to the AHA, exercising 
above 75% of your maximum heart rate may be too strenuous unless you are in top physical condi-
tion. Exercising below 60% of your maximum will result in minimal cardiovascular conditioning.

Check your pulse recovery rate – If your pulse is over 100 bpm five minutes after you stop exercis-
ing, or if it’s higher than normal the morning after exercising, your exertion may have been too 
strenuous for your current fitness level. Rest and reduce the intensity next time.

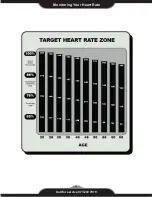
Fitness Safety The target heart rate chart indicates average rate zones for different ages. A variety 
of different factors (including medication, emotional state, temperature and other conditions) can 
affect the target heart rate zone that is best for you. Your physician or health care professional can 
help you determine the exercise intensity that is appropriate for your age and condition

(MHR) = Maximum Heart Rate
(THR) = Target Heart Rate

220 - age = maximum heart rate (MHZ)
MHZ x .60 = 60% of your maximum heart rate.
MHZ x .75 = 75% of your maximum heart rate.

For example, if you are 30 years old, your calculations will be as follows:
220 - 30 = 190
190 x .60 = 114 (low end or 60% of MHZ)
190 x .75 = 142 (high end or 75% of MHZ)
30 year-old (THR) Target Heart Rate would be 114-142
See Heart Rate Table (on next page) for additional calculations.

Call for service 07 3272 7010

21

Summary of Contents for Pacer 1400

Page 1: ...OWNER S MANUAL PDG0035 Call for service 07 3272 7010 ...

Page 2: ..._______________ Fold Transport ____________________ Operations_________________________ Monitor Your Heart Rate _______________ Warm Up__________________________ Warranty Service __________________ Page 3 4 5 6 7 Electrical Information________________ _____________ 7 9 10 11 12 13 14 19 21 22 Bluetooth Connection _____________ _____ 20 23 Fitness Guide _______________________ 24 Trouble Shooting _...

Page 3: ...ve your understanding and benefits of exercising by carefully reading the instructions given in this manual Please familiarize yourself with the maintenance advice provided for you SPECIFICATION Horsepower Continuous Peak 3 5 7 hp Speed Range 0 8 18 KPH Incline Level 0 12 Power Built in USB charger Speakers Chest Belt Receiver Bluetooth MAX USER WEIGHT 150 KGS Call for service 07 3272 7010 3 3 ...

Page 4: ...Exploded View 2 Call for service 07 3272 7010 4 ...

Page 5: ...Exploded View 2 5 ...

Page 6: ...Part List 2 Call for service 07 3272 7010 6 ...

Page 7: ... treadmill 10 Do not place hands or feet under the treadmill Always keep hands and legs off the treadmill when others are using it 11 Never turn on treadmill while standing on treadbelt Always return the treadmill to slow speed to provide for safe dismount and low speed restart 12 To disconnect turn all controls to the off position then remove plug from outlet 13 Use the treadmill only for it is i...

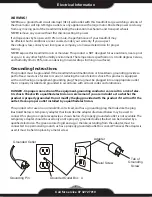
Page 8: ...rovides a path of least resistance for electric current reducing the risk of electric shock This product is equipped with a cord having an equipment grounding plug The plug must be plugged into an appropriate outlet that is properly installed and grounded in accordance with all local codes and ordinances DANGER Improper connection of the equipment grounding conductor can result in a risk of elec t...

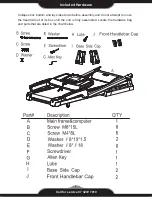
Page 9: ...bottom and lay sides down before assembly and do not attempt to move the treadmill out of its box until the unit is fully assembled Locate the hardware bag and parts that are listed in the chart below Call for service 07 3272 7010 9 ...

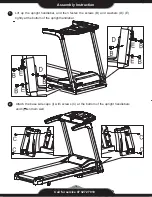
Page 10: ...ght handlebar and then fasten the screws B and washers D E tightly at the bottom of the upright handlebar Attach the base side caps I with screws C at the bottom of the upright handlebars and tighten them well Call for service 07 3272 7010 10 ...

Page 11: ...pright handlebars Attach the front handlebar caps J with screws C at the front of the horizontal handlebars and tighten them firmly with screwdriver F Adjust the console to the desired viewing angle and then use the Allen wrench G to tighten these 2 screws Call for service 07 3272 7010 11 ...

Page 12: ... 3 to 5 minutes to evenly distribute lubricant NOTE DO NOT over lubricate treadboard Any excess lubricant that comes out should be wiped off IMPORTANT ONLY USE HALF THE BOTTLE OF LUBRICANT PER APPLICATION LUBRICATION SCHEDULE Start the treadmill without anyone on the running belt press speed up bottom until speed reached 16kph If toward the left side of the deck Using an Allen wrench turn the left...

Page 13: ...se make sure there are no children or other things under the deck when you lower it TO MOVE THE TREADMILL Before moving the treadmill be sure the power cord is unplugged from the wall and the treadmill Fold up the running deck until it is locked and push the equipment on its transportation wheels Hold the handlebars to move the treadmill To prevent malfunctioning of the treadmill store it in a dry...

Page 14: ...START STOP Starts or stops the workout SPEED Adjusts speed 0 2 kph increment or scroll through the programs SAFETY KEY Attach the safety key in its position to power on the computer When safety key is pulled away the treadmill stops BEFORE STARTING Straddle the belt and stand on the plastic side rails Attach the safety key clip to your clothing Do not stand on the running belt while starting or st...

Page 15: ...ATRIX Two 10x20 dot matrix reflects hearts on HRC programs P17 19 and WEIGHT AGE on Body fat program P23 Reflects incline speed on all other programs TIME Shows workout time Maximum time can be displayed is 99 59 Operations Quick Start Press POWER then press START The treadmill will start at 0 8 kph You can adjust the speed and incline Program Press POWER Press to scroll through programs Press ENT...

Page 16: ...ded or grip the hand pulse sensor to use this program Use UP DOWN to input AGE press ENTER press START After 3 minutes warm up the incline will adjust at a rate of 1 every 30 seconds until the target heart rate zone is reached P20 22 User Programs After selecting this program adjust the speed and incline for each segment and press ENTER Press START to begin If speed or incline is changed during th...

Page 17: ... Interval P8 Jogging P7 Walking II P10 Cardio Burn KPH MPH KPH MPH KPH MPH KPH MPH P11 Hill Interval P12 Mountain Interval KPH MPH KPH MPH P19 HRC3 INTERVAL FATBURN SP IN P18 HRC2 CARDIO HEART INCLINE P17 HRC WEIGHT LOSS SPEED P16 TARGET ELEVATION GAIN P20 USER 1 P13 TARGET DISTANCE P14 TARGET CALORIES P15 TARGET TIME P21 USER 2 P22 USER 3 P23 BODY FAT 17 ...

Page 18: ...on reaches 8 the darken muscles shown on the right figure indicates those muscle groups are being used to exercise C Either speed reaches 8km h or the elevation reaches 6 the darken muscles shown on the right figure indicates those muscle groups are being used to exercise D Either speed reaches 6km h or the elevation reaches 4 the darken muscles shown on the right figure indicates those muscle gro...

Page 19: ...her feature Metric Miles The user can switch the Metric values Kilometer to Imperial values Mile or the Imperial values to Metric values When power is off press ENTER until it beeps to switch the distance from Metric to Imperial or Imperial to Metric Odometer An odometer showing accumulated distance will appear in the time window for one second when you press the safety key button or pull the cord...

Page 20: ...e for instance Paradigm Pacer 2800 3 Once your Apple device is connected with the treadmill now you can begin to start the program Tap on PAFERS Tread Monitor to begin 4 After you heard the BEEP sound and the treadmill console will be switch off the light to your Apple device From your Apple device the darken part becomes colorful shown as below pictures which means they the Apple device and the t...

Page 21: ... recommends aiming for the lower part of the target heart rate zone 60 then gradually progressing up to 75 According to the AHA exercising above 75 of your maximum heart rate may be too strenuous unless you are in top physical condi tion Exercising below 60 of your maximum will result in minimal cardiovascular conditioning Check your pulse recovery rate If your pulse is over 100 bpm five minutes a...

Page 22: ...Monitoring Your Heart Rate Call for service 07 3272 7010 22 ...

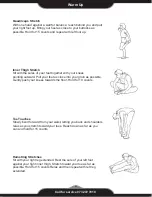
Page 23: ...se into your groin as possible Gently push your knees towards the floor Hold for 10 counts Toe Touches Slowly bend forward from your waist letting you back and shoulders relax as you stretch toward your toes Reach down as far as you can and hold for 15 counts Hamstring Stretches Sit with your right leg extended Rest the sole of your left foot against your right inner thigh Stretch toward your toe ...

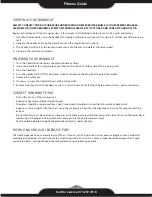
Page 24: ...ve the safety key 6 If necessary wipe the treadmill down with a damp cloth 7 End each workout with a cool down session a few minutes of stretching to help prevent strains pulls and cramps CORRECT RUNNING FORM Run in the centre of the running mat Keep your head up and look straight ahead Shoulders should be square and level don t round your shoulder or swing them forwards or backwards Keep your tor...

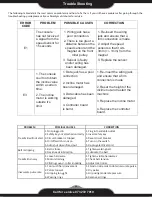
Page 25: ...sor and the magnet on the front roller pulley 3 Sensor is faulty and or wiring has been damaged 1 Re insert the wiring jack and ensure that a firm connection is made 2 Adjust the speed sensor so that it sits 3mm 1mm from the magnet 3 Replace the sensor PROBLEM CORRECTION E CAUSES L B I S S O P Treadmill will not start 1 Not plugged in 2 Safety key not a ached correctly 3 Circuit breaker is tripped...

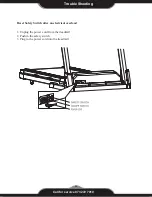
Page 26: ...Safety Switch after an electrical overload 1 Unplug the power cord from the treadmill 2 Push in the safety switch 3 Plug in the power cord into the treadmill Trouble Shooting Call for service 07 3272 7010 26 ...

Page 27: ...r repairs not provided by us or our Service Centre Nor does this warranty extend to products used for commercial or rental purposes This warranty does not cover ordinary wear tear and weathering failure to follow directions improper installation improper maintenance or acts of God such as damage caused by storms lightning heavy winds and by snow or ice Making A Warranty Claim A service representat...

Page 28: ...ried out by the Service Centre will be organized and covered by Boyles Fitness If collection of the item is required this will be organized by the Service Centre and at our expense Do not return any products without authorization as this will be at your expense Our sales and service centre has been set up to provide assembly assistance replacement parts and accessories and to efficiently handle al...

Reviews: