background image

Please take a note that don’t touch paper size selector.

Step2:

Then install the other parts of paper tray .It will be finished.

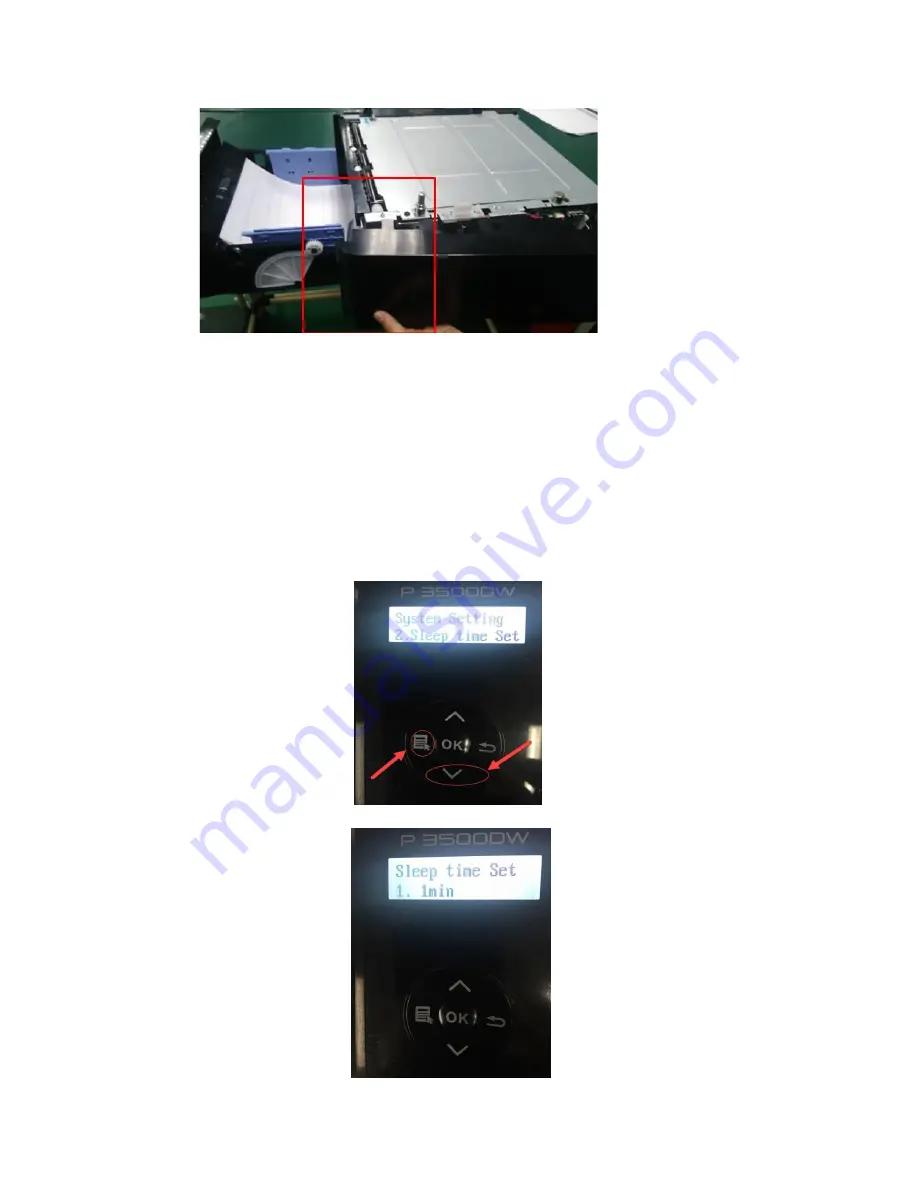
16. How to adjust the sleep time setting?

Step1:

please choose the NO2. Sleep time setting in the system setting by page

down button.

Step2:

you can select from ‘ 1 min ‘ to ‘8 hours’ in the sleep time set.

Summary of Contents for P3000 Series

Page 1: ...Status Indicator shows orange when I insert a new cartridge 9 Papers Jam issues 9 9 How can I clear any paper jam 9 10 Print jobs stuck in paper curve What should I do 14 11 What is my Printer Specifi...

Page 2: ...t will be need 29 23 How to change the printing port is available when it showed Printing port is on used 29 24 Why it will be smoked when printing 30 25 How to cancel a printing job in the queue 31 2...

Page 3: ...the soft wares and drivers for my printer P3000 Series Here is the Link P3500DW http global pantum com global drive p3500dw P3500DN http global pantum com global drive p3500dn Step1 Please log in our...

Page 4: ...Step2 Please chose Drivers Downloads the picture will be shown as below Step3 Please enter your model of your printer in the blank the picture will be shown as below...

Page 5: ...at the below of page it will be done 2 Is my printer mac Compatible What are the versions that it is compatible with Yes P3500 PCL6 series printer support Mac 10 4 10 5 10 6 10 7 10 8 10 9 10 10 10 11...

Page 6: ...l on the new toner cartridge firstly and then insert the toner cartridge in the printer until hearing a click sound 5 How do I check the amount of toner left in my cartridge Step1 Please click Prt Inf...

Page 7: ...Step3 At last you will see it on the information Page 6 How to check how many pages printed so far Step1 Please click Prt Info Rept in the menu setting...

Page 8: ...Step2 Please choose NO 2 Info Page by page down Step3 At last you will see it on the information Page...

Page 9: ...tor shows orange when I insert a new cartridge Step1 Check the cartridge whether you pull out the seal on it Step2 Take out of the chip from the cartridge and use a clean dry cloth to wipe it softly T...

Page 10: ...d paper straight out Step3 After removing the jammed paper reload the tray into the printer and restore the printing by pressing the button on the panel Paper Jam in the Manual Feeder Tray Step1 Gentl...

Page 11: ...pressing the button on the panel Internal Jam Step1 Open the front cover Step2 Remove the toner cartridge in a straight line To avoid the exposure of the toner cartridge which will affect the print q...

Page 12: ...p4 After removing the jammed paper reload the toner cartridge and close the front cover then the printer will automatically resume printing Paper Jam in the Fuser Unit Step1 Open the rear cover Step2...

Page 13: ...Remove the jammed paper and close the fuser door and the rear cover then the printer will automatically resume printing Duplex Unit Jam Step1 Remove the duplex printing unit from the back of the print...

Page 14: ...other parts of the printer ensure that there is no jammed paper and close the front cover then the printer will automatically resume printing 10 Print jobs stuck in paper curve What should I do Fetch...

Page 15: ...sfully There are three possible reasons as below a There is too much paper in the tray Remove excess paper from the tray b The print media is loaded incorrectly Please correctly load the print media c...

Page 16: ...cartridge and gently shake around 5 to 6 times so as to make the toner evenly distributed inside the cartridge 15 How to disassemble the additional tray 1 The method of disassemble Step1 Take out pap...

Page 17: ...Step3 Follow the above step 2 to separate the paper tray bottom same Take out the outer cover from right side to left side Please take a note that don t touch paper size selector...

Page 18: ...wire into the appropriate side as shown above picture If the status is NG you can confirm it after starting printer If the status is ok but still have troubles with printer it may cause by motor or b...

Page 19: ...p2 Then install the other parts of paper tray It will be finished 16 How to adjust the sleep time setting Step1 please choose the NO2 Sleep time setting in the system setting by page down button Step2...

Page 20: ...ending print task 17 Restore factory settings Restore factory settings is used to restore to printer default settings Step1 Press Menu key to enter menu setting interface Step2 Press OK key to select...

Page 21: ...er from multifunctional input tray for automatic duplex printing When you put paper into the multifunctional input tray this printer will select the printing paper inside multifunctional input tray in...

Page 22: ...y or make sure the user set optional tray as the paper source Note The optional tray supports automatic duplex printing of common paper only Do not put any special printing medium into the option tray...

Page 23: ...e Step4 Click the preference option or attribute button for printing configuration Step5 Select the duplex printing area under basic tab with long side or short side binding style optional Step6 Click...

Page 24: ...ay If you select not to raise the paper supporting board of output tray we recommend you take away the printed paper immediately after it is output During printing the printer automatically adjusts th...

Page 25: ...20 How to check the printer s serial number location Please check with below pictures 21 How to add a printer by manually Step1 Click add a printer it will be shown as below...

Page 26: ...ase chose the printer that I want isn t listed and chose next it will be shown as below Step3 Please chose adds a local printer or network printer with manual settings and chose Next it will be shown...

Page 27: ...Step4 Please chose Use an existing port and select Next it will be shown as below Step5 Please chose have disked and click Next it will be shown as below...

Page 28: ...windows pop up it will be shown as below Step7 Please chose the INF file in the installation package and then chose Next it will be done Step8 It will be finish to installation automatically after yo...

Page 29: ...er PC port then reconnects to the printer and re install the driver Step2 Click PC table start Devices and Printers delete the useless printer copy manually the mouse right click on the useless printe...

Page 30: ...mperature is 10 32 Humidity RH is 20 80 and it will work fine 2 Paper status the paper status when dry or moist will also influence strongly the printing vapor When the paper is just unpacked to print...

Page 31: ...teps you need to end the printing job in the printing queue Step1 Please double click your model of your printer in the printer and device the picture will be shown as below Step2 Please right click t...

Page 32: ...paper size displaying dial are described as follows Size supported by dial B5 STA LGL LTR A4 A5 Step1 Pull the standard input tray out of printer Step2 Turn the paper matrix dial to matching to the p...

Page 33: ...standard tray for example Press the menu button to enter into the menu setting interface Step1 Press the direction key or to select 2 Paper tray settings option Press OK button Step2 Press the directi...

Page 34: ...nting of standard input tray please refer to Chapter If the multifunctional input tray holds medium please select standard input tray as the paper source through the menu key 2 Printing settings to en...

Page 35: ...r line into the printer and turn on the power Note Before installation or moving of the optional tray please cut off the power supply to the printer After installation of optional tray do not raise th...

Page 36: ...the user set optional tray I II as the paper source the printer will finish printing task with paper fed from optional tray Note The optional tray can hold 550 pages of 80 g m2 common paper as a maxim...

Reviews: